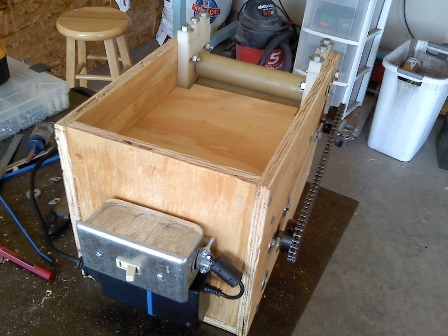
Rubber Pinch Rollers
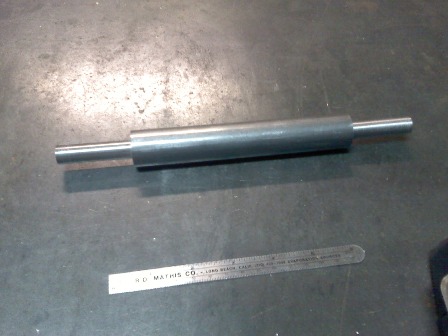
All the pea/bean shellers I found online use a pair of driven rubber coated pinch rollers to separate the beans from the pods. Basically you feed the pods into the rotating rollers. Since the beans don't fit through the rollers, they get forced out the side of the pod while the pod passes in between the pinch rollers. The peas fall through an opening right below the pinch rollers into a bin. For pinch roller shafts, I went down to Fausers and paid $5 for 2 feet of 1" diameter cold rolled steel. From there I cut them to size and used a lathe to turn down the ends of the rollers to 0.5" diameter so they'd fit in the bearing block. For the rubber coating, I bought one foot of 1" ID 0.125" wall thickness latex tubing for $5. I slipped this tubing over the 1" diameter portion of the shafting. This worked well for one of the shafts/rollers but I had a hard time getting the latex on the other roller for some reason. The latex is very difficult to cut/trim to the correct length after assembly. The pinch rollers on all the shellers I found online seem to have a 'splined' or 'cogged'
cross-section. I think this helps grip the pods, especially wet and slimy stuff like fresh peas and soybeans. I haven't found a place to buy this stuff yet.
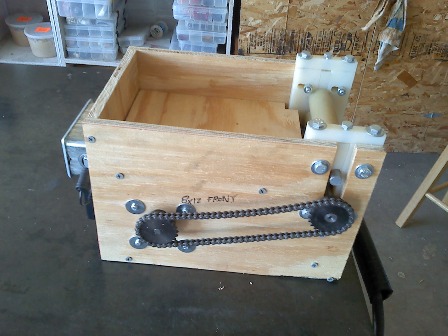
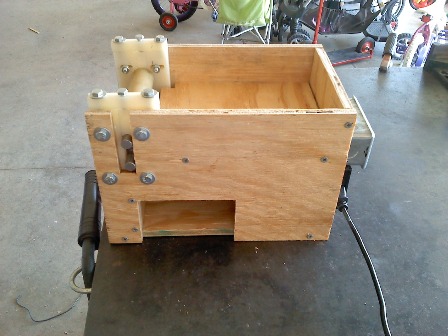
Bearing Blocks
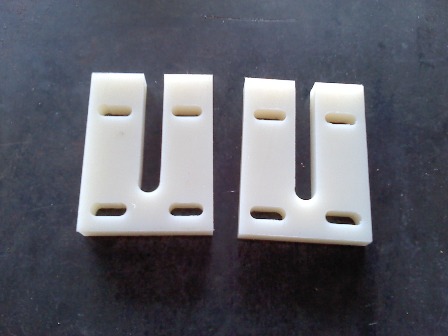
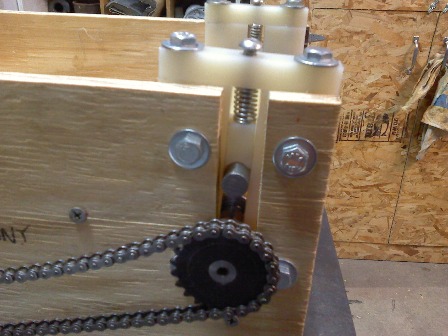
The rotational speed is pretty low (90 RPM) so for this one not going to use a ball bearing but just a journal bearing. I'm using ultra-slippery nylon 6 for the material. Ordered a 0.5" thick 3"x12" bar from McMaster for $15. UHMW PE is a bit less expensive but the nylon will be more rigid. I cut two 3"x4" blocks out of the nylon and I milled out a slot to accommodate the two pinch roll shafts. Mounting slots are included to both tension the roller chain as well as allow for inaccuracies in my work. The shafts are kept in place with a nylon 'keeper' with adjustable tension through a jack screw. I used a milling machine to shape the nylon parts. After completion of the sheller, I changed from a jack-screw tension adjustment to a spring loaded tension approach. Now there are compression springs that drive the top roller into the driven roller underneath. By using this method, the spacing in between the rollers automatically adjust to the size of the pods.
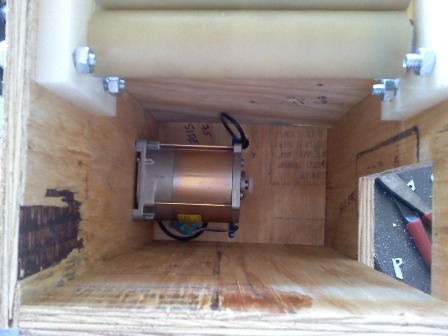
24 VDC Gear-Head Motor
Ok so went into the basement and pulled out a 24 VDC gear head motor from the pile of junk down there. This one is rated for 180 RPM at 24 VDC. I think it will put out about 50 watts but I haven't measured the current draw yet. For a power supply I'm using a 12 VDC rated at 1 amp from a printer or something. Running at half the rated motor input voltage, it likely puts out about half the rated RPM (so 90 instead of 180). Since i'm on the low budget I also am using a chain drive since I had a string of No. 25 chain as well as some sprockets laying around. The motor mounts right on the plywood frame and the chain transmits the rotational motion to the pinch rollers. Only one of the pinch rollers is driven by the chain/sprocket while the other pinch roller is driven by contact with the driven roller. I installed a standard 110 VAC light switch to turn off and on the power to the motor without having to unplug the cord from the wall.
Plywood Frame
I would have preferred to make the entire thing out of something better than plywood, but plywood is what's piled up in a heap in the garage. An acrylic window near the rollers would be cool so you can see the pods busting open but not in this version. I used standard '1/2' plywood that is actually more like 0.475" thick. I hate wood. It's easy to cut but I don't have the tools to make anything precise with wood.
Parts List
Cold rolled steel shafting, 1" OD x 24". $5 from local steel house shaped with lathe and cut with metal bandsaw
Well you get the idea. if you have a lot of the parts laying around and also have access to a machine shop, you can make this for pretty cheap. but if you don't have this stuff, you may be better off paying the internet for one.
Bustin' Beans
I ran a couple of soy bean pods through there that my wife was going to eat. It actually seemed to work remarkably well for the 3 pods I ran through it. After the intial run I tried some more soybeans with poor success. It seems that as soon as the latex gets slimed up by the fresh soybean juice, the rollers just don't grip well enough to feed in the pods anymore. This is where theh splined or cogged rubbber rollers would be helpful I think. So it looks like I'll be using this for dry beans until I can find a better coating for the rollers. If you have a source for the cogged extruded rubber profiles, let me know! I may try out some adhesive backed grit paper to see if that performs better under wet conditions.
08/08/12 Update
So looks like there's no way to bust wet soybeans with this thing without either making both rollers driven
or going to a cogged roller (makes both rollers driven as well). But the good news is that using the latex
rollers with only 1 drived roller works great for dry beans. I shelled all my beans in an hour-awesome!
Link to the initial design of the motorization.


Latex tubing, 1' ID 0.125" wall thickness x 12". $5 from McMaster-Carr
Nylon 6 bar, 0.5"x3"x12", $15 from McMaster-Carr shaped with milling machine and cut with wood bandsaw
Plywood, 1/2" thick. Pile of it in garage, no cost. Cut with wood bandsaw and drilled with drill press. Slotted with router.
Suitable gear-head motor. Bought on ebay about 7 years ago for maybe $20
Power supply for DC gear-head motor. From a printer or some dumpster somewhere
#25 roller chain and 2" OD sprockets. Bought from surplus center about 7 years ago for maybe $20
Outdoor switch fixture and 110 VAC on/off switch. Bought from hardware store for about $2
Design01
Design02
Design03
Design04
Design05
Design06
Design07
Design08
Design09
Copyright 2010, Greg Miller
https://www.angelfire.com/80s/sixmhz/beanbuster.html