Razor Sharp System with Tool Guide
Email: sixmhz@yahoo.com
Link to my Homepage
Introduction
I caveman could sharpen a knife with a rock better than most people could while using the latest 'gadget'. There's a ton of junk out there that you can buy that claims to sharpen great but either that crap never works or it takes so long you can stand to do it only once. I've been working on establishing a good sharpening system for a while now and I've used all kinds of stones and guides but I always end up somewhat disappointed. Well I'm getting tired of that crap and wanted a finale (finale as in the last one) sharpener that satisfies all of my knife sharpener requirements listed below:
1. Result in sharpness that you can shave with
2. Fast, like not longer than it takes to dull the blade
3. Adjustable angle so I can change the edge quality on any of my knives regardless of blade thickness or length
4. Maintain a consistent angle throughout the sharpening process
5. Affordable
So I've been searching the internet and looking at all kinds of knife sharpeners trying to satisfy all these requirements. Requirement No. 2, being fast pretty much eliminated anything that wasn't motorized.
That's good because there's a lot of crap you can buy and search through so this really weeds out most of the junk. Really just left with a few options. The trusted Tormek system looks really nice and
you can buy any accessory to suit man for a price, a very steep price, say $700+. Not going to buy that one because rule no. 5. Then we have the cheaper versions of the Tormek made by Jet and Grizzly, other wet stone
sharpeners. These are likely a good buy for the price. But I read that reshaping a blade on any of these low RPM wet grinders basically takes forever. So then I saw some recommendations for paper wheel
systems, namely the Razor Sharp System. I thought that by the name alone it sounded pretty darn good. The ol' Razor Sharp System uses a carbide grit wheel for roughing out the blade and then polishes with a paper wheel and rouge polishing compound. Presumably this process is a lot faster than the wet stone grinders. But the problem with the ol' Razor Sharp System is there is no guide and no way to maintain a
consistent angle on the knife (Requirement No. 4). So I liked some features of the Grizzly grinder (low cost, adjustable angle, guided angle) but it seemed like would be too slow. I liked the Razor Sharp System (low cost, adjustable angle, fast) but it has no angle guide. So I decided to make myself a hybrid of the two systems. The plan was to use the Razor Sharp System and build an adjustable angle guide system
that would allow a consistent angle throughout the sharpening process.
System Design
Really all I had to do was try and copy the designs that the wet grinders were using: come up with clamping system to hold the blade, an adjustable guide post, and a way to fix all this to the sharpening
system. I purchased the 8" Razor Sharp System ($33, consists of 2 paper wheels, instructions and the polishing compound) and a 6" diameter 3500 RPM slim line grinder ($60) from www.grizzly.com and they threw in a free apron, how about that?
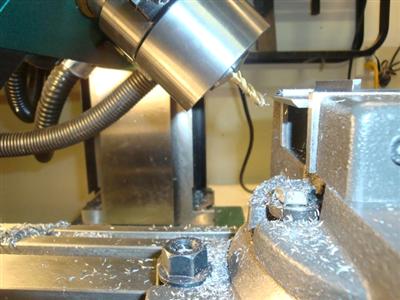
After receiving the goods and taking additional measurements, I was able to create a simple design in AutoCAD using the sizes of steel parts I have laying around in the garage. Then a few evenings' work
out in the garage produced the initial design for the sharpening system.
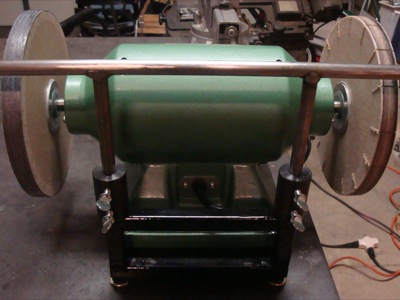
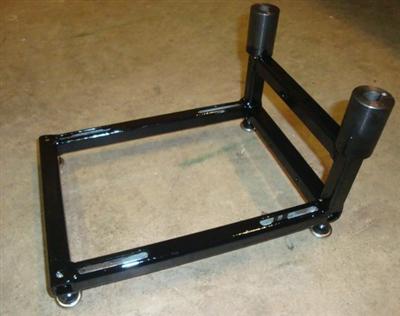
Main Frame
The main frame (not to be confused with 'came with the frame') is constructed out of my favorite surplus steel geometry, the galvanized 0.75" square tubing with 0.125" wall. The cost for this stuff is basically shipping
from the surplus center. I slotted out the bolt holes for the grinder to have additional adjustability. I used some 1/4"-20 threaded 'feet' made for chairs from the hardware store so the leveling would be
easy after completion. Notice the new color of paint, well that's my new stinky black tractor paint by Van Sickel - It's good stuff!


Adjustable Tool Guide and Clamping System
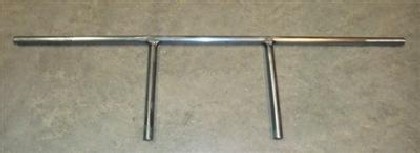
The blade clamping device was made of low carbon steel in the form of 2" angle stock. The clamp uses two pairs of screws to clamp onto the blade. The effective length of the clamp handle can be adjusted with the flanged nut (nut with washer welded on) on the handle. It's then locked in place with a 1/2"-13 jam nut. The tool guide posts are made of 0.5" diameter steel
shafting. This stuff was leftovers from snowbot and was pretty straight. The rods drop into two 1/2" shaft couplers welded on the main frame. The shaft couplers have two 1/4"-20 thumb screws on each coupler to lock the guide rods in place. The tough part on this project is getting the shaft collars and the
guide rods parallel enough that you can mate the parts together and still be able to move them up and down for adjustment. It does move, with some effort though.


Below is a photo putting the 45 degree edge on the clamp.
Set-Up for Tool Sharpening
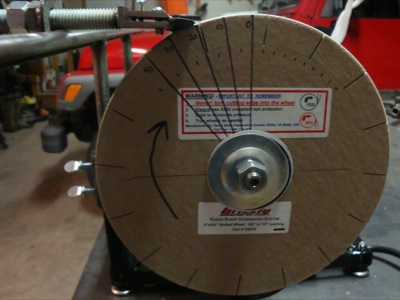
After letting the paint dry for a couple of days, I decided to give the system a try and see if it worked as well as I had hoped it would. The first thing to do is measure out and mark degree graduations on the paper wheels using a protractor and a sharpie marker. I'm not using any fancy angle measuring tool yet, just ball parking the 20 degree mark for my knives. Next mount the blade into the clamping fixture with the blade approximately parallel to the clamp edge. Now the blade and clamp assembly now rests on the tool guide and the length of the clamp handle is then adjusted to fix the angle at 20 degrees (or whatever angle you want). Most importantly, ensure that the rotational direction is away from the edge of the blade so the blade doesn't dig/catch into the wheel and toss the blade up into your eye. For my grinder this means the 'front' of the grinder is actually in the back. You could reverse the direction of the motor, but then the left and right hand threads on the grinder arbor would be backwards, so you'd have to flop the arbor around as well. Below are photos of setting the angle with the adjustable length handle and a view of what it looks like from the top while sharpening. Notice how the flanged nut rests on the tool guide rod to fix the distance and angle while sharpening.

Tool Sharpening
Here's the process:
1. Clamp your blade in the holder
2. Set your angle
3. Turn on grinder
4. Wax up the grit wheel (wax keeps the temperature down and reduces the aggressiveness of the wheel)
5. Make a half dozen or so passes on each side of the blade until the burr can be felt all the way across the blade
6. Load the buffer with rouge
7. Make a half dozen passes on each side of the blade with the buffing wheel
8. Find some more knives to sharpen!
I was pretty pleased with how the blades were coming off the tool. The material removal rate from the carbide grit was good, plenty fast enough. I think the tool guide is a major improvement in consistency over free-handing it. I sharpened all the knives in the kitchen and my pocket knife during the first 'trial run'. Took
about 10-15 minutes per knife with set-up time. The blades have a very consistent and polished (mirror-like) edge down the entire blade. All the blades I sharpened were capable of shaving with.
The only design flaw I ran into is that the entire system slides backwards when pressing the blade into the wheels. I used a pair of quick-clamps on the frame to clamp it down to my table to keep it from moving. So far my opinion is that this is much superior to any manual method. I don't think I'll ever need a different system although I may need to fabricate other holding devices for different blade geometries like hatchets and such.
04/30/12 Update
So far I've had very good success with this system. I've sharpened knives for almost everyone I know. I've made additional clamps to hold and sharpen regular knives, fillet knives, small knives, and even swords.
Link to the initial design of the tool.
Design01
Design02
Design03
Design04
Design05
Design06
Design07
Design08
Design09
Created: 11/23/10
Last updated: 04/30/12
Copyright 2010, Greg Miller
https://www.angelfire.com/80s/sixmhz/grinderguide.html