Design Considerations
As with most of anything I build it has to meet certain specific project design considerations. This project's constraints were pretty minimal. Just had to fit in the garage
and I wanted to use a moderately thick plate for the top. For this project, I used 2" square steel tube with 1/8" wall thickness for the frame and a 36"x36" square steel
plate with 3/8" thickness for the top. I made the frame 6" shorter than the plate so the plate would overhang each edge by 3". This allows easy clamping of the welding
electrode anywhere around the table. I also wanted adjustable leg lengths because I can't make anything that is square.
Steel Frame
The frame was made of 2" square steel tubing, 1/8" wall thickness. I purchased all the steel from my local steel supplier, Fauser. I check online and the cost for the steel
was nearly double what the local guy wanted. In addition, I would have paid $120 for shipping if I ordered online. The local supplier delivered to my driveway for a mere
$10 and I had the steel the day I ordered it. The cost of the 2" tube was $96 for 30 feet of it. It was supplied in a 24' piece and a 6' piece. That 24 footer had to go corner
to corner to fit in the garage before it got chopped up. I also had to build a stand out of scrap would in order to support this extra long part on my band saw. This stand looked quite
horrible, and it was promptly destroyed after use. After everything got chopped up, the amount of steel looked much smaller. I ended up with two ~10 inch extra
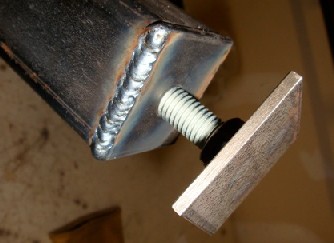
cuts of the 2" square tube with no mistakes. The base of each leg is 'capped off' with a 2" square plate with a 1/2" nut welded to it. The nut and plate allow a threaded rod
'foot' to adjust the leveling of the table. Most of the problems I ran into constructing the frame was related to squareness of the assembly. My crumby 12"
adjustable square is worthless. 90 degree magnet welding squares are worthless (beyond about 2"), and the steel tubing itself was not straight. So I could get it squared up in
some places, but not in others. So basically I had to choose where I wanted things square (like the top) and in other places it didn't matter so much that it wasn't square.
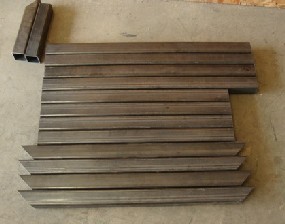
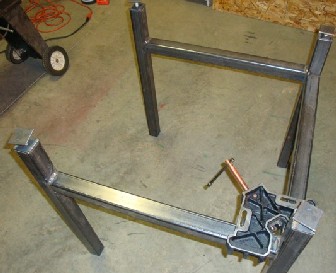
Here are photos of the frame parts before and after welding together.
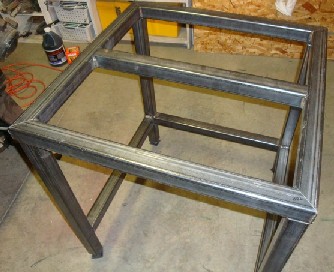
Here's the picture of the 'top' frame of the table.
Here's the picture of the leg height adjustment/leveling.
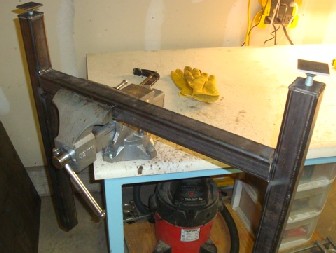
Here's the picture of the one of the leg halves being assembled.
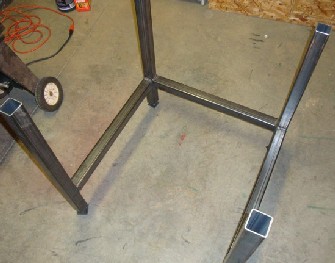
In order to ensure the top was planar, the last cross-member was fixed by inverting the entire frame so that the 'top' that will accept the steel plate is on the
~flat garage floor. I used a 90 degree welding clamp to fix the members together before tack welding.
Here's the picture of the assembled frame.
Steel Plate Top
The steel plate top is 36"x36" and 3/8" thick. I paid about $120 for this piece, again from the local supplier. After the frame was complete, it was time to get the plate up
on top of the table.
The plate weighs around 100 lbs I'll bet. I didn't have any help, so I used the storage hoist that is mounted on the ceiling of my garage. This hoist has all kinds of uses
including taking the hardtop off my jeep and hanging dead animals on so I can get them cleaned up for me eating them - yum! My wife likes nothing more
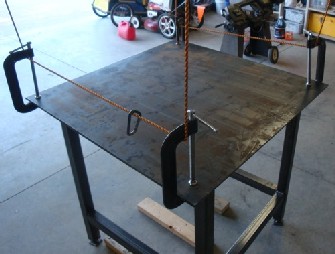
than coming out to the garage and finding a big 'ol deer hanging from the ceiling. I used a C-clamp on each corner of the plate to secure the lifting ropes. Then I used my
1/2" cordless drill to power up the hoist and lift the top into the air. After the top was at sufficient height, I pushed the frame underneath and lowered the hoist.
The plate is not flat of course (and neither is the frame!) but they were close enough. Then I C-clamped the top to the frame and welded it into place.
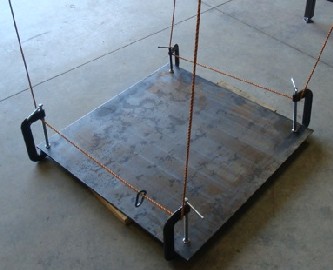
Here's the picture of the top plate being hoisted onto the frame.
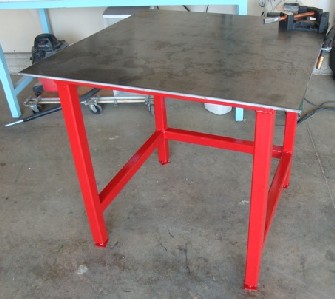
Here's the picture of the top in place.
Painting
I'm pretty impatient when it comes to finish. I did manage to degrease everything with some simple green and an old sock. Then I put on 3 coats of
tractor/industrial enamel. We'll have to see how durable this stuff is but it looks better than rusty steel.
Additional Features
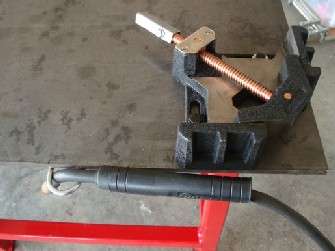
I welded on two 'U' bolts to the underside of the table top for welding gun holders. I also drilled and tapped 2 pairs of 3/8-16 holes for mounting the 90
degree welding vise. The two pairs of holes allows me to choose between two mounting options depending on what I'm welding and how I want the work piece
supported. I also replaced the 'T' style
handle on the welding vise because it's pretty much useless when mounted over the table. I bolted on a 3/4" square tube for the handle instead. If more gripping power
is required, I'll just put an adjustable wrench on the 3/4" tube handle.
Link to the initial design of the table.


Design01
Copyright 2010, Greg Miller
https://www.angelfire.com/80s/sixmhz/weldingtable.html