
My Mini-Me Info PageJust what is a "Mini-Me" you ask? First off, it has nothing to do with that little dude from the Austin Powers movies. The Mini-Me is a VTEC head swap for the 88-00 Honda D-series motors. It involves taking a SOHC VTEC D-series head and attaching it to a Non-VTEC block. There are only two different D-series VTEC heads that are used for this swap. The D16Z6 head from the 92-95 Civic EX/Si or Del Sol Si and the D16Y8 head from the 96-00 Civic EX. There are other versions of D-series VTEC heads from the 92-95 Civic VX and the 96-00 Civic HX, but neither application is used as these heads are primarily more emissions friendly then they are performance friendly. As for the engine blocks, most any D-series block will work. The exceptions are the D16A1(86-89 Integra) and any of the 8 valve motors. The popular blocks are the D16A6 (88-91 Civic/CRX Si/EX), the D16Y7 (96-00 Civic DX/LX), the D15B7 (92-95 Civic LX/DX), and the D15B2 (88-91 Civic/CRX LX/DX). Another choice for the bottom end that isn't usually used but would be a good choice would be the D15Z1 (92-95 Civic VX). The Z1 bottom is good due to it's 1.62 R/S ratio due to it's use of a longer 137mm rod. The other 1.5L blocks use a shorter 134mm rod. Rod/Stroke ratio (R/S) is basically the ratio of the lenght of the connecting rod versus the length of the stroke of the crank. The ideal ratio is around 1.75 or so. On a high-revving motor, the closer the ratio is to that number, the better. Essentially, the higher the ratio, the longer the piston will dwell at TDC(top dead center) and BDC (bottom dead center). This is good because it allows for longer combustion and compression events. Just for your knowledge, the B16A has a R/S ratio of 1.74. OK, enough techno-babble, why do the swap anyway? Wouldn't swapping in an entire D16Z6 or D16Y8 be better? First off, price. This is a rather argumentative though. Usually, you can find a VTEC head for $100~$200. This is less than you can usually find a complete swap for. Usually is the key word however, as every now and then a deal can be found for a complete motor for the price of just the head alone. Most times though, you can get a head for relatively cheap and after you factor in the price of the additional parts you'll need to complete the conversion, it will be cheaper than the whole motor. For a couple of reasons it is more ideal to swap in the entire motor if you have it or can afford to purchase the entire motor. First off, assuming the motor is in good condition, the motor will have that great Honda reliability we have all come to love. (I know you racers must be thinking "what reliability??"). Anytime you rebuild or "Frankenstein" a motor, it will almost never have that factory reliability. Another reason is that it is probably easier to swap an entire motor than it is to do the conversion in the car. I know that this is argumentative as well, but to me, it's easier. The key thing here is doing the head swap in the car. If the swap is being done with the motor outside of the car, then this negates my point. The important thing about doing a Mini-Me is to remember that cost is everything. If you can do the conversion for less than you can purchase and install a complete SOHC VTEC engine, then do the Mini-Me. If not, get the complete motor.
|
 Getting Started
Unlike the LS/VTEC or B20/VTEC, putting the Mini-Me together is relatively easy. You could almost consider it a bolt-on affair. Here is the basic list of what you will need:
Additional Parts to Consider
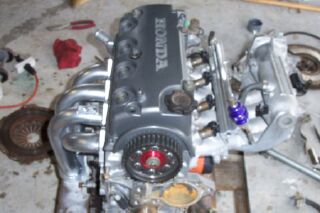
The Assembly First off, you will need to remove the Non-VTEC head that is currently on the engine. If you need instructions on how to do this, I suggest that you get a Honda factory manual. Actually, this should be the first thing that you buy after purchasing your car. The factory manual will be your bible. Here's a little hint, if you don't know which one to get, get the 94-97 Honda Del Sol one. It has info on the D15B7, D16Z6, and the B16A3 motors. As long as you stay with a D or B series, this manual will probably be all you need. Anyway, after removing the Non-VTEC head, clean the block of any headgasket residue. The Non-VTEC's use a composite headgasket that over time breaks down and can be a pain to remove on older engines. Take your time and carefully remove any leftovers off the deck surface. With the head off of the motor, now would be a great time to change the water pump, thermostat, and any other parts of the engine that would normally be a pain in the ass to change. At the very least, the water pump. At this point, you will need to remove the oil control jet that is located in the engine block. The jet is located between the #2 and #3 cylinders on the firewall side of the engine. The easiest way to remove the jet is with either a set of Vise Grips or a dry-wall screw. Don't worry about damaging the jet, as you won't be needing it after you swap the VTEC head on. Just don't damage the engine block or your hands. It is necessary to remove this jet to ensure that the oil can pressurize the head for VTEC activation. Leaving the jet in will not allow enough oil to get to the head. You do not need to run any oil lines on a Mini-Me conversion. Now that the block is ready and you have replaced whatever parts you decided on, the VTEC head can be installed. However, if there is anything that you want to do to the head, you should do it before you install it. If you want to replace the valvetrain for something stronger, get a port and polish and 3 angle valve job, or just replace the cam, do it before you install. Sounds kind of obvious, but you need to plan these things out ahead of time. If you will be using a 1.5L bottom, it is suggested that you use an adjustable cam gear. This is due to the fact that when you put a VTEC head on the D15 bottom, you cam timing will be off by half a tooth. You will find this out when you are trying to install the timing belt. I used a Skunk2 gear because I got a good deal on it, but any quality gear will work. I highly suggest putting the cam gear on before installing the head.
Now for the final assembly. It's as simple as putting a head back on the block. Just make sure that you have the head gasket in the proper orientation, and that you remembered to remove the oil control jet. The VTEC head should fit on the block without any protest. If you do run into any snags, take your time and don't force the head onto the block. Now you are ready to bolt the head down. This is where the factory manual will come in handy once again. Following the installation instructions in the manual, proceed to tighten down the head bolts. Make sure you follow the sequence and torque specs. You will note that torquing the head bolts is done in 2 steps. Some feel that adding a 3rd step is even better. It's up to you though, I did mine in 2.
Assuming that you got the head on without any snags and torqued the headbolts down to the proper specs, you can move onto finishing up the Mini-Me. The next step is the hardest, at least in my opinion. You will now need to install the timing belt. But before you install the belt, make sure that the crank is set with the #1 piston at top dead center (TDC) and that the cam is set at zero. You can do this by lining up the cam gear to the two marks on the timing belt cover that bolts up behind the cam gear. To get TDC, there is a line on the timing belt pulley and an arrow on the block, match those two up, and you will be at TDC. Again, use of the factory manual will aid you in doing this. This must be done as precisely as possible to ensure that you motor will be in time. Using either the Z6 or Y8 timing belt (depending on which head you are using), route the belt around the crank pulley, around the timing belt tensioner, around the water pump, and over the cam gear. Sounds easy, but it's not. Just follow the directions in the factory manual. If you are using a 1.5L bottom like I have, then you will run into the "half a tooth off situation". That is where the adjustable cam gear comes in. So while you are attempting to install the timing belt, I would suggest that you have the bolts on the cam gear loose so that you can adjust the outer ring to accomodate the teeth of the timing belt. It takes a little elbow grease but the belt will fit. It's a little tight, but it will go on. After you get the belt on, follow the instructions on tightening the tensioner and setting the tension on the timing belt. Assuming that you have the timing belt on and adjusted correctly, you can now move onto bolting on whatever miscellaneous parts you need to complete the assembly of the motor. Now would also be a good time to install a new thermostat, port and polish the intake manifold, change the gaskets, install a new clutch assembly, and add any aftermarket bolt-on's that you have. You should think about these things moreso if you are assembling the motor outside of the engine bay. Get to all those hard to reach places of the engine. With everything bolted on and the tranny back on the motor, you can now reinstall the motor into you car. Re-attach the shift-linkage, re-install the axles, attach all the hoses and vaccum lines, refill the fluids, and tighten down all the mounts. Almost finish, but missing one big requirement.....wiring and a computer. |
 ECU's and Wiring
(*This section is for 88-91 Civics and CRXs only. 92-00 Civics can use thier respective SOHC VTEC ecus for the Mini-Me) Now for the confusing part of the Mini-Me, what ecu to use. Depending on which ecu you use, that will determine what route you need to take in regards to your wiring harness. For those with DPFI equipped cars, let me just state that it will be much easier to use your existing harness and add the necessary wires for MPFI and VTEC. With that said, I will list down the various options you have for running your Mini-Me. The ecus are not listed in any particular order.
ECUs
After you have decided on an ECU, you can proceed with your project and hopefully have a peppy little, budget built motor to get you around a little quicker than your stock Non-VTEC D-series motor. Ideally, you should get the car on a Dyno and do some air/fuel tuning, especially if you plan on using a VAFC. While you are on the Dyno, you can also fiddle with the cam timing (if you have an adjustable gear) to get the most out of your motor. There are numerous variations on this motor using different pistons from different D-series motors to change the compression ratio. Using a D15b2 or b7 bottom with a Z6 head will yield a healthy 10.1 to 1 C/R. Here is a D-series C/R calculator that you can play around with and perhaps build your own hybrid. D-Series C/R Calculator |


