'Wet' Nitrous Powershot install
Small warning- This is just a general guide and should only be considered as ideas. You are responsible for your own actions and your own safety.
Special Thanks to Scott West for his ideas and experience on this subject as they made figuring things out on my install very easy. Hopefully, I can recreate some of the easy-way steps, and give others some ideas that were passed onto me.
The nitrous kit I used was a simple second-hand NOS Powershot kit, adapted with a NOS fogger nozzle to be a 'wet' nitrous set-up specifically for the my Swift. The difference between wet and dry nitrous set-ups lies within how the fuel is delivered. In the wet system the fuel will be injected along with the nitrous in the intake, where-as with the dry system you rely on the factory ECU or other means to take care of fuel delivery.
If you are looking to buy a system used similar to what I did (the one i bought was meant for old carborated V8s so extra parts after this list were needed), make sure it includes the two solenoids, the 12 foot steel braided line that goes from the bottle to the front of the car, the bottle itself, the full throttle microswitch as those are the most expensive parts. The carb plate isn't neccessary as you can't use it, but may be good to have in case you plan to sell the NOS kit at a later day.
Of the additional things that you will need to make the kit work numbers 1 and 2 are the most expensive and the only things you need to buy from an actual performance parts store as the rest can be bought at any of the Crappy Tire or Partsource kind of places.
1. 90 degree NOS fogger nozzle. Either part #13712 or part #13716. You need the 90 degree so that when it is secured in the intake hose it injects the nitrous and fuel aligned with the flow of the airstream. The difference between the two part numbers above is aboout $30 and that the nozzle #13716 is made of stainless steel and is supposed to provide better atomization of the fuel and nos for import applications.
2. about 16-18" of two stainless steel braided lines with the proper AN fittings. In the case of the fogger nozzle and solenoids I have they come with 3AN fittings although you may want to have the parts on hand at the shop so they can double check the size of fittings on your system.
3. 5/16" fuel line about 3 feet worth
4. 5/16" fuel line tee
5. A new fuel filter on the NOS fuel solenoid is a good idea if the system is used. The filter that fits is just a generic Ford Filter. The part # I used from our parts store was
6.
7. 30 amp in-line fuse ($3.50 CAN funds)
8. 30 amp automotive relay available from Crappy Tire or wherever. ($3.50 CAN funds)
9. main arming switch inside the car ($3.50 CAN funds)
10. along with 30-40 feet of 18 gauge (or so) wire along with some connectors for all the wiring.
11. A metal plate of some sort to mount the two solenoids on. and a couple of bolts to mount it on the shock tower.
How does this all fit together?
A quick overview with the directions from the NOS instruction manual

And onto the quick walk-through of how I set things up
Install the main arming switch inside the car. The 12V power on the switch is going to go to a switched power somewhere so that you can't arm the system if the car is off. If you have a switch with a light (I did so I could tell better if the system is on or off), install the ground wire to your nearest convenient ground.
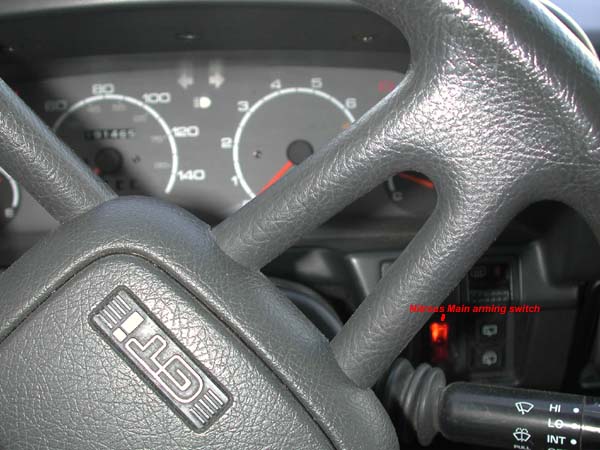
From there run a wire from the ACC (accessory) lead from the switch, go through the firewall of the car and to the one side of the throttle micro-switch (keep in mind you are wiring this in series so that if one switch isn't on, the system won't activate). Take note in the picture so you can get an idea of how to mount your switch. You should just be able to bend the bracket back, but on mine the guy hacksawed part of the bracket off and I had to customize it a bit. Just make sure that the switch is set-up so that it only clicks on once the throttle plate comes all the way back and activates it. From here... run a wire from the other end of the throttle micro-switch over to your 30 amp automotive relay.
I secured mine on the fuse box and soldered the connections on the bottom as I couldn't find the right connectors :).
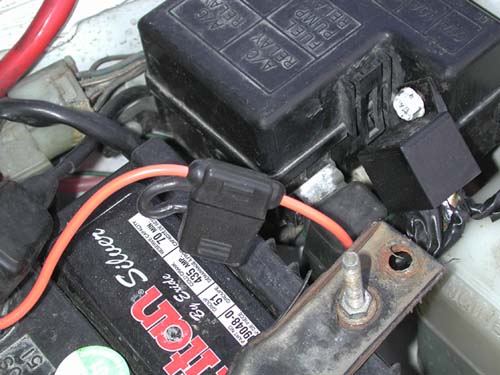
The wires for the relay can be figured out in this diagram as I added what I used them for if it made more sense. Bascially, just put a 30 amp in-line fuse directly to the battery, ground out the other, a couple are for the solenoids and the other comes from your series of switches. Make note that you'll want to check to make sure the numbers are the same on your relay and adapt accordingly.

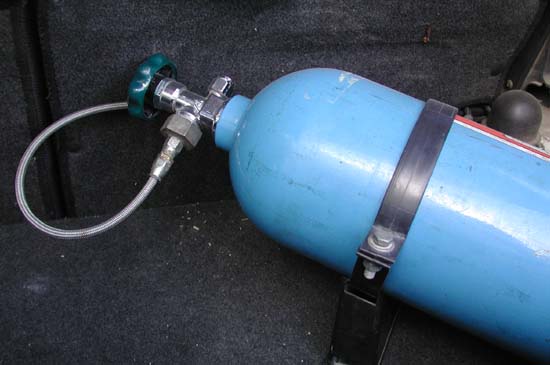
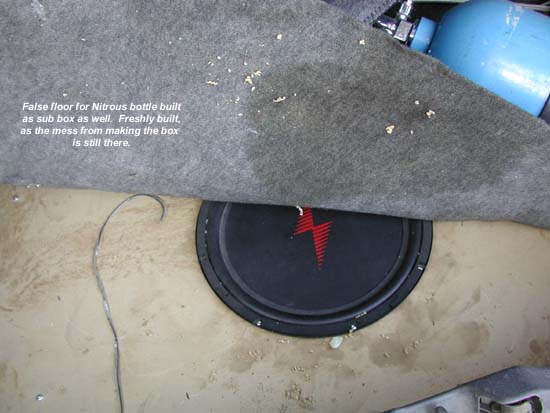
The nitrous bottle is mounted is mounted in trunk on a false floor. Without the false floor there is no easy way to mount the bottle as with the spare tire there, there is nothing to screw the mounting brackets into. If you need a false floor, just use the carpet in the trunk as a general outline of how big to make the floor (making sure the wood won't rub and squeak being to tight against any of hte plastic trim pieces). If you want to go one step further with your false floor and make it a sub box, then go here (warning this link does not exist yet).
although there is no link for sub box yet.. here's a pic
I drilled out a couple of holes under the back seat to carry the NOS line outside. There is an existing hole near the front of under the back seat that I drilled out. Your main concern is make sure the Main NOs line can bend and will not become frayed or damaged from the seat on top or the hole it goes through. The pic is kind of crappy but, if you have your seat off you should be able to see where it goes.
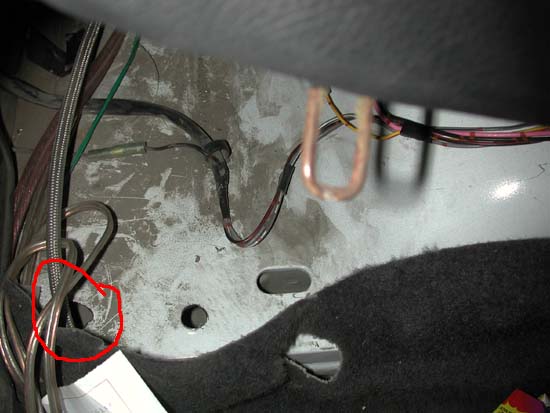
From here, secure the NOS line with some metal U-clamps along the frame rail of your car where it will eventually find it's way to the nitrous solenoid (put the line wherever you can making sure it won't get frayed where it rests. Mine is pretty much hidden underneath the car so there are no pics until it makes it's way to the NOS solenoid).
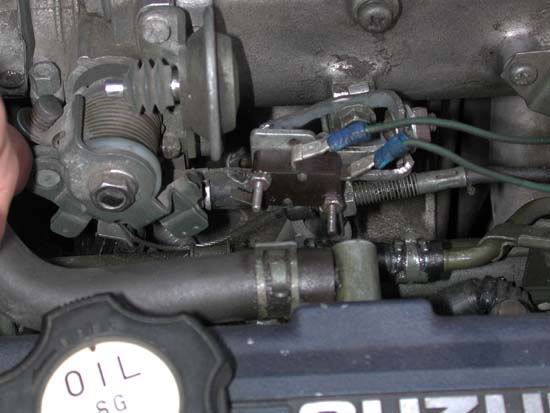
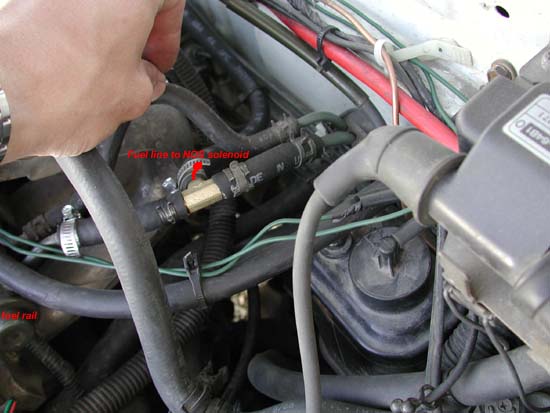
Before we get to the solenoids, here is a pic of where I tee'd into the fuel line. Use the 5/16" tee, and 5/16" hose to haul the fuel over to the filter on the NOS fuel solenoid. Make sure you use the proper fittings and clamps and make sure that you are not losing any fuel on the way to the solenoid. Now is also a good time to put a new fuel filter on the back of your fuel solenoid if it is equipped as such. The filter that fits into the solenoid itself was a generic fuel filter from a Ford I believe
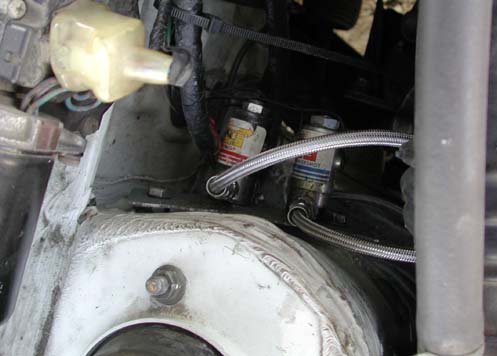
The fuel solenoid is mounted along side the nitrous solenoid over on the passenger side shock tower (mount the solenoids on the metal plate listed as 'parts you need earlier', and mount the plate to the shock tower). The plate is secured in place with a couple of bolts and nuts used as spacers. The holes in the shock tower already exist, and all I did was make them bigger to accomadate the bigger bolts I used. If you look at your shock tower you will see the existing holes
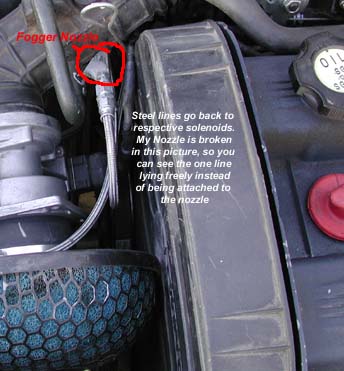
From the solenoids you will need your 18" of steel braided lines with the proper AN fittings to go to your fogger nozzle in the intake pipe. Mounting the nozzle is fairly easy... cut back that little unused piece of rubber in your intake pipe enough so that it is now a hole and you'll find your fogger nozzle fits snuggly in the intake path once in place. It is a good idea just to 'goop' it or at least silicone the nozzle in place. Your nitrous and fuel jets go in small end first into the nozzle. In the case of my system .015" fuel and .024" nitrous is good for about 35hp. For a few other fuel and nitrous jet sizes and the horsepower they are good for on this systemgo here (THIS LINK DOESNT EXIST YET)
After installation
Once you have everything installed, leave the nitrous bottle closed, but arm the system, and go for a drive and make sure that the fuel solenoid and all your wiring is working when you step on the gas to go WOT. If your car sputters, rpm drops, or the engine feels choked, then it's a good sign that your fuel is going through. Stop your car, check to see that all the fuel was sprayed into the intake and not all over your engine bay. And if you have no apparent leaks leave the car idle and open the nitrous bottle and listen for leaks as it fills up the line. If the engine starts idling faster then it leaking past the solenoid and you should turn off that bottle and investigate. If you have no leaks and all seems well, turn on the nitrous and ahve some fun where there is no chance of hurting yourself or another living thing.
If you made it all the way up to having everything done, except for having a leak from the solenoid to the nozzle. Check your fittings on the solenoids and the steel braided lines themselves. Since my NOS kit was an old system, the fittings on the solenoids were worn and abused and wouldn't seal properly. The difference between the old and new fitting is quite obvious and thannkfully so is the fact that I no longer have any leaks.

COMING SOON- How to install an MSD rpm limiter to activate the Nitrous system according to the rpm chip installed. A great way to save your engine from damage caused by activating the system at too low revs!

