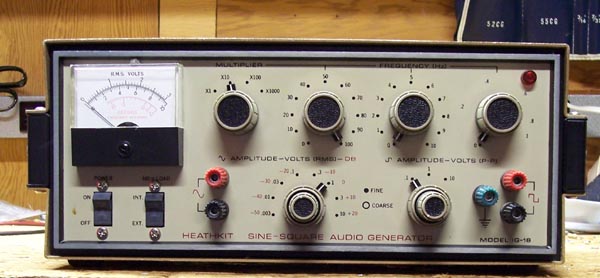
LOW DISTORTION AUDIO GENERATOR.
Modifying a Heath IG/SG-18 for ultra low distortion.


Additional notes as of July 11, 2013.
I bought and assembled the IG-18 kit before I got married. Sue and I were married in June of 1971 so the unit is most likely 43 years old and possibly 44. In the past day or so I was preparing to make some critical tests on an amplifier so I connected the generator into the input of the distortion analyzer to check it. To my dismay the reading was 0.09 instead of the 0.015 expected. I looked at the output of the distortion analyzer on my scope which shows everything but the fundamental frequency and when I set to line trigger I saw a 120 Hz component.Disassembly and testing of the IG 18 revealed much more ripple in the power supply than normal. Long story a little less long, the two 300 uf capacitors in the power supply, (C1 and C2) had developed high ESR (effective series resistance). That was an understatement. After unsoldering them from the board a check on the LCR meter showed one to read 43 nano farads and the other wouldn't give a reading. They were marked 300 uf 60 volt. I found a couple of 470 uf 50 volt caps in my stock and since that was all I had I soldered them in. The ripple was gone and the voltage across C1 was 52 volts. This is not recommended. Do as I say not as I do.
When I made the original mods I was using a Heathkit IM 5258 distortion analyzer. I extended its range downward by connecting a Heathkit IM 5238 AC Voltmeter to the output terminals and used a resistive divider so the ranges would dovetail together. As you might imagine this introduced some inaccuracy. I now have an HP 334A distortion analyzer and it reads 0.022% on the oscillator alone. In the text below when you read 0.015% interpret it as 0.022%.
Control Adjustment for Minimum Distortion.
To minimize distortion within the generator you must keep the load on the oscillator circuit as light as possible. To do this set the controls as follows.
- "600 OHM LOAD" to "EXT."
- "AMPLITUDE - VOLTS (RMS) - dB" to "10 +20"
- "AMPLITUDE" vernier, concentric with switch, to the 3 o'clock position.
- Do not connect an external 600 ohm resistor to the output terminals.
These settings will deliver approximately 1 volt at the output terminals. If you need less set the vernier lower and if you need much less set the step switch to lower voltage values.
If you need more than 1 volt, increase the vernier setting but only as far as necessary to give the output voltage you need.
And now, back to our story.
The IG/SG-18 was a very popular product for the Heath company. The IG-18 was the kit version and the SG-18 was the assembled version which was targeted primarily to schools and colleges. Both models were identical, differing only in the paint job.They, it from now on, is a lamp stabilized bridged-T oscillator with a schmitt trigger to provide a square wave output. A lamp stabilized oscillator has the potential to have very low distortion but this one, for a number of reasons, did not live up to those expectations. It has been about 10 years since I performed the modifications described here so I don't remember exactly what the distortion was but I think it was about 0.5%. After a series of modifications I was able to get it down to 0.015%.
Of course if you don't have a harmonic distortion analyzer you really have no need for an audio oscillator with a distortion of 0.015%. Many older vacuum tube analyzers such as those made by HP are now turning up on the benches of hobbyist and experimenters. The lowest range on these units is 1% so an oscillator with distortion of 0.1% would be considered adequate. The steps to reduce the distortion in the IG/SG-18 are given from the simplest to the hardest so when the distortion is low enough for use with your analyzer you can stop.
At the time I modified my IG-18 I didn't do it in the logical order presented here. Actually, turning down the voltmeter calibration pot was the last thing I did. That took away the last few hundredths of a percent. Some of the mods may not even be necessary. I honestly don't know
There are a number of causes for the high distortion in this unit and they are as follows.
- The front panel voltmeter employs a bridge rectifier which places a nonlinear load on the output.
- The harmonics from the square wave leak over to the sine wave output.
- The output amplitude is operating a little too close to clipping.
- The active filter in the power supply does a very poor job of filtering.
- The amplifier which serves as the gain block for the oscillator has too much distortion.
- The magnetic field from the power transformer induces 60 cycle hum into the sine wave output.
To clean up the signal the following things must be done.
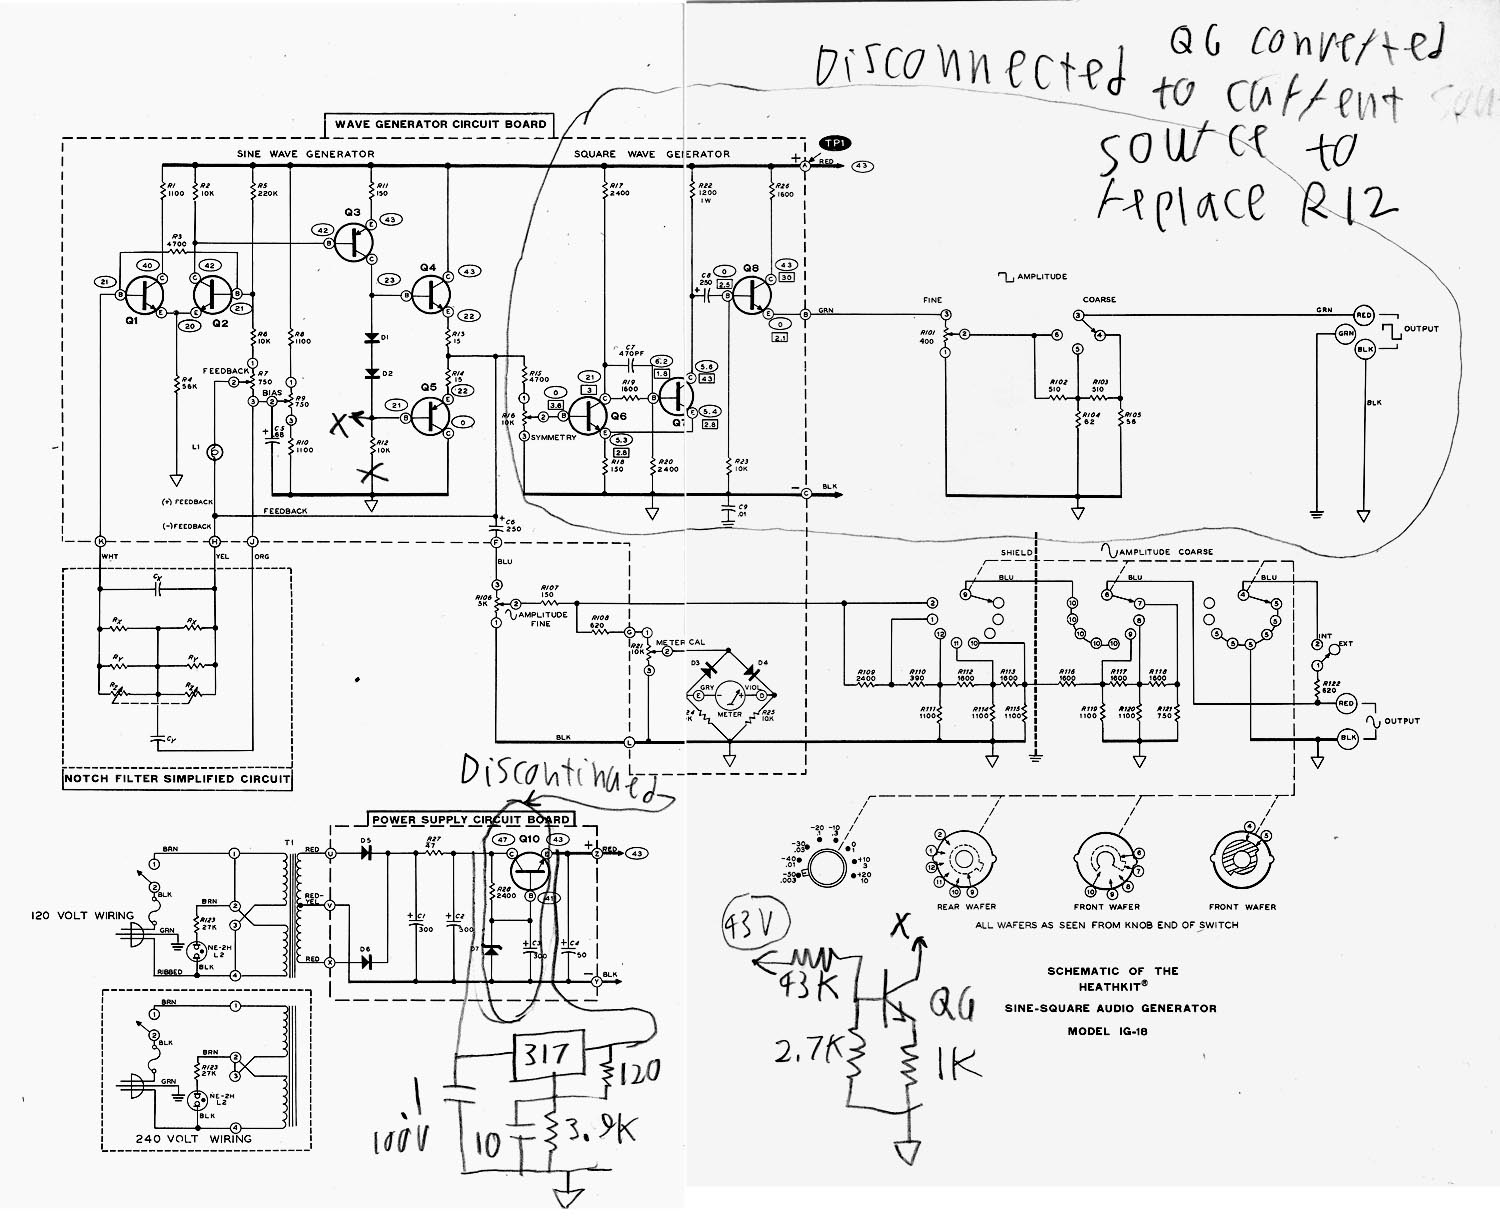
- Disable the front panel voltmeter.
- Disable the square wave generator.
- The output must be reduced from 10 volts to 8 volts.
- The emitter follower active filter must be replaced by a 3-terminal IC voltage regulator.
- Use one of the transistors in the square wave circuit to form a current source to linearize the gain block.
- The power transformer must be mounted outside of the case.
Fear not, I will elaborate further on each item. The order has been very carefully chosen so you can do the simplest things first. Now we need to see the schematic diagram.

For a verbal description click here.
The day that the Heath company closed its doors
was a sad day indeed for electronics home brewers.
Before it existed there was nothing in the world like it,
It was never equaled by its wood-be competition,
And there will never again be anything like it.
HomeOr use your "Back" button to return to where you were.
This page last updated April 15, 2006.