
This article originally appeared in The COURIER Volume 7 #2, Around 1975. It is reproduced here with the permission of the editor, Dick Bryant. Jim Pitts built one of these and used it in his "Loot, Scoot, & Boogie" game.
 |
Note 1. Lay out measurement X first - X may Note 2. Thin card stock works well Note 3.Cut out along arcs - Save your first cut-out |
As built from the sketches the boat would rock very slightly from side to side, giving a realistic cant on the wargaming table. If absolute stability is required, this can be achieved by gluing a small piece of toothpick on either side. The toothpicks are not visible when the boat is resting on the table. When 'x" equals six Inches the size is just right for whaleboats or bateaux, useful adjuncts in horse-and-musket period operations.
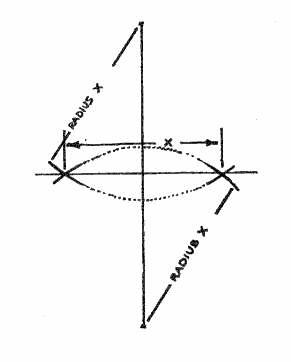
Start with two perpendicular lines and lay out the-desired length of your boat with the intersection of the lines as the center of the boat. Now take a compass and place the pivot leg at the end of your boat on the horizontal line. Open the legs to the full length of the boat and swing the marking leg to find a point on the vertical, perpendicular line.
Now place the pivot leg of the compass at that point and make an arc from "c" to "d" (see diagram). Repeat the process for the other side. You should now have a sort of pointed ellipse with two inter-secting lines drawn through it.
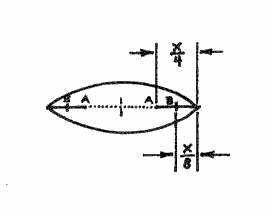
Measure a distance equal to 1/4 of "x" (0.25x) from the end of the boat and make a mark. This is the point you will cut up to when slitting the end of the boat to make the prow. Now measure 1/2 of that distance (i.e., 1/8 of 'x' or 0.125x) and make a mark on both sides of the line to form a sort of cross.
This is a guiding line to show you when the ends of the slit prow have been crossed far enough, and to help you get them even when gluing.
 |
|
Note 4.Measure off Points A and B and cut |
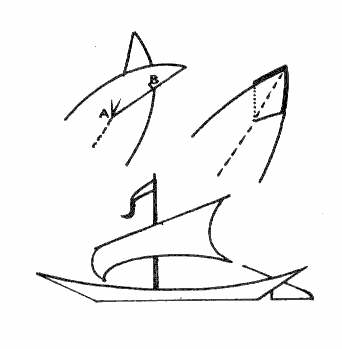
Make the slits in the ends up to A In the diagram, and pull points one under the other until the curved gunwale begins to develop. Point B should be even with the edge of the boat.
Glue in place with Elmer's or similar glue. Drying time should be about thirty seconds to hold and dry enough to use in five minutes. (AJH Note: taping ends, then coating with glue to hide tape. may be easier.)
Total time of construction for your first boat will be about 15 minutes, but if you save the first "pointed ellipse" that you cut and use It as a template, you save the longest part of the job (the initial layout). You can now turn one out about every five minutes!
If you want a mast for a Saxon ship, glue a small piece of wood in the bottom and drill for the mast. You can make the mast from a small dowel, or the round stick, which you can get from cotton-tipped swabs available at the druggist. This will produce about fifty sticks 5' long and about 1/16" in diameter.
If you want to dress up the boat you might glue in seats and mount some oars. I didn't bother, and am satisfied with the appearance. In spite of the complex locking diagram above, the boat is very simple and quick to build.
|
Note 5. Lap, glue, then trim as shown. Crease Note 6. Use as completed for bateaux or whaleboat. |
 |

The finished product, drawn up on the shore. The viking raiders were so eager to get to work that they left the sail up!
Return to "The Jackson Gamers Build things
Return to the Jackson Gamers' Homepage
Angelfire - Free Home Pages
Free Web Building Help
Angelfire HTML Library
htmlGEAR - free polls, guestbooks, and more!
Thank you for visiting The Jackson Gamers' pages at Angelfire. Please come back and visit again!