Terrain with Palm Trees
Ron Strickland tells how and Jay Stribling tries to follow instructions! Ron's comments are in black, while Jay's are in red.

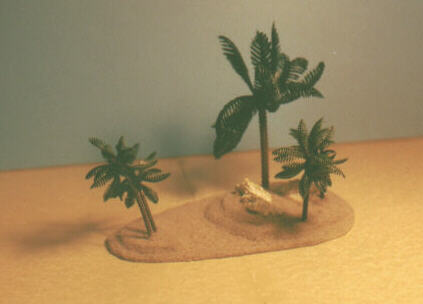
I have discovered that the small 3" tall cake decorating palms have other uses besides sticking into cakes. The ones I buy locally have 2 trunks and 3 separate sets of fronds per tree.

I strip the fronds from the trunks (they are easily removable - sliding on or off), then take scissors, cut the trunks up into equal lengths, then trim one end slightly. I then take the fronds, 2 of them, and slide them back onto the trunk section, use a drop of elmer's (white glue)to firmly secure them in place and then set aside to dry.
Next I take and cut an irregular shaped and trimmed section of mat board. these sections vary from 1" approximately to 8" approximately in length/width. i then spray these with acrylic sealer to moisture proof them(GESSO works too but is expensive for this stage).

Then I cut slightly smaller sections of irregularly shaped 1/4" thick foamcore card, which is then glued to the mat board section with white glue, pressed down and allowed to dry completely. this is the base for a low-lying terrain base. to make terrain bases of different heights, I add more foamcore sections, then press down and allow to dry completely.

When these sections are dry ( both flat and rolling terrain bases), I again moisture proof them with acrylic spray or gesso (gesso is best as it does not melt the styrofoam sandwiched bewteen the paper of the foamcard).


The next stage is to make holes in the foamcore as desired, add a cake palm tree of the larger variety(5"tall) or more than one or even some of the 3" trees as young growth, then make more holes in a random pattern. place elmer's (white glue in these holes, and then plant your palm trees, AND your lush, tropical fern - looking undergrowth! be sure to leave room for soldier's on the base if so desired. let dry!
The last step almost, is to mix up a batch of RON'S el cheapo wal-mart spackling compound, parakeet gravel, sand, and elmer's (white glue) basing mix and spread over the terrain base to give it an earthlike texture. Use a hair blowdryer to expedite drying in all of the above steps if y'all are in a hurray, otherwise let it dry as it will!

Ron recommends that y'all buy your own hair blowdryer as girlfriends and wives tend to resent reaching for theirs and finding it .....gone ..... for a wargamer's tool !!!!!!

When dry, apply the earth tone y'all like best to the spackling and etc.
Add coarse vegetation or regular foam grass as desired using white glue as a sticker. if using the coarse vegetation, soak it in white glue before applying to the base and then let it dry -rock hard! let it dry!

Then spray with gloss or matte acrylic (your choice). let dry.
There it is - jungle terrain bases!!!! And it will be bases that are almost bullet proof as far as chipping and breakage is concerned! these will travel well. This same procedure works when making just bases for individual or multiple plant bases without trees.
This method will allow a player to make up jungle or forest or grassy areas that can be of any size (via the use of multiple bases), that allows the easy movement of troops through same, and that also can clearly show the edge of the jungle, forest etc. at a very low cost too!
It can be used with other types of plastic vegetation, or with plastic brush or broom bristles cut to the desired length and painted to color of choice. a variety of plant types with the coarse foam vegetation, the cake trees, and woodland scenics trees can make really spectacular jungle terrain, grassy terrain, or forest terain.
I hope this is helpful to all - Enjoy!
Return to "The Jackson Gamers Build things
Return to the Jackson Gamers' Homepage
Angelfire - Free Home Pages
Free Web Building Help
Angelfire HTML Library
htmlGEAR - free polls, guestbooks, and more!
Thank you for visiting The Jackson Gamers' pages at Angelfire. Please come back and visit again!