INTRODUCTIONMaterials Needed:
PsilocybeCubenis Mushroom Spores
A syringe (10 ccs or larger)
Horticulture Grade Vermiculite
Brown Rice (Ground into a fine powder)
Perilite
Hydrogen Peroxide
8 oz. Mason Jars
A pressure cooker (6 qt. Or larger)
An aquarium (a 10 gallon is what I use)
Damp Gone (A desiccant used to dry the mushrooms)
Aluminum Foil
An Alcohol Burner
A casserole dish (or any dish with a cover that will seal)
The goal is simple: to grow some potent kickass shrooms. How to get there is the problem.
Pyscloyblin Fanaticus originated the method for growing sacred mushrooms that this document is based upon. This document is being made for a few friends who have tasted my shrooms and now would like to get in on the action for whatever reasons they might have. The description I am about to present worked quite well for me. I have studied many documents on the Internet and the Library attempting to grow this particular strain of mushroom, this document presents the shortcuts and products of two years of testing and perfecting my methods. The bottom line: Follow these directions and you will have mushrooms.
Very little knowledge of Mycology is needed to actually produce this various strain, it is by far the most widely distributed and consumed Magic Mushroom on the face of the earth. Mushrooms are a fungus, but, I am positive that you knew this. What you might not know is that what you typically consider a mushroom is actually the fruit of the fungus, just as an apple is the fruit of an apple tree. The fungus that a mushroom fruits from is called mycelium. Just as an apple tree starts from apple seeds, mushrooms start from spores. Mushrooms are about 90% water, when fresh. These few facts are very simple and this is about all the mycology you need to know.
What I would like to do know is give an overview for growing these shrooms. Before you grow, mushrooms, you need to first grow mycelium, then make the mycelium fruit to give you mushrooms. To grow mycelium you need to plant the spores in a suitable substrate or medium. Planting the spores is just like planting a seed to grow an apple tree, but the method is different. In this method your spores will be contained in a watery solution in a syringe. The substrate will be what we call rice cakes and is made out of three ingredients: horticultural grade vermiculite, brown rice (ground into a fine powder), and water. The substrate will be mixed and placed into 8 oz. Mason Jars, then cooked at 15psi, After cooling the jars will be injected with the spores in the syringe. After 7-10 days, maybe sooner, mycelium will start to grow; mycelium is a fast growing white fungus. After the cakes are 100% colonized, in about 3-4 weeks, fruiting will start, then it is time to take the cakes out of the mason jars and place them in the terrarium that you will make out of an aquarium. From here you will pick fresh mushrooms for about the next 10 days, then the rice cakes nutrient supply will exhaust and it will be time to put in fresh cakes, The fresh shrooms are picked and immediately put into the drying stage.
Quick link reference to different portions of the page:
Preparing your mason jars
Preparing your aquarium
Preparing the Substrate
Cooking the Substrate
Injection of Jars
Growing of Mycelium
Removal of cakes
Caring for cakes
Picking fresh Mushrooms
Drying of Mushrooms
Making a spore print
Making a spore syringe
Links to other Drug Sites
You will need 8 oz. Mason jars to grow
shrooms with this method. I have found that there are actually two kinds
of 8 oz. Mason Jars: short and fat, and tall and skinny. I actually use
a combination of both, but would recommend using the short and fat mason
jars for the inexperienced grower. To prepare your mason jars you will
need to punch four holes in the lid around the rim; this is necessary so
we can later inject the jars with spores. The picture clearly depicts the
location of the wholes you will need to punch in your lids. I recommend
a nail or actual hole punch for the job.
Back to reference list.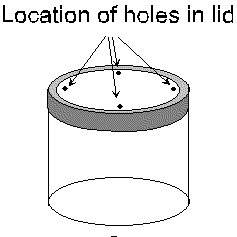
You will need an aquarium for use in the fruiting of the mushrooms. Any aquarium will work, as long as it does not have any leaks. I use a 10 gallon aquarium, but a larger or smaller one will work. It all depends on how many shrooms you want to grow. For the top of your aquarium you will need a lid, this lid must make a perfect air tight seal on the top of the aquarium. For this purpose, I constructed a wooden frame that loosely fits over the top of the aquarium. I then stretch plastic tightly over the wooden frame. For plastic, I use white garbage bags cut open. The lid must seal the top of the aquarium, but must not be so tight that it is a pain to lift off. My lid is very loose yet seals off the top.
Back to reference list.
PREPARATION
OF THE SUBSTRATE
1. Grind regular old Uncle Ben's Brown rice to a fine
powder in a blender, food processor, or a
coffee bean grinder.
2. In a mixing bowl, put ½ cup of horticultural
grade vermiculite, and then add 1/8 cup (2 level
tablespoons) of brown rice powder.
3. Mix these ingredients together thoroughly; thoroughly is the key word.
4. Then to this mix add 3 tablespoons and 1 teaspoon
of water, and maybe just another drop or
two to be Safe.
5. Mix these ingredients thoroughly, (just a note, it
will throw the procedure off a little to add
the water before mixing, the rice tends to clump, so be sure to follow
these directions).
6. Carefully spoon this mixture into an 8 oz Mason jar,
put the mixture in very loosely, do not
pack it down.
7. Now that you substrate is mixed and in the jar, wipe
around the rim of the jar with a paper
towel.
8. Fill the jar with dry horticultural vermiculite to
the very brim, again donut do pack the damn jar,
do it loosely, but be sure to fill the jar.
9. Next, close the jar up, wrap the entire jar in aluminum
foil, the cake is now ready for the
pressure cooker.
Back to reference list.
COOKING
THE SUBSTRATE
You will need a pressure cooker to grow shrooms, one that can cook at least up to 15psi(pounds per square inch). I use a six quart pressure cooker. It works fine and will hold up to six rice cakes at one time. The directions for this part are simple.
1. Wrap the jars in Aluminum foil.
2. Put the jars, in the pressure cooker.
3. Fill the pressure cooker up with water, about half way up the jars is plenty good.
4
Cook the jars at 15 psi for a full 20 minutes, you must wait till the pressure
cooker reaches 15
psi. You just have to be
familiar with your pressure cooker to know when this happens.( a short
note: I put the burner on
high till the cooker comes up to high, then I turn it down to medium high)
5. Wait till the pressure cooker cools down (about an hour), then remove the cakes.
6.
It will take anther 3 to 4 hours for the cakes to cool down completely
before you can move onto
the next step- inoculating the jars with spores.
Back to reference list.
INJECTING
YOUR JARS WITH SPORES
To inject the spores, you will need a clean viable syringe with spores in a watery solution, an alcohol burner, and a glass of water. Remove the foil from all the jars you wish to inoculate with spores. Cut 4 small pieces of tape for each jar you will be injecting and have them handy.
1.
Cook a coffee mug full of water in the microwave until it boils. Cover
and let it sit for 30
minutes.
2.
Light your alcohol lamp.
3.
Unscrew and remove the ring around the mason jar, but do not remove the
lid. This exposes the
holes in you lid.
4.
Remove the cap off the syringe, place the needle of the syringe in the
flame of the lamp, and heat
until it starts to glow.
5. Dip the needle in the cup of water.
6.
Now working quickly put the needle into one of the holes, pushing it down
as far as you can.
Press up against the glass lightly if you can and inject just the tiniest
bit of solution into the jar.
About ¼ of a ml is all that is necessary, I try to use 1 ml per
jar.
7.
Next, repeat steps 4 and 5 and proceed to the next hole until you have
done all four holes.
8.
Then place one piece of tape over each hole and return the ring to your
jar.
9.
Your jar is now injected with spores. Place in a warm place, 70-85 degrees
Fahrenheit. The
warmer the better for this. No light is necessary.

This part is simple. Once the jars are injected, nature will take care of itself. In 7-10 days tiny white dots will start appear. This is the mycelium. Over the next 3-4 weeks this mycelium will completely cover your rice cake. Any color other than white is bad-gray or green are by far the most common contaminants. If these appear throw out the rice cake immediately and thoroughly clean your Mason jar. After your cake is completely covered with white mycelium, you must know wait for fruiting to start. Then you will need to remove the cake from the jar.
Once the cake is completely covered with white, it is actually safe to remove the cake from the jar. However, I advise waiting until fruiting starts. This may seem difficult, especially with your first batch, but cuts quite a bit of time off of the overall process time. After colonization is complete, it should not be longer than another 7-10 before fruiting begins. You will know that fruiting has begun when you see little pinheads forming on the white. These are actually your first true signs of mushrooms. I wait until I see little red dots on white stems. Then it is time.
1. Remove the ring and lid for the jar.
2. Scrape away the loose vermiculite from top of the cake.
3. Replace the lid to the jar.
4. Flip the cake over, and give the jar a fairly good tap-enough to knock the cake loose.
Back to reference list.
CARING
FOR YOUR CAKES IN THE AQUARIUM
Here comes the big change from the original version-the use of perilitte in the aquarium. Fill the bottom of aquarium with about an inch and a half of perilite. Then slowly add water to just below the level of the perilite. You must be careful not to add too much water. Then add about two or three tablespoons of hydrogen peroxide throughout the aquarium to help keep out infection. Next, add about another quarter of an inch of perilite to the top. Smooth this out as much as possible to make it level. After about two weeks, simply add another 6 to 8 ounces of water. You will need to clean out your aquarium and change the perilite about every 4 to 5 weeks.
You are now ready to add your fully colonized cakes. Simply place them right on top of the perilite. You will need to open the aquarium about every three days and fan over the top. This is done to avoid the buildup of carbon dioxide in the grow chamber. You have to fan to remove the CO2 because the gas is heavy than air.
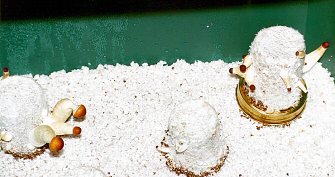
Here is a picture of a few cakes in full fruiting action on perilite. Notice on this picture that one cake is on a lid, while others are not. This is a personal preference. I typically just set them right on the perilite, The metal from the lids tends to rust. I have experimented with cut outs from plastic plates, but to date have not had any problems with setting the cakes directly on the perilite.
Back to reference list.
PICKING
FRESH MUSHROOMS
You will be amazed how fast the mushrooms
grow. You will want to pick the mushrooms right at the peak of potency,
which is right before the cap opens. At this point the mushroom would get
larger, but not any more potent, therefore I choose to pick then and put
the mushroom into the drying stage. Each cake will give you anywhere from
3 to 7 mushrooms, all varying in size. The cake will produce mushrooms
for about 10 days; at this point I discard the cake. If you leave it it
the grow chamber, it will grow more mushrooms eventually. Yet I find
the lapse is the not worth the risk of infecting your grow chamber.
As a cake ages, watch for any odd coloration's. ( Another option is to
bury the spent cake In a hole in the yard. Some people have told
me that every time it rains, mushrooms grow in the spot. I have yet
to do this, so I am skeptical.) The expected yield for each cake is about
2 to 3 grams of dried mushrooms.
Just a quick note, many little deformed mushrooms and white blobs of fungus will appear on the cake all the time, especially in the beginning of the process, I have no idea why. What I do know is that they are perfectly edible, in fact they are about twice as potent as the bigger mushrooms. I usually keep these for myself. So always always always completely clean the cake off of every white blob and tiny mushroom before discarding.
Back to reference list.
DRYING
YOUR MUSHROOMS
To dry your fresh mushrooms, you will need a product called Damp Gone. This is a desiccant, used for keeping dampness out of basements and closets. It is sold at any hardware store. Be careful what you buy because there are similar products on the market. One is actually called Damp Be Gone. How to tell that you have the right product is that it looks like brown kitty litter. This product is completely safe and non-toxic. Place the Damp Gone in a pan or a bowl. I use an ordinary cooking pan. Fill your container with Damp Gone up to about an inch from the rim. At this point you will need a screen to cover the pan with the Damp Gone inside. The pan with Damp Gone inside and a screen on top will then need to be placed inside a garbage bag, so you can seal off the environment with a twist tie. To dry your fresh mushrooms and mushroom bits, simply place your mushrooms on the screen over the Damp Gone. Fresh shrooms will dry in about 3 days to a rock hard brittle state. They are now ready for storage; I recommend a plastic container that seals with a lid. The shrooms will remain potent for months to come.
One note about Damp Gone-be sure you by the type that looks like brown kitty litter. This desiccant can be used over and over; thus one purchase can last forever. After drying approximately one once of mushrooms, you will notice that your Damp Gone is becoming Water Logged and not drying the shrooms as fast as it once was. No problem-place the Damp Gone in the pan into the oven for one hour at 400 degrees Fahrenheit and it will be as good as new. The oven will emit odd smells, and maybe a little steam, but there is no need to worry. Remember you are drying the desiccant out, so the steam is from this process. You may do this as often as you like without harming the product; I have had mine for four years, without any problem.
One more note about drying-never dry to speed up drying by using heat. This degrades all the sacred goodness locked in the mushrooms. You must wait the two to three days it takes to dry them.
Back to reference list.
MAKING
A SPORE PRINT
This is probably the hardest and most frustrating part of cultivating mushrooms. This step is necessary if you want to continue to grow mushrooms without continuing to buy new spores every time you would like to inject new jars. I have successfully avoided buying new spores for 3 years at this point. For this process you will need 1 mature mushroom, a sterile piece of paper, and an appropriate container.
Picking the right mushroom is often a tricky process. You must be learn to watch the mushrooms grow, observing every detail of their growth. They start out as pinheads, then develop a large dark red head, next the stem becomes elongated. At this point, the dark red head will start to lighten and the cap will start to open. This is the point at where I pick the mushroom if I am going to consume it. For spore collecting purposes, you must let the mushroom cap open up and turn almost completely flat. This is where you must watch carefully. In nature, the cap will open and the mushroom will drop millions upon millions of spores into the air. The wind will carry the spores away and they will land in a suitable environment for growth. Your goal is catch these spores on a sterilized piece of paper, so you may manipulate them as you choose. You have approximately 12 hours from the time the cap flattens out until the mushroom will drop it spores, so careful observation is the key. Getting the mushroom at the right time is important, but just as equally important is keeping the spore print sterile.
1.
You will need to sterilize either a note card, or my favorite, a piece
of manila folder. Simply wrap
the chosen piece of paper
or folder in aluminum foil.
2.
Put it in the oven at 350 degrees Fahrenheit for about 3 to four minutes.
Make sure not to
scorch the paper.
3. Now
you must sterilize a container with a lid that seals completely. I use
a casserole dish. The
dish is completely glass and seals when closed-this is important. Your
container does not have
to be glass, but it should be able to seal. Put the closed container in
the oven at 400 degrees
Fahrenheit for at least 30 minutes. This will sterilize the container.
4. Let the card and the container cool completely before proceeding.
5.
From this point on, I recommend either washing your hands in alcohol, or
wearing gloves and
washing them with alcohol before handling the mushroom or the container.
6.
Once you are ready, pick your mushroom. Wipe a pair of scissors off with
rubbing alcohol, and
clip the cap of the mushroom off. Try to remove as much of the stem as
possible.
7.
Unwrap your sterilized piece of paper and place it into the dish. Do this
quickly as you do not
want the card or the open container to be exposed to the open air very
much. It is impossible to
avoid all exposure, yet
try as hard as you can to limit this.
8.
Now, Open the container one last time and place the cap of the mushroom
on the paper. Do not
press down on the cap, just rest the mushroom on the paper. You do
not want to damage the
gills of the mushroom.
9.
Immediately close your container. I recommend sealing the container
by placing pieces of tape
around the closed container. This will help avoid any accidental
openings.
10.
In about three days, sometimes sooner, you should see a dark purple ring
under the cap These
are spores. After the spores drop, wash your hands with alcohol and open
the container one last
time and remove the cap from the paper, then close and seal the container
until you are ready to
make a spore syringe. You may dry the cap you used to make the print; it
is still good, but not
great.
11.
You must wait at least three days before using your spore print; this gives
the paper time to dry
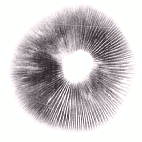
out. Here is a picture of an excellent spore print. This process took me
a number of tries to get
just right, so be patient.
Back to reference list.
In order to keep growing your own mushrooms you will need to learn to load your own syringes. All you need is a spore print, a syringe (10 ml or larger works best), a razor blade, an alcohol burner, and some sterile water.
1.
Start, by sterilizing water, simply place about 4 to 6 oz of water into
a Mason jar. Put a hole into
the lid of the Mason jar. The hole is important because if you forget,
the jar will pressurize shut
and when you force it open, air will rush in, possibly carrying contaminants.
Wrap the jar in
aluminum foil.
2. Put in the pressure cooker at 15 psi for a full 60 minutes. Donut skimp on the time at all.
3. Let the water cool down, it should take at least 2 hours.
4.
While waiting for your water to cool, you must sterilize your syringes.
Make sure the syringes
are closed and have no liquid in them at all. Wrap the syringes in
Aluminum foil, and prop them above the water in the pressure cooker. To
do this I simply turn a
couple of extra mason jars upside down and lay a rack that came with my
cooker across
the jars. The idea is to
allow the wrapped syringes to experience the heat of the cooker
without
getting them into the water. Cook the wrapped syringes at 15 psi for 10
minutes.
5. When they are done, let them cool, everything should be cool within 2 hours.
6.
Gather the spore print, the wrapped syringes, the sterilized water, and
the razor blade all in front
of you.
7.
Wash your hands thoroughly with alcohol. Cut the tape on the spore print
dish, so you can easily
access it.
8. Working quickly, wipe the razor blade off with alcohol, then unwrap and open the sterile water.
9.
Quickly grab the spore print and with the razor blade, scrape all the spores
off the print into the
water, then quickly close the jar up.
10.
Unwrap a syringe, heat the needle as you did while inoculating, then open
the jar with spores
and water insert the needle and very slowly fill the syringe with spore
water.
11.
Repeat this until you are out of syringes or solution. I usually use one
spore print to fill about
50 ml of syringes. Some people claim this is an absurd waste and
that you could actually get
about 500 ml of spore solution
out of one healthy print. I do this to cut down on my chance of
contamination,
which is your greatest enemy in this whole process. You will never be able
to
completely avoid doing away with all contaminants, so the idea with my
process is to outnumber
the contaminants. Using such a high concentration of spores has given me
phenomenal
success. Your newly loaded
syringes will work best after three days, they need
to adapt to their
new watery home. The syringes
will last about six months.
Back to the top of the page.
Back to reference list
SOME OF MY FAVORITE DRUG RELATED LINKSThe Drug & Psychedelic Q & A The Shroomery