Volume Clouds by Rory Hallman
After you are through with this tutorial you will know how to create
realistic clouds with volume fog.
Volume clouds are processor intensive when rendering. This file
can be downloaded at the bottom of the page.
Step 1: For volume clouds
to work you must first define the limits of the scene. For the renderer
to know when and where
to stop rendering you must create a backdrop. A booleaned sphere or
a box works fine. For my example I will use a booleaned
sphere.
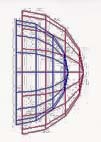
Make a hemisphere with a radius of 50 and 16 segments.
Click on the scale button.
Scale the sphere down 10% while holding shift. 3dsmax will ask you
if you want to clone the object, select copy and click ok.
Move the inner sphere so it is offset with the outer sphere.
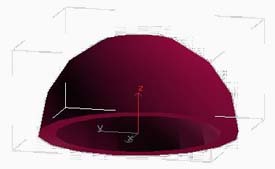
Step 2: Next boolean the spheres
together.
Select the outer sphere.
Under geometry pick compound objects.
Select boolean then pick copy and select the inner hemisphere.
You now have made a good backdrop.
Step 3: Set up a camera inside
and the sphere.
Tilt the camera so that it has the inside of the sphere in it's view.
Select a blue material for the sphere.
Step 4: In the Render enviroment select add volume fog.
Select exponential.
Density 40
Step size 4
Max steps 100
Select fog background
Select fractal noise.
Noise threshold high =1
noise threshold low =.2
uniformity =0
levels =6
size =40
wind = front
phase =0
strength =0
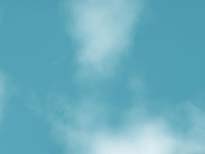
Select the camera view and render. Be patient because this is very processor
intensive. You can add ground and
whatever else you would like to the scene. These clouds appear to be
real without adding any geometry to your scene.
You can even do a realistic fly through. If you would like to
just limit them to a certain place in your scene use an atmoshpereic
apperatus in the helpers rollout.