

This walkthrough has been written from scratch by me, Deschain. Do what you please with it, but please don't claim it as your own work. Also, don't just use this to get through the game without thinking for yourself. Silent Hill is meant to be experienced. This guide is for people who are genuinely stumped. Silent Hill and the images on this page are copyrighted by Konami. Thank you and see you in Hell. (Otherwise known as Silent Hill.)
Q. How do I solve the piano puzzle?
A. The order for the keys is 3, 10, 11, 8, 2. Be sure you count the black keys.
Q. How do I save Cybil?
A. To save Cybil you have to get the bottle from the Hospital Kitchen and use it to collect this red liquid in the Director's Office. You must do the the FIRST time you get to the hospital. (Right after the school). Then when you fight Cybil on the Merry-go-round, you can run around till she's out of ammo or go after her right away. Either way, get right next to her and use the red liquid. Harry will toss it in her face and voila!.
Q. How do I save Kaufmann?
A. To save Kaufmann, go to Annie's Grill after you come out of the sewers. Use your map to locate it. You must also follow the trail of clues left by Kaufmann to open the motorcycle in the motel garage.
Q. Can I save Lisa?
A. So far as I know, there is NO way to save Lisa.
Q. What do I do in the room with the symbols and buttons?
A. To solve the Zodiac Puzzle, put the number of appendages (arms and legs) the symbol has into the number panel.
Q. What do I do at the altar?
A. Use the flash camera on the pictures at either side of the altar to reveal shapes. Use the buttons on the doors to mimic these shapes and unlock the doors.
Harry Mason slowly regained conciousness. It's cold was his first thought. Suddenly he remembered Cheryl and looked over to find the passenger seat empty. Panic threatened to overtake him for a moment, but he slowly regained his composure. She probably just went to get help, he thought. Jesus, it's snowing! he realized. Okay, this is getting weird. I better find Cheryl. Stepping out of the car he suddenly realized how quiet everything was....
This is where the game begins.you can check your wrecked car for a health drink, then head down the road until you see something in the fog.
Suddenly Harry noticed a figure in the overwhelming fog. Cheryl! Is that Cheryl? Without warning, the little girl took off across the street and into an alley.
Just follow the girl down the alley and open the gate. Notice the mess just inside? Keep heading down the alley. Slowly it turns dark.
Why is it turning dark so quickly? Harry wondered. Looking in his pockets he pulled out a book of matches and lit one. In the distance he heard the ominous sound of sirens. What the hell is going on here? His mind raced. A wheelchair lay heaped in the corner. Harry grew more desperate. He started to walk quickly, then broke into a run. A gurney sat in the middle of alley. This is insane! he thought. He realized he was stepping in puddles of blood. Then turning a corner he saw something hanging on the fence...
A body is strung up on the fence with barbed wire. After examining it, three small figures emerge out of the darkness. There's not much you can do. The path you came from is blocked by a fence. Just let the little bastards kill you.
Again Harry sinks into the unconcious world...
You awaken in a small diner with a young police officer watching over you. After you ask her what's going on she tells you she doesn't know and now the game truly begins. Cybil gives you her gun and goes off for reinforcements.
Okay first things first. Grab the health drink, map, flashlight, knife, and anything else you see. When you try to leave, the radio in the corner goes berserk, then a flying creature bursts through the window. Don't give it a chance, just blast the almighty piss out of it until the radio falls silent. Now, pick up the radio and get going.
Directly to your right as you leave the cafe are two boxes of bullets for your convenience. If you go left to Queen Burger (don't forget to check your map for these locations) you'll find a health drink on the window sill, then another flying beastie comes around the corner. Shoot it or run; it's your call. Now head for the convenience store. Inside you'll find several health drinks, a first-aid kid, and a save spot. Once you're done, head back to the alley where you (died?) were looking for Cheryl. Beware of the dogs and more flying bastards. Eventually the alley is blocked by debris. Here you'll find two more boxes of bullets, a steel pipe, and a clue: Cheryl's sketchbook with the words "To School" on one of the pages.
Now you can wonder all around the town and soon you'll find that all the roads to the school all gone. Here's what you do: Going south on Levin St., turn right on Matheson. At the edge of the chasm you should find more sketchbook pages. These say: "Dog House" and "Levin St". Return to Levin St. and find the house with a doghouse in the frontyard. (On the west side of the street.) Check it, and you'll discover a house key. Enter the house, collect the items and go to the back door. It's locked, but next to the door is a map which reveals the locations for the "Keys for Eclipse." Once you check the map, the locations will automatically be copied to your map.
Okay, let's go to the far right corner of the map, to the end of Finney St.. You should find a wrecked police car. Check the trunk for the first key. There should also be a box of bullets. Now, go to the alley in between Bachman Road and Ellroy Street. Halfway through the alley there will be a gate. Go through it, and inside you'll find a severed dog's head (yuck), a health drink and the second key. Okay, the last one is on Ellroy St., as far south as you can go. On the west side of the street, there will be a branch that extends over the chasm a little ways. Cross it and you'll come to a small chunk of land with a bloody mailbox. The third key is inside the mailbox. Grab it and head back to the Doghouse.
Now unlock the back door and step outside.
Oh no it's getting dark again already? Harry wondered.
Grab the health drinks off the table and go to the back gate. My advice now is to switch off your flashlight so you won't be spotted. Take a left and run like hell until you get to the main road. Turn right on the road (Matheson), then at the intersection you can turn right and go all the way north for some health drinks and ammo, but you'll also find two dogs, or head left to go straight to the school. You can also go inside the school bus for some health drinks. If you get lost check your map, people! Just remember to do it somewhere safe so you won't be seen.
Now, you're inside the school, right? In the very first room, grab the School Map. Go through the doors and into the main hall. Go right first. The double doors at the end are locked, but next to those is the infirmary. Inside there are a couple of health drinks, a first-aid kit, and a memo pad. Now at the other end of the hall you'll find a reception desk with three bloody books.
Harry looked down at one of the books. The first read:
The next one said:
"A place with songs and sound"
The third one gave Harry the chills:
Harry shuddered.
These are your first clues to the three puzzles ahead.
Behind the desk is a door to the teacher's lounge. Inside you'll find a box of bullets and a strange picture on the wall. Now go through the center doors into the courtyard. You'll run into some child zombies. Three shots will knock them down, then quickly stomp or kick them so they won't resurrect. Through the next set of doors, more zombies assault you. Take 'em out, then go into the middle doors. You'll find some ammo and a Black Ghost. Don't worry, they can't hurt you. Exiting that room, go right. In this hall, the Teacher's Room doors are jammed. You can find some ammo in the bathrooms, and unlock the door to the main hall. Now head upstairs.
You can explore the classrooms for ammo and health drinks if you please, but after that head for the Lab Equipment Room. Inside you'll find distilled water and glucose which you can't take, and a chemical which you can.
Take the chemical into the Chemistry Lab. There you'll find a statue hand which is tightly clutching a gold object. Pour the chemical on the hand and it dissolves. Now pick up the Gold Medallion. You can go right coming out of the Lab and into the next hall. Explore the classrooms and the Library, then head down the stairs. Unlock the door leading to the main hall and if you want you can scour the classrooms down there, too. When you're done go outide to the courtyard and to the Clock Tower. If you look at it, you'll notice the door is locked and the hands are stopped at 10:00, like the book said. Put the Gold Medallion in the groove on the left side. If you look again you see that the hands are now at 12:00. So you need to find a place with songs and sound. Where else? The Music Room.
If you explore the locker room you'll find a thumping locker. Go ahead, open it. I dare you. Once that's over go to the Music Room. You'll find a piano with blood on the keys and a poem on the blackboard, written in blood of course.
It reads:
I've answered this question for people many times. I wonder if anyone can figure it out with these clues: (challenge)
1. The color of the birds corresponds to the color of the keys.
2. The birds have no voice.
3. Where do the birds land?
If you still can't figure it out, then I'll just tell you. If want to figure it out on your own, don't read below.
3, 10, 11, 8, 2. Ya happy now?!?
Okay moving along. When played in the correct order, the Silver Medallion falls to the floor. Same drill as with the gold one, stick it in the Clock Tower. Now it's 5:00. Head for the basement, and turn on the boiler with the red light. You'll hear an ominous grumbling sound. Get ready, cause things are about to get really, really strange.
Go back to the Clock Tower. Take a deep breath of that snowy air, you might not be breathin' it again for a while. Okay, now step into the Clock Tower....
As soon as he had stepped inside, Harry began to have second thoughts. I really don't want to do this, he thought as he descended down the ladder. At the bottom empty bottles were strewn across the ground, and faintly, in the distance, he once agin heard the mournful sound of sirens. Not again! he groaned. Ignoring the warning sign hanging over the door, he began to climb up the opposite ladder. Over and over he thought, what will I find? Harry opened the door and stepped outside.
The first thing he noticed was that the snow had turned to rain, and it was no longer so cold. The second thing he noticed was that he seemed to be in the courtyard he had just left. Have I been here before? he wondered. The last thing he noticed was the symbol in the center of the courtyard. "I don't remember this being here before," he muttered to himself.
Welcome to the Nightmare School. The map is the same, but everything is now twisted and evil. The school now looks like a torture den. Head to the double doors across from the Clock Tower and step inside. The floors have turned to an ugly and rusted metal grating. Wonder what lies below? As soon as you step in, prepare to be assaulted by two or three zombie children. Once you've taken them out, go to the double doors across the hall. Inside is a huge fan with blood and gore smeared on the blades. On the benches you'll find some bullets and a first-aid kit. Now go to the Storeroom down the hall. On a table towards the back you should find a pink rubber ball to take. Now to the hallway. Head left as you come out of the storeroom and go to the door next to the double doors at the end. Inside here you'll find a few giant cockroaches, one shot from the handgun and then a good stomp should finish them. Now into the door to the right of the door you came in. (Still with me?) You should now find yourself in a long, narrow hallway. In the center the hall is blocked by a fence. Go into the classroom to go around. More zombie kids come at you in the first room. In the next one is a large table, where you'll find a picture card lying on top. A picture of a key...hmmm. Now go out the door and you should be on the opposite side of the fence. Look for a health drink on one of the benches. Another fence blocks the stairwell, but you can still get to the main hall. Zombie children abound in this hall, go to the infirmary for health and a save spot. Back in the main hall, you can unlock the doors to the courtyard if you wish, then go into the entry hallway.
The floor in the center of the room was gone, leaving a gaping black abyss. Above the hole, bodies were strung up on the ceiling along with mysterious cages. In the corner lay a heaped wheelchair. A wheelchair in an elementary school?
Get ready for even more zombie brats. After they've been dispatched, look in the wheelchair for an Ampoule. Back in the main hall, the double doors to the next hallway are locked, so go to the Teacher's Lounge. Remember the ugly painting on the wall here before? Now you're in it. A huge stone door with no knob or handle confronts you. Whip out the Picture card you found earlier and slide it in the slot. Open sesame. Now go to the boys' bathroom FIRST. There are no stalls, save for one at the end of the room.
The stall door creaked open and a hanging corpse greeted Harry. He was now nearly beside himself with fear. On the floor of the stall however, lay something more reassuring. A sawed-off, double barreled shotgun kind of reassuring. Harry picked it up and looked at it admiringly. On the wall written in blood were the cryptic words "Leonard Rhines - The Monster Lurks". What does that mean, Harry wondered.
Meet ol' Double Barrel. Now to the girls' bathroom. When you leave you suddenly find yourself on the second floor. Go the boys' bathroom here for some Shotgun and Handgun ammo. Now back in and out of the girls' bathroom to return to the first floor. Head into the Teacher's room and kill more monsters. Then in the next room, you find a long table with blue telephones on it. Weird. Now go to the door.
One of the phones suddenly rang and Harry nearly jumped out of his skin. With a shaking hand, Harry picked up the receiver of the ringing phone and with a bemused expression noticed there was no cord connecting the receiver to the phone, or the phone to the wall for that matter. He listened to silence for a moment, then amazingly Cheryl spoke on the other end. "Daddy?" she cried in a terrified voice. "Daddy, help me! Where are you?" she pleaded. Harry was so shocked it took him a minute to find his voice. "Cheryl!" he cried. But Cheryl was gone with a click. Then there was a busy tone. Harry crazily thought about waiting to see if the operator would begin talking, but then decided he didn't want to know. "Damn!" he yelled, slamming the phone. With a newfound determination he exited the room.
Out the room up the stairs all the way to the 3rd floor, the roof. You now have access. In one corner of the roof are three points of interest: a valve handle, an empty drainpipe, and another drainpipe with a key inside. Look inside both pipes. You can't reach the key with your hand, you'll have to think of something else. Remember the pink rubber ball? Put it in the empty pipe. You did CHECK both pipes didn't you? Now turn the valve handle. Water pours out over the rubber ball and washes the key down the drain. Go all the way back to the courtyard to retreive it. It will be lying next to an outflow pipe and a puddle of water. Now back upstairs to the second floor. Explore the classrooms to your right as you come out of the stairwell. In the hall where the music room is, you find still more Zombie kids (sick of 'em yet?). Music room door is jammed, go to the locker room.
Harry stepped into the locker room. Just like before, one of the lockers was thumping, as if something inside wanted out. Harry walked to the pounding locker, and tapped it. The noise stopped and the locker door creaked open. Nothing inside but blood. Harry turned to leave...
Surprise! Search the corpse for a key and leave the locker room. Now up to the hall with the Chemistry lab. The lab and storeroom are both jammed. Use the key you found on the library reserve door. Inside is a book. Leonard Rhime's "The Monster Lurks". Read it and then go to the library next door. In the library you should find some ammo and another book.
Hearing this, the hunter, armed with bow and arrow said "I will kill the lizard," but upon meeting his opponent,he held back, taunting, "Whose afraid of a reptile?" At this, the furious lizard hissed "I'll swallow you up in a single bite!" The huge creature attacked, jaws open wide. This was what the man wanted. Calmly drawing his bow,he shot into the lizards gaping mouth. Effortlessly, the arrow flew, piercing the defenceless maw,and the lizard fell down dead.
After story time, go into the hall and use your Classroom key in the classroom door. Expect more of those #$%&**^ zombie children and some ammo. Now into the next class and next hall (you know the drill) and down the stairwell. Now you can unlock the gate that previously blocked you path. Head to the infirmary and save, cause you're about to meet one bad dude. Down in the basement go into the storage room first. You'll find two shotgun shell boxes and another Ampoule. Now to the boiler room. You'll find a very Myst-like puzzle involving valve handles, and two rotating gates. The order for the valves is: Turn the RIGHT one left TWICE, and the LEFT one right ONCE. Now proceed through the passage and an elevator takes you down below.
The darkness was impenetrable; overwhelming. Harry struggled to see - something, anything. Then with no warning a fire sprang up in the middle of the room, igniting a corpse sitting there. Then something growled.
Meet the Lizard King. You can blast away at him, but nothing seems to happen. Remember the story? When the lizard gets close enough, it opens its jaws. When it does this step out of its range and fire shotgun blasts into its mouth. After a few times of this, the monster falls down dead. Simple.
No sooner had he finished the beast when the light died again. The sound of sirens filled his ears, shrieking their terrible song, then they too faded out. Slowly Harry realized he could see again, and found himself looking at a young woman leaning against some machinery. She looked up at him and smiled, then faded like a mirage. "What was that? Who in the hell was that?" Harry asked no one in particular. He looked where the girl had been standing and saw something lying in the floor.The girl has left behind a key. Take it and leave the room. Upstairs Harry notices an odd sound. Church bells? After all that the fog and snow seem almost serene, huh? You can check the list at the reception desk for the location to use the key you found. You can now leave the school.
Now head down Bradbury Street. There is an alley in between Midwich and Levin. Towards the back is a gate to a backyard. Go inside and use the K. Gordon key to open the back door. Grab anything of interest in the house and then head back outside and further down Bradbury. In between Levin and Bachman is another alleyway which leads all the way up to Bloch. To the left as you come out of the alley is the Cut-Rite Chainsaw store, and down to your right is the Balkan Church. Head to the church. Inside you meet someone.
Dim light filtered through the church windows and onto the altar, where a person stood with their back to Harry. Slowly the figure turned around and Harry found himself looking at an older woman wearing a man's necktie and no shoes. Her face was nearly covered in bright makeup, and Harry nearly laughed at the absurdity of the situation. "I knew you would come," she told him. "It was foretold by Gyromancy." Now Harry was simply confused.
The woman starts babbling about all sorts of things and then locks herself in another room. On the altar she leaves behind two items: the Flauros and the Drawbridge key. There is a health drink to the left; take what you need and leave. A little farther east of the Church is a gas station, if you've played through once you'll find the gascan inside, which you can either use on the chainsaw back down at the chainsaw store or save it for the rockdrill. If this is your first time, you can also find a box of bullets. If you go south on Ellroy you'll find an small area with a truck and some more handgun and shotgun ammo. Now cross over the bridge. Halfway across is a control tower. In the bottom floor you can find the rockdrill. On the top you'll find a control panel to use the drawbridge key in which obviously lowers the drawbridge and a map of the shopping district. Also, on either side of the bridge where it begins you can find some steps leading down. Some of the steps have ammo lying on the them.
X-steps
___/________________
BRIDGE
____________________
\
X-steps
Once all that is over with, head across the now-lowered drawbridge and into Central Silent Hill. You should check out the Police station first, especially if you're needing shotgun ammo or if you missed the shotgun in the school (how could you?). There's a chalkboard with notes about drugs being sold to tourists, and a memo concerning the recent death of a police officer named Gucci. Now that you're though with that, set sail for the hospital. On the south side of Koontz street is the hospital and if you're a brave soul you can venture a little farther east until you find an alley with some cars and a couple of health drinks. Now you're all ready for the hospital.
Harry stepped through the door and into the Alchemilla hospital. As soon as he stepped around the corner, he heard a gunshot in the next room. Cautiously he opened the door and peered inside. A man sat on a chair with a blank expression, holding a pistol and looking at the bloody corpse of the monster he'd obviously just killed.
Meet Dr. Michael Kaufmann. After nearly popping a cap in your ass, giving you a questionable story about what happened to him, and then telling you that you're daughter's probably monster food, he takes his things and leaves. He's fun like that.
Once Kaufmann leaves, go into the door left of the door you came in. You'll pass through an empty room, then end up behind the reception desk, where a health kit and a map of the hospital are yours to plunder. Now back to the room where you met Kaufmann. Go into the other door you haven't been in, through the room with a newspaper (complete with clipped-out article), and into the next hall. Exploring the rooms one by one: in the conference room you can find a basement map and basement key, in the kitchen you can grab a health drink and an empty bottle, and in the Director's office, use the bottle to collect the spilled red liquid. Now muster up your nerve and go down to the basement. In a room to your left (Harry's left), you find the generator. Turn it on. Mind the cockroaches and head to the elevator. Check the second floor...door is jammed. Third floor...door is also jammed. Fourth floor...wait! That wasn't there before was it? Mwuhahahaha! When you leave the elevator at the fourth floor, you'll see a clip of the mysterious girl you saw in the school walking into an anique shop.
Well now here you are on the fourth floor. Everything is very old and rusted looking. Go through the double doors and into the hall. All the doors are jammed, continue ahead to the next double doors. It gets darker as you run. In the next room the darkness is total and Harry switches on the flashlight. The doors lock behind you. Straight ahead until you find the stairwell. You're on the 3rd floor? Good. Go through the doors on the landing. Meet the mutant nurses. Introduce them to Mr. Double Barrel. Now that the pleasantries are over, let's get busy.
Since there are many rooms to explore I'll just go by what's to be found in each room. So bust out those maps.
In the men's restroom you find the blue plate of Turtle. In room 302 you find some ammo, a notepad, and an ancient VCR. You have nothing to put in it yet, so continue on. In room 304 you can grab some health, and you may notice a steel plate screwed to the wall. Don't worry about it right now. In room 306 you find the yellow plate of Cat. Now back to where you came in, go through the center room with the washing machines. In the storage room you can find some handgun ammo, a health kit, and blood pack. Go back down the stairwell to the 2nd floor. In room 201 grab the lighter. In room 204 you come across snake-like creatures sticking out of the wall. Use the blood pack, and Harry will toss it to the side where the snakes lick it up in a frenzy. Now walk past them and grab the green plate of Hatter on the windowsill. In the Nurse's center you find a locked door and a poem:
Head back to the stairwell and go down to the 1st floor. Take out the doctor and go right. In the center room on the map, you find a locked door. Beyond a noise can be heard (?). In the director's office you find the red plate of Queen and a save spot. In the kitchen you can snag some health. And in the office you can find some bullets. At the end of the hall by the elevator, check the vending machine three times for three health drinks. Now back upstairs to level 2. Return to the nurses' center. Arrange the plates on the door according to the poem, by color. Clouds flowing over a hill = white, sky on a sunny day = blue. Understand? Good. Be ready for lots o' zombie nurses on the other side. In the operating room you find a basement storeroom key. In intensive care grab the disinfecting alcohol, and in room 206 you can get a health kit. Now unlock the doors to the elevator room and go down to the basement. Check the morgue for an ampoule and health. In the generator room grab the emergency hammer (yay!), and in the basement storeroom you can find two boxes of shotgun shells (yay again!). Push the cabinet in the corner aside to reveal a new door. (Intriguing..) In the next room you find a grate covered with vines. Douse the vines with the alcohol and start a bonfire with the lighter. Now step down into the passage.
Harry stared down a long and unimaginably dark corridor. His small flashlight only illuminated the space a few feet in front of him. A cool musty wind blew by. Everything was totally and utterly silent.
Proceed down the corridor. At the end is a gate that's jammed. A little way back and on the left ,(your left), is a door that isn't jammed. Step inside. Now you have several more doors confronting you. Go to the one immediately right. You'll find a videotape. All the other doors are jammed except one on the far left.
A bed sat in the middle of the room. On a table next to the bed was a picture. Harry studied it for a moment, and was surprised to find that the girl in the picture was the one he had seen in the school basement. There was a name at the bottom: Alessa...
Grab the examination room key next to the picture, and it's time to get the hell out of here. All the way back to the first floor, to the door where you heard a noise. Unlock it and go inside.
Harry swept his flashlight across the room, curious to discover the source of the noise. At first he saw nothing, then a fleeting glimpse of movement caught his attention. Huddled under a table was a shivering figure. Suddenly the person broke out from under the table, stood up and burst across the room towards Harry, who scarcely had time to react. He was confused when the figure fiercely embraced him. The person looked up, and Harry found himself looking at a very young, and very frightened nurse. Harry found that he couldn't move his eyes away, because there was one other detail to the person. She was beautiful.
Meet Lisa Garland. She is extremely happy for having found another normal person. She tells you that she too, hasn't a clue as to what has occured in the town. But before your conversation can continue, you are interrupted.
Without warning, the sirens split the silence with their insane shriek, so loudly that it seemed to Harry as if they were in his own head. He barely heard Lisa when she asked him if he was all right. Then there was nothing but the awful sirens, louder than bombs, louder than screams, so loud he felt that his mind was about to snap, leaving him hopelessly mad. Then, as suddenly as they started, they faded out. Harry found himself back in the hospital. Not the dark one, only what passed for the light one. The person standing by the door was not Lisa, it was the stange old woman from the church.
She introduces herself as Dahlia Gillespie. "The other church, that is your destination," she tells you. Then she leaves the antique shop key and exits. Grab the key and leave the room. Check the payphones in the hall and Harry will mark the location of the antique shop to the map. Let's get moving.
If you haven't visited the police station yet, now would be an ideal time. Otherwise, look for the antique shop in the top right corner of the map. Once there, push aside the dresser against the wall. Harry discovers a secret passage, and Cybil makes an appearance. She tells you she saw Cheryl near the lake, but Cheryl vanished into thin air. Harry resolves to go to the lake, but Cybil reminds him Bachman Road's the only way, and it's destroyed. After all that, Harry explores the secret passage and discovers a strange altar. Is this the other church? Grab the axe off the wall and leave. As he is about to leave, the candles on the altar flare up. Cut to Cybil who has become concerned over Harry's silence. She sets out to investigate the passage and finds the altar. But Harry is nowhere to be found.
Darkness again. Harry woke in the antique shop, but like before everything had changed. Now a new, disturbing thought began to flicker in his mind. What if this is all a dream? What if I'm still unconcious from the wreck? He pushed the thought back and tried to ignore it.
Leave the antique shop and get ready for some fun. Outside there's plenty of monsters just itching to feast on your flesh. My advice: switch off the flashlight. If you look around you'll see the streets are impassable in either direction. Head to the town center, it should be just a few doors down from the antique shop. The security gate has a large hole ripped from it, giving you access to the door. Once inside go to the escalator in the center of the room. Before you go up a nearby TV blinks on and an image of Cheryl restrained fills the screens. When that's over, continue to the second floor. Your radio starts going berserk, but nothing attacks you. On the left walkway, look for a door. Inside you can find some items and a save point. Afterwards, continue down. You'll see some larva-like creatures devouring a corpse. When you step closer, the floor gives way, spilling you back down to the ground. As Harry gets up, a very large larva-like thing pops out of the dirt. First thing you should do is grab the hunting rifle out of a broken store window. After that, keep running around to avoid the monster. When it misses you, pump as many rounds into it as you can. It should fall pretty easily. But it's not dead yet. It leaves by smashing through the doors to the outside.
Follow it outside. Now you're behind the Town Center. My advice again: switch off that flashlight, run south to Sagan. Run like hell all the way to Crichton, then south again to return to the hospital. Inside you'll meet up with Lisa.
Lisa was excited to meet Harry again. Harry on the other hand, was determined to get to the lake, and desperately inquired if Bachman was the only way. Lisa pondered it for a moment, then something occured to her.
Looks like the sewer is your only chance. Harry asks Lisa to come but she refuses. In the reception room make use of the save, an then step outside.
Harry stepped outside and paused, for everything was deathly still. Wary, he opened the front gates to the street. To his surprise, The road was destoyed on both sides of him. The only place to go was the building across the street.
Get ready for a fight. Ascend the stairs on the side of the building to the roof. Out pops the giant larva, now turned to giant moth. Your best bet here is to keep running, never standing still, and keep hitting it with shotgun blasts. Eventually it falls and you're transported back to the normal realm. Now return to the bridge from whence you came, back to Old Silent Hill. Not to worry once you're across, the game automatically takes you where you need to go, the sewer station near the school. There's a padlock, but it is easily destroyed. I recommend the hammer. Once inside, descend the ladder in the sewers below.
Since the sewers can be very confusing and difficult to explain in words, I've drawn up a few maps.
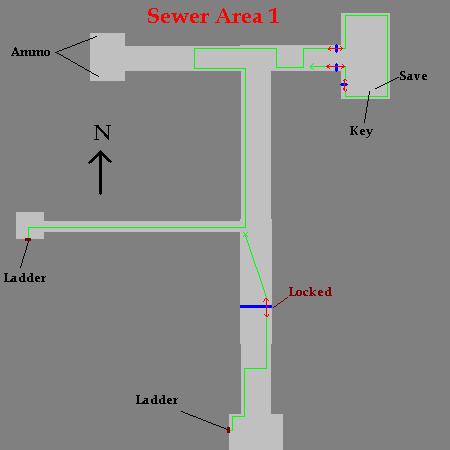
Part 1: Basically, just follow the green path I've marked to the key, then retrace your steps back to the locked door, and head for the ladder. You can also nab some ammo in the far corner as I've shown.

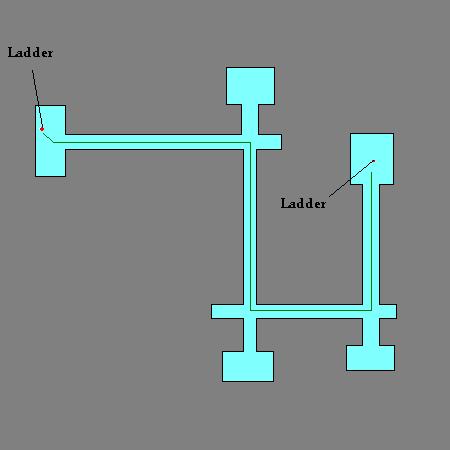
Part 2: Again follow my path. When you reach the key, you'll be ambushed by a bunch of MT's. Just grab the key and haul ass outta there. It's better to just conserve your ammo and health than attempt to fight all those bastards. For your convenience, a save point is located next to the exit. Now let's go back topside.
Relieved to be breathing fresh air again, Harry emerged from the sewer near Bachman Road. Looking around he found that it had grown dark again.
Explore the rubble for some ammo, and look for the sign near the street for a map of this area. Now, if you want to save Kaufmann, look on the map for Annie's Grill. I suggest you turn off your flashlight if your radio starts buzzing to avoid monsters. Once you've made it to the grill, you'll find Kaufmann being attacked by a jumping beast. Harry automatically shoots it, then Kaufmann gets up and kicks it for good measure. He says something about the military arriving then jets off again. Before he leaves, Harry asks him if knows Alessa, to which he promptly says, "No". Some thanks. Look around where he was attacked and you'll find he left a few things. Namely a receipt from a store called Indian Runner and a key. If you examine the receipt, you'll notice numbers on the back 0437. Now it's off to Indian Runner, it should be easy to find with the map.
At the Indian Runner, you'll find a padlock on the door. Use the combination from the receipt to open it. Inside you see that the place is trashed. Behind the counter are some things of note. First some rifle ammo and a health drink, a journal talking about drug deals, a locked safe, and on a note on the wall, the combination for the back door of Norman's motel: 0886. You can check the drawer behind the counter for a key to the safe. Inside is what appears to be drugs, but you can't take them, in either sense of word :). Now to Norman's Motel. On Weaver St. find the door with a keypad next to it and enter the combination. Inside grab the magnet off the couch and go through the open door to the front room. Unlock the door to the outside and go to the parking lot beyond. Find room #3 and use Kaufmann's key. Grab a health drink in the bathroom, and push aside the dresser to discover a crack in the floor. Use the magnet to retrieve the motorcycle key in the crack. Now go back to the office in the door next to the couch, and use the key in the motorcycle. Inside the gas tank you find a small glass vial containing a red liquid. At the next moment Kaufmann arrives, very angry with you for discovering what is obviously a secret of his. He swipes the vial and leaves. Oh well. Now your destination is the lighthouse. Head down to Sanford street and run all the way to the bridge.
Harry's mind was puzzling over the ordeal that had just occurred. That vial looked just like the busted one in the hospital. What is that stuff? As he was crossing the bridge though, something in the air changed. Uh oh, here it comes again,he thought. But it was different this time somehow. Rather than shifting from reality to a nightmare, this is more like reality becoming a nightmare. The feeling of impending events would not leave Harry.
Continue your run to the lighthouse. When you get to the pier, look for a board that extends over to a boat. Inside the boat you meet up with Cybil, then Dahlia makes an appearance, directing you to the light house and the amusement park. Cybil heads for the park and you set out for the lighthouse. Run as quickly as possible and try to avoid the monsters if you can, all while following the map to the lighthouse. Once there the only way to go is to the top. There you'll see Alessa, but as soon as you arrive she vanishes into the mist. If you have been using the Channeling Stone, use it here for the last time and you get the UFO ending. Otherwise leave the lighthouse, and you will automatically be taken back to the boat. Cybil has not returned, so Harry decides to go find her. Get back to Sanford street and go all the way to where the road ends. On the North side of the street, there will be a fenced in area which you can get in via an open gate. Avoid or shoot the dogs, and find the ladder going down into more sewers :( You see a brief scene whre Cybil is attacked from behind. Once inside, grab the map off the wall.
Pretty straightforward. I advise avoiding combat if you can, especially on Hard level. The clawed beasties don't go down easily, and there's hoardes of the buggers here. Also stay alert for the turtle-things who drop from the ceiling. There are a few items to be had, but you should keep moving to the end.
Once topside, you find yourself in an amusement park, and unfortunately there's no maps here. The only enemies are a few of those black ghosts that do nothing, and some demon kids from the school. Look for a concession stand which has a memo pad, and a carousel. There will some small steps leading up to a gate. Just keep searching, you should eventually find it.
Once there you see a quick scene of Cybil getting up from a wheelchair and looking very evil. If you got the red liquid, try to run up to her and use it. If not, you're gonna have to fight. The main thing you should worry about is her gun. Fortunately it's not a "Magical Gun"(tm) and it will run out of ammo, hopefully not in your rear end. My method is to run away at first. The merry-go-round starts up, and when you come back to Cybil, she's sitting on a horse (whee!) Take aim and shoot her once her twice when she hops down, now run like a little girl till the carousel starts again. Wash, rinse, repeat. When she's empty you'll see her throw the gun down. This is your cue to open a can of Whoop-Ass(tm) on her. Just be sure she doesn't get within Strangling Distance(tm), (okay, I'll stop now) as she hurts you pretty badly. Once she's bought it you see a gruesome cinema of her death. If you save her, she and Harry talk about Cheryl, and Harry reveals that he's not really Cheryl's father, as he and his wife found her abandoned near the highway as an infant.
Harry starts to leave when he encounters Alessa. He demands to see Cheryl, but Alessa calmly knocks him on his ass. Then Dahlia interrupts and reveals she is Alessa's mother.
Cut to the hospital, where Harry awakes as a very disturbed looking Lisa watches. They talk for a minute, then Lisa takes off. Harry hears a noise from the basement. He leaves the room to find a catwalk suspended over an abyss, leading to an elevator door. Harry decides to solve this mess once and for all.
Once the doors open, prepare for the final challenge. When you come around the corner you see a ghostly Cheryl running down the into a door. If you check, it's locked. Looking around, you may notice a resemblance to the hospital. The difference is, the whole place is kind of a mish-mash of all the places you've been to thus far. And there's no map :( You can explore the rooms, eventually, you want to hit the last door on the right. You'll find a classroom with a lone desk, and some hateful words carved in it. Go out the other door to find a few choice items: The Pliers and Screwdriver. Now leave the way you came. Go back to the door next to the elevator, where a faucet sits alone. Use the pliers to wrench the Key of Ophiel out. Now find the door marked Ophiel. Inside you'll find two more rooms with puzzles. For the Zodiac puzzle, go to the back where there are keypads below the pictures, and put the number of appendages (arms and legs) into the keypad 6, 4, 8. After you put in all three, the stone of time falls down. Grab it and leave.
Next you'll notice two signs. One is a list of names, the other a riddle:
Using these clues, arrange the names on the list in order from youngest to oldest. Take the first letters and you spell "ALERT". Inside you find an empty room and another door. In the next grab the Amulet of Solomon and leave.
"Harry?" The voice nearly made Harry jump. Looking over he realized it was only Lisa. Something was wrong, though. "I understand now. Why I'm still alive even though everyone else is dead. I'm not the only one still walking around. I'm the same as them, I just hadn't noticed before. Please stay by me," she pleaded. Suddenly Harry felt such a mixture of pity and revulsion he nearly screamed. Lisa approached, attempting to embrace him, but he shoved her away in a burst of panic. She hit the wall roughly then stopped. A single drop of blood trickled down from her head, curving under her eye, then running down her cheek like a tear. Then blood came from her nose, her mouth, till her face was all but covered. The once-beautiful Lisa, now a hideous monster with only traces of her former self, she stumbled drunkenly towards Harry. He wanted so desperately to help her any way that he could, but he knew was powerless to save her. With as much courage as he had left to muster, Harry slipped out the door and held it shut, while the Lisa-thing banged and sobbed inside. "Lisa....
*Sniff* If you want to return to the room, you'll find Lisa has gone, but left behind a disturbing diary. Now find the Antique shop room. Directly in front of the elevator doors where you entered. Use the stone of time in the clock and you get the Key of Hagith. Find the door marked Hagith and enter. Inside you find an elevator go to the second floor. Inside the third door on the left is the Jewelry store room. Grab the shells, Crest of Mercury, and Ring of Contract. If you go to the end of the hall and unlock the doors, and into another hallway. In the room around the corner on the right, you'll find some bullets and the Camera. In the last door on the left, you find a steel plate one the wall. Use the screwdriver to open it. There's a key, but it has electricity running through it. Leave and enter the room directly across from where you came in. You find yourself in the hallway where you started. Remember this. Now take the elevator to the third floor. Use the camera on the pictures to the left and right of the altar. They will reveal three shapes each. Mimic the shapes in the blank keypads on the door adjacent to each picture. Left picture=left door, etc. Through the left you'll find the birdcage key and some bullets, through the right, you'll find some health and a book. If you read the notes at the Police Station, you can read it.
Return to the first floor and the elevator you started from. To the right across from the faucet room is the birdcage room. Use the birdcage key to get the Key of Phaleg. Now enter that door (where Cheryl went). This looks like the Asylum area of the hospital. 2nd door on the left leads to an attic-looking room with graffiti. In the corner grab the Ankh. In the 2nd door on the right, you find Health, bullets, and Jelly Beans. Open the Jelly Beans to find the Key of Bethor. In the other room is a TV/VCR setup where you can watch the videotape as normal. In the first door on the right across from Bethor, is the kitchen. Before you grab the knife out of the fridge use the Ring if Contract to close the chain, otherwise it's lights out. Now grab the Dagger of Melchior. Go to the door of Bethor, inside is the generator room. Turn it off. Now go all the way back to second floor, where the electrified key was and grab it. It's the key of Aratron. Since the power's out you can't use the elevator, so remember the door that warped you to the first hallway? Use it and enter Phaleg again. In the last door on the right you see a scene with Dahlia, Kaufmann and some doctors talking. After that's done, grab the Disk of Ourobouros. Now go to the across the hall. A child's room. Save your game now. Put all the talismans in the big door and it unlocks. Inside you see a scene with Dahlia and a young Alessa arguing. Go down the stairs and get ready for the final battle.
If you saved Cybil, you'll see her confront Dahlia, but she gets knocked unconcious (big help!) Then Harry confronts Dahlia and Alessa. If you saved Kaufmann, he shows up and throws the red liquid at Alessa, which forces Samael out of her body. If not, Alessa becomes an angel-like creature. Either way Dahlia gets toasted (yes!) and you're in for a fight. As I've said in my boss strategy, the best way to do it, keep running around Alessa/Samael till she/it shoots lightning. You'll know when that's about to happen cause you'll hear thunder. Try to zigzag around and hopefully you won't get hit. If you do immediately check your health and heal if necessary. When the lightning stops bust out your rifle and plug away. Rinse, repeat. Eventually she/it will go down, and game over.
Bad Ending:
Alessa emitted a horrible scream and crumpled to the ground. Suddenly Harry heard Cheryl's voice. "Thank you Daddy, goodbye." "No!" Harry cried, collapsing to the ground. "It can't end like this!" Slowly the light from the flames faded out.
Inside the wrecked Jeep set the body of Harry Mason, a look of despair on his face. Blood slowly trickled from the corner of his head. Was it all the final dream of a dying man?
Bad+ Ending:
Alessa emitted a horrible scream and crumpled to the ground. Suddenly Harry heard Cheryl's voice. "Thank you Daddy, goodbye." "No!" Harry cried, collapsing to the ground. "It can't end like this!" Suddenly Harry felt a slap across his face. Cybil. "Harry, let's go."
Together they escaped...
Good Ending:
Samael let out a final roar then died. Alessa's form returned in its place, cradling a baby. Harry knelt down and Alessa handed him the infant. With her last ounce of strength, she forced open a gateway, amazingly bright, and then expired. Confused and scared Harry ran into the light. Kaufmann too, saw the light and headed towards it. Suddenly though, something grabbed him from behind. It was Lisa, completely insane and bloodthirsty. Kaufmann struggled but was helpless. He let out a final wail of despair as he was dragged down into the abyss.
Harry ran, he ran till his legs ached and his lungs burned. All the while he cradled the young baby in his arms. After what seemed like forever, he finally paused to rest under a streetlight. Looking down, he couldn't help but wonder. Is this really Cheryl? Is it really over? Harry looked into the calm sky and wondered.
Good+ Ending:
Samael let out a final roar then died. Alessa's form returned in its place, cradling a baby. Harry knelt down and Alessa handed him the infant. With her last ounce of strength, she forced open a gateway, amazingly bright, and then expired. Harry looked at Cybil who was standing beside him. The gate might close soon, they agreed, and both of them ran for the light.
Kaufmann too, saw the light and headed towards it. Suddenly though, something grabbed him from behind. It was Lisa, now completely insane and bloodthirsty. Kaufmann struggled but was helpless. He let out a final wail of despair as he was dragged down into the abyss.
Sometime later, Harry and Cybil stopped to observe the baby. Cybil lovingly touched her nose, and Harry had a sudden fierce recollection of his wife who had done the same thing when they had found Cheryl so many years before. It's over, he thought. But still, part of him wondered.
fin
