Mike Fisher's Level 2 Project

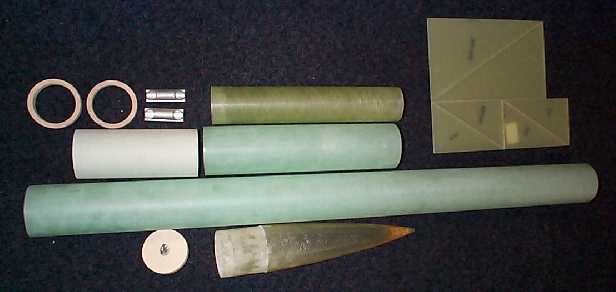
The X-calibur by Public Missiles Ltd. is such a cool rocket that I decided to upscale it for my level 2 certification in 2000. (***UPDATE*** I certified TRA Level 2 in October 2000, but not with this project. Details below.) After some communication with Andrew Waddell, PML's online representative, it became apparent that the quantum tube airframe would not be structural enough to fly through mach transition with a rocket of this length. Since I eventually plan to fly this rocket with the largest 54mm motor that it will hold, I have decided to order a project pack from Hawk Mountain Enterprises with all fiberglass airframe and a 54 mm fiberglass motor tube. This photo shows some of the components. After this photo was taken, I ordered a longer 24" payload section, two fiberglass pistons, and a longer 24" 54mm motor tube. A special thanks to Alan Gorecki of Hawk Mountain Enterprises for dealing with all of my design changes. (Yes, I've already cut out the fins in this photo.)

Tailcone Motor Retainer or T.M.R.
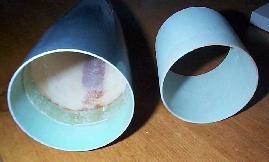
I am the exclusive inventor of the Tailcone Motor Retainer. It consists of a PVC threaded collar that slides over the motor tube and is epoxied on. The tailcone is machined from PVC and has internal threads so that after the motor is installed, the tailcone is threaded on, providing positive motor retention as well as a practically indestructable tailcone. I have successfully flown the 29mm and 38mm version of the TMR. On this rocket, I will evaluate the 54mm version.
This is a photo of the TMR and a shot of the 54mm fiberglass motor tube with threaded collar slid on.


Fin Cutting
This was pretty straightforward. I cut the fins out the evening that I received the project pack. They are made from .093 FR-4 fiberglass which is the heat resistant version of G-10 fiberglass sheet. Since all of the cuts are straight lines, I used my chop saw with a carbide blade. Again, don't forget the dust mask and eye protection.
Airframe Slotting
 It took me awhile to decide how I wanted to slot the airframe for the fins. I was going to build a slotting jig similar to the one that was detailed at John Coker's rocketry site but kept putting off buying the supplies to make it. Finally, one evening, I decided to slot it by hand with my Dremel tool and two cut-off wheels sandwiched together. A steady hand and some serious cajones are needed when slotting these expensive tubes! Don't forget the dust mask and eye protection as well. About an hour after I started, my tube was slotted. Piece of cake. Look at the photo, I even got them straight.:)
Fin Beveling
John Coker's site also has an excellent article on building a fin beveling jig as well. While I like the idea and look of beveled fins, there is that pesky jig again, and the fact that I don't yet own a circular sander makes it even tougher. Since I don't think I can convince my wife that I need a circular sander to bevel six fins, and I am a "hands on" type of guy, I decided to use another method.
In my day job, I am an optician, fabricating opthalmic lenses. I have a lot of experience working with "faceted" lenses. These lenses are beveled in a manner close to what I desired in the fins. I usually just use a steady hand and sharp eye when faceting lenses, so I figured, no problem, the fins would be easier since they are flat.
 The fins were too big to facet in the same manner as a lense though, so I had to come up with a different method. I decided that the best way to do this by hand would be to use some 300 grit, wet or dry sandpaper that is contact cemented to a flat surface. I used a formica cabinet top and some 3M sticky back sandpaper that was kept wet with water and an occasional drop of dishwashing soap.
Holding the fin at a consistent angle was the key to good results, as well as maintaining even pressure. Constant checking is also needed to check straightness of the bevel and monitor stock removal. Patience is the key here. It took about two hours to bevel all six fins. I am very pleased with the results. As you can see by the photo, they turned out very nice.
Motor Mount

I added 1/4" square balsa rod stringers along both sides of where each fin root would mount due to the difficulty of adding internal fillets in such a small space. I could have used expanding foam, but was afraid of bowing of the airframe tube outward since there are six slots in the tube and two of them being fairly long. The nice thing about the stringers is that they contact the inside of the airframe tube when the motor mount is slid in, as well as make fin alignment super easy as long as they are epoxied to the motor tube correctly.
Test Fitting
Test fit of the parts. Finally starting to look like a rocket! That's a Dr. Rocket RMS 1706 case for scale.

Fin Fillets

I've skipped the documentation on the epoxy job of the motor mount and fins because it was quite routine. 30 minute epoxy used exclusively with milled fiber and microballoons added to fillet joints (yawn).
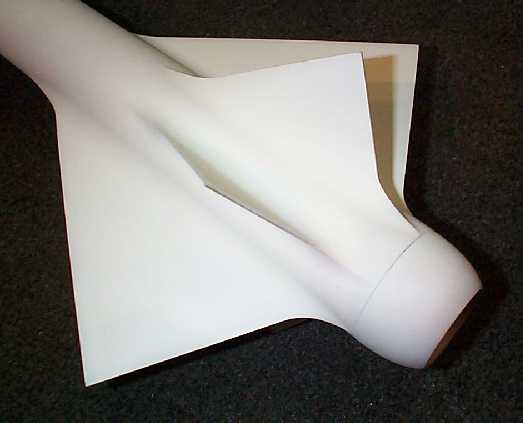
This is what I refer to as "fillets from hell". The reason that I call them this is because of their massive sculpted look and the work required to make them. They are formed after the standard epoxy fillets are cured and sanded. Then, automotive body filler (Bondo) is applied to both sides of where the fin meets the body tube. Next I press 1" schedule 40 PVC pipe into the wet body filler, squeezing it firmly into the crease so that it presses out the extra. Then after it cures, the pipe is tapped off lightly with a mallet. This leaves perfect shaped fillets except for the leading and trailing edges. This calls for a bit of artistry to sculpt it properly and get them all to match. Photo is after sanding and a coat of white sandable primer.
Nose Cone Modification

The nose cone sent from Hawk Mountain was a bit out of round, typical of a two piece mold. Also, it was a bit stubby looking for my taste, especially for a sleek launch vehicle. The shoulder was tight fitting but a bit rough as well.

I decided to lengthen the nose cone by cutting off all but an inch of the shoulder and epoxying a two inch section of fiberglass airframe tubing to the remaining shoulder. This leaves me with another inch inside the tube to epoxy a short section of airframe coupler which makes the new, nicer nose cone shoulder.

Rocket Gets a Name!
Decided that a project of this scope needs a name. Looked at the rocket long and hard until it spoke to me in a quite logical voice. It said, "My name is Spock." Alrighty then, Mr. Spock it is.
Choosing Colors

I decided on a pearl green with a metallic silver nose cone. Photo is of the upper airframe tube with nose cone. The fin section is still awaiting wet sanding, another coat of white sandable primer and more wet sanding before getting some color coats. The cool thing about this color is that it is almost identical to the stock woven fiberglass tube color, but it looks iredescent. Also, it compliments the name that I have chosen for this rocket quite nicely.
TRA Level 2 Certification!

Well, the fiberglass rocket project is coming along nicely, but I decided to certify with an "easy access" 38mm motor since the fiberglass rocket project takes a 54mm "restricted access" motor that is usually a special order. I felt that it might be a bit more difficult to obtain the 54mm motor, as well as only being able to order one motor for the purpose for certification.
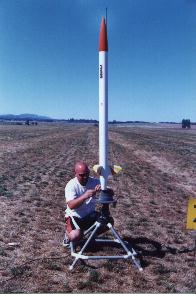
I used a BSD Apache on a J350 in Amity, Oregon in September. Great rocket, great flight. Did a repeat performance the very next day on the same motor. Estimated altitude of both flights was between 4,000 to 5,000 feet.
I sent in my paperwork to Tripoli and got a phone call a few days later from Bruce Kelley. It seems that the person that signed off on the flight was not authorized to do so. The person who signed is both a Tripoli member and NAR member, got the rules confused. In the NAR, any level 2 flier can sign off on a level 2 cert flight. In the TRA it takes a prefect or TAP member. No big deal, I get a chance to send it up again with a bigger motor!
A few weeks later there was a make up launch in Brothers, Oregon for a launch that was missed a couple of months earlier due to fire danger. This one would give me a chance to use a J570 since the weekend waiver was good to 10,000' AGL. I also installed an electronics bay from Giant Leap Rocketry and an Olsen M2 altimeter for recording and dual deployment.
What an excellent flight on the J570! The Apache screamed to just over 6,700' at a max velocity of mach .63. Time to apogee was 20 seconds. The long motor delay which was meant for backup for the altimeter deployment, kicked just before apogee when the rocket was still going up. Kudos to Scott Binder for designing such a aerodynamic kit. This thing really coasts.
The recovery was nominal with the main deploying right on time. It still landed quite a way out there despite dual deployment. Gotta use a smaller drogue next time. Thanks to Dennis Winningstad, TAP member, for the valid sign off on the flight.

Here is another photo of the Apache. The fiberglass rocket is coming along well and will fly in 2001!
Stay tuned for updates as construction progresses!
Visit my home rocketry site.
Fisher Rocketry
Visit my main site.
Mike Fisher Reptiles

Email: mikefisherreptiles@juno.com


 It took me awhile to decide how I wanted to slot the airframe for the fins. I was going to build a slotting jig similar to the one that was detailed at John Coker's rocketry site but kept putting off buying the supplies to make it. Finally, one evening, I decided to slot it by hand with my Dremel tool and two cut-off wheels sandwiched together. A steady hand and some serious cajones are needed when slotting these expensive tubes! Don't forget the dust mask and eye protection as well. About an hour after I started, my tube was slotted. Piece of cake. Look at the photo, I even got them straight.:)
 The fins were too big to facet in the same manner as a lense though, so I had to come up with a different method. I decided that the best way to do this by hand would be to use some 300 grit, wet or dry sandpaper that is contact cemented to a flat surface. I used a formica cabinet top and some 3M sticky back sandpaper that was kept wet with water and an occasional drop of dishwashing soap.


