Sunny Diary
This diary is for being constructed for the interest of anyone who may be thinking of embarking on building their own race car. I hope that the information contained in this page is useful to someone out there. I intend to Update this page on a regular basis, hopefully each Tuesday night (but don't hold me to that).
As I feel this page should read like a story of the development of the car, all new updates will be listed at the bottom of each page. So, if you are following this build up, please scroll down to the bottom of the page to see the latest developments.
Click here to jump to latest developments.
 Pick up day. (29/9/02)
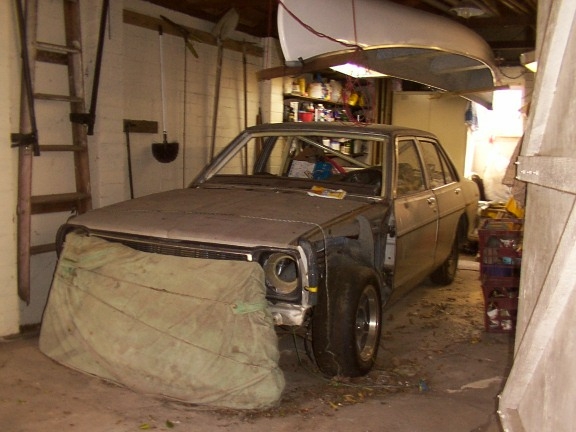
While it's not much to look at yet, given some time and plenty of patience, we should have a competitive car by January.
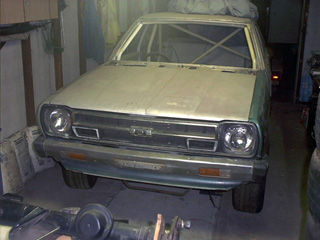
This first Picture shows where the car came from sitting in a garage in Sydney, just waiting for the build up to be continued.
 With the car on the trailer you get a better idea of just how much work there is left to do. Fortunately most of the parts needed to build the car have been fabricated and in some cases fitted already.
Once I get the garage sorted and find a home for all the parts and spares, I will get some more photo's on line. I will be sure to get some close ups of all the major components very soon.
(Ed: The story continues - see below)
Update - October 23rd, 2002.
Well.........so much for the weekly updates!
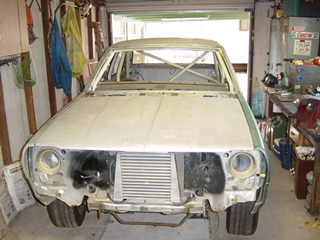
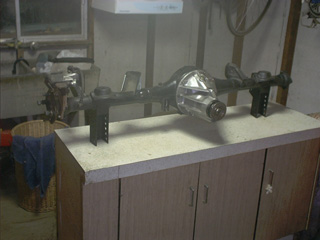
The pictures below show the current state of the car - which isn't pretty, but we are making some progress. Once I got the car home, I decided that the first thing that needed to be addressed was the diff. I am running a H190 diff (from an S11 Sylvia - early 1980's), the axles have been resplined down to 27 to suit the two LSD centres that I purchased with the car. The centres are Nissan works items (originally run in the Works Stanza's), one of which is still brand new! The ratio's that I will be running are 4.875 for short tracks and 4.11 for long tracks. If you look closely atthe first picture, you will notice two arms hanging down - these are part of the Watts Link set-up which I will be running. Once the diff is in the car, I will post some more detailed pictures of it. At this stage I am trying to figure out how I will do the brake set-up, choosing the dimensions for the disc is the tricky part. Once this is done, fabrication of the caliper bracket will be easy.
You will also notice that there are no windows or lights in the car. At this stage, I am dummy fitting everything to the car. Once everything is fitted, including wiring loom etc, the car will be stripped back to a bare shell and painted. The reason for this is to hopefully present a neat and tidy car when I am finished. Any brackets that need to be removed or added, plus any holes that need to be drilled will be done prior to painting, this way the car should look it's best when the day comes to present it at the race track.

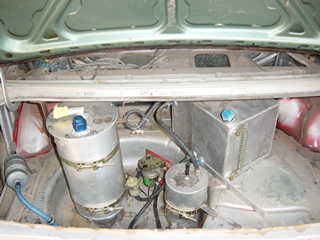
In the boot, I have a 20 litre fuel tank (right hand side), surge tank (centre) and oil tank (left hand side). The surge tank is fed by a carter low pressure pump, which then leads to a High pressure pump (Bosch racing pump).
With only 20 litres of fuel, we will be restricted to shorter events, but this should be fine, as our series is made up of a series of sprint races, normally no longer than 10-12 laps. Having said that, 12 laps at Eastern creek or Phillip Island will test the 20 litre capacity.
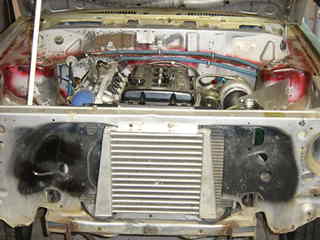
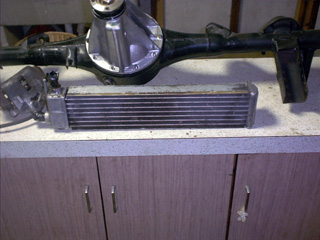
Here is another shot of the intercooler. After looking at the data logged from the engine, last time it was run, we will also be adding a water injection to the intake after the intercooler to try and lower the intake temps. On the last occasion this engine was raced (prior to being rebuilt), intake temps reached 68 degrees celcius. we will be aiming to lower this temperature, so that we can hopefully gain a little more horsepower in the tuning of the engine.
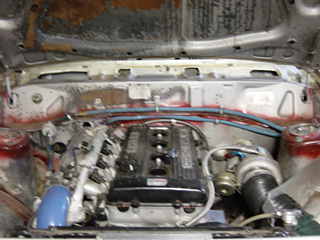 As you can see, the fuel lines (blue) have been plumbed in, so too have some of the oil lines. Still to be sorted out are the oil lines for the oil cooler, and also the oil lines to run back to the drysump tank.
Engine Specs - FJ20DET
Capacity: 2L
Cams: Twin overhead
Valves: 16
Pistons: Forged (9:1 static compression)
Rods: Crack tested, shot peened.
Crank: Nitrided
Oil System: Dry sumped
Fuel System: Bosh Fuel injectors.
Inlet: Custom plenum chamber, intercooler.
Exhaust: Custom exhaust manifold, Garrett T28 Turbo, custom three inch dump pipe, three inch exhaust.
Management: Motec M4 Pro.


These pictures show the heat shield installed for the air cleaner (left). This seals up against the radiator and there are holes in the front panel to allow air in - effectively producing a cold air box for the intake. On the right is a close up of the custom plenum chamber.
Update - October 29th, 2002.
I have had a very busy week, and I feel like we are making some good progress on the car. Most of the plumbing in the engine bay has now been completed, with just the oil cooler and dry sump lines to be installed, plus the bottom radiator hose. The top hose was an interesting challenge, to get it to bend around the intake pipe from the intercooler. Luckily the engine is solid mounted to the chasis, so I don't expect much - if any - movement, so clearances can be fairly tight (and they are!)
At the rear of the car, progress is being made also. The wheel bearings and seals have been purchased and are now ready to be fitted. First though, I need to finalise the brake design set-up. We are using a VL commodore rear caliper, with a custom made bracket (which has been designed out of MDF prior to fabrication). The disc has still not been settled on, but it looks like I may use a disc off a late model Nissan Pintara (U12). The dimensions for these seem to be suitable for what I need - I am currently waiting to hear back from a manufacturer of brake rotors (dba), as to the internal dimensions of the disc, to see if it will fit onto the axle.
That is where we are up to for now, unfortunately I will be away for a week, so there will be no report (or work!) next week. Stay tuned though for further updates.
Update - November 14th, 2002.
Well I am back from my trip, and have gone straight back to work on the car. The parts for the oil system have been organised, and some of which will be picked up early next week. I have decided to run solid pipes for the oil from the rear of the car for three reasons. 1) The engine builder said so, 2) It is much cheaper than running braided hose the entire length of the car and 3) the pipes will act as oil tanks to help keep good oil pressure to the pump. I hope to have the oil system completed in the next two weeks.
Very limited progress has been made on the rear end, but a suitable disc may have been found. It looks as though I may be able to use a rear disc from the U12 Nissan Pintara. If this is the case, it should be a simple bolt on fit, with a slight modification to the rear caliper bracket. I am currently trying to source one of these discs to check the suitability prior to ordering two new ones from Disc Brakes Australia (our series sponsor). I hope to get some new photo's posted for next week.
 Update - November 20th, 2002.
The rear end is still causing us some hassle. It appears now that the Pintara disc I had hoped to use will not fit after all, so I have started looking for other alternatives. If a suitable disc cannot be found, I will have to go back to the pintara disc and redisgn the brake caliper set-up. I am hoping to incorporate the caliper bracket into the retaining plate on the end of the diff housing. This will save welding a bracket to the diff. The only problem is clearing the caliper with the inside of the wheel rim, and also the off-set of the disc rotor needs to be quite small. I still have a few more disc rotors to test, so hopefully one of those options will fit.
In the picture you can clearing see the aluminium diff centre housing, plus the brackets added for the lower trailing arms which have 5 pick-up points to allow us to adjust the pinion angle on the diff.
 Once the diff is completed, I hope to get the car back on it's wheels, so that we can fit all the body panels and also add the front and rear spoilers, plus the wheel arch flares. I am currently in the process of tracking these down now. The reason for this, is to get the car "logged" as soon as possible. having a car logged, is basically registering the car with CAMS. I would like to do this prior to the end of this year, just in case there are any rule changes for next year.
As you can see by the picture, the car still needs painting, but it's amazing what you can do with computers these days. The car will painted digitally for the purposes of photo identification.
 The painting of the car is planned for either just before or soon after Christmas. The car will be painted inside and out, including the roll cage etc. For the best quality finish I will be stripping the car right back to a bare rolling shell. This process has already started - the dash has just been removed.
Another reason for the dash removal is to facilitate the installation of the braking and clutch systems. Due to the lack of space in the engine bay, I will be mounting the clutch master cylinder inside the cabin, with a remote reservoir in the engine bay. Also I plan to add a twin master cylinder set-up for the braking system with a balance bar between the master cylinders to adjust brake bias easily from the dash.
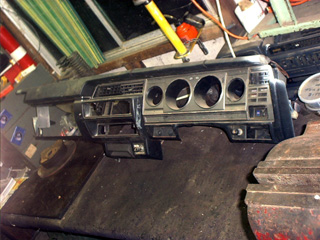
While the dash is out of the car I plan to take the opportunity to modify it to accept all the gauges and switches we will need in the car. To do this I need to cut out large portions of the dash and replace them with flat aluminium panels. This is much easier to do on the bench. I will post another picture once the dash is completed.
 Another little problem I have is where to mount the oil cooler. It was originally intended to sit behind the front apron, but the brackets that have been welded on do not allow enough room for the cooler to fit. The other consideration is ground clearance - which is very difficult to gauge while the car is up on stands. Once we get the car back on the ground I can start to play with different mounting positions for the oil cooloer.
Another option will be to use a smaller cooler and mount it next to the intercooler, behind the grill. However, this will be looked at only if we can't mount the current cooler anywhere else.
Update - November 28th, 2002.
Some good progress has been made this week (no photo's though - sorry). I have resorted back to the Nissan Pintara disc rotor for the rear end, mainly due to the fact that it is a perfect fir for the axle's and is almost identical to a VL Commodore disc, which matches the Callipers perfectly. What this means is I have had to rethink the design of the Calliper bracket. After looking at a design on a friends race car, I have started working on the new design. I plan to have the calliper bracket design finished by this Sunday, then the dummy bracket can be sent to a machine shop for the brackets proper to be made. Once this is done, I will post some more photo's.
Update - December 18th, 2002.
Progress is being made, but time is running out! At this rate, it does not appear the we will be on track in January. The oil lines for the dry sump system have now been completed, the brake calliper brackets have been completed and the car is finally back on it's wheels - hooray!!!!
Over Christmas the car will be prepared for painting, which includes getting some flares for the car. The new diff is substantially wider than the original, so flares are essential. So.... now the hard work begins.... I will be pulling the car apart again very soon, back to just a rolling shell. Then the sanding will begin. Looks like I am going to be busy over Christmas.
Update - January 27th, 2003.
Happy New Year, and welcome to the first update for the new year. Progress is being made in a number of areas. The rear suspension has been modified, a Willwood reverse pedal box has been installed, with both brake and clutch master cylinders now being located under the dash board, we will need to run remote reservoirs to make life easier down the track.
Everything in the car has been stripped out, and the sanding has begun. The fibreglass flares we were hoping to source proved to be more difficult than expected, particularly over the Christmas period. As a consequence, the car is currently with Cess Evans in Glossodia having steel flares fabricated. While there, Cess will address a few other small imperfections in the body work. Once the car comes back to the workshop, the sanding will be finished, seat installed, and taxi bar added to the roll cage to provide mounting points for the harness, then be sent to the paint shop.
In the mean time....I will be concentrating on the dash board, and the arrangement for adding all 7 gauges to the Sunny dash. So far we have added a flat Aluminium panel which will be used to hold all gauges including Tacho, Oil Pressure, Oil Temp, Fuel Pressure, Boost Pressure, Water Temp and Volts. Pics will be added as soon as they are available.
Home Page
Sunny Specifications
Sunny Diary - Page 2
Sunny Diary - Page 3
Sunny Diary - Page 4
Sunny Diary - Page 5