Sunny Diary - Page 3
 The Electricals are getting sorted! (3/8/03)
Some good progress has been made recently with the electrical system. At this stage we are focussing on getting the engine started, so wiring for lights, wipers etc has not been looked at yet. Once the car is started, we will start to think about lights etc.
The first thing we needed was a battery. Luckily, a friend of a friend was selling an 8 month old Oddesy dry sell battery. These batteries are great for race cars. They have a stack of cold cranking power, are a sealed unit, are very compact, and much lighter than a conventional car battery. Getting it second hand also meant we got it at less than half the new price!
To install it into the car, I first made a simple aluminium tray for the battery to snuggly in to. on the sides of this tray I cut a flap and drilled a hole to attach the bracket which holds the battery in place. The tray itself is anchored to the floor of the car via 4 countersunk bolts with Nylock nuts used. The last thing I wanted was for the battery to come loose in case of an accident.
This pic also shows the earth cable, and the oil lines. Also, as the engine is solid mounted, it will not need to be earthed seperately..... one less wire to worry about in the engine bay!
 From the battery we move forward to the main power switch. This switch disconnects the entire cars electrical system from the battery. The switch is actually three switches in one, although we only need to use two of them. On the base of the main switch there are two other switches, one normally open, the other normally closed. I will connect the alternator charge wire through one of theses switches and then back the batter side of the main power switch. The reason we do this is to stop the alternator from supplying the system with power once the main power switch is turned off. This in turn stops the engine.
Next to the Main power switch, we have the panel holding the ignition swith (on/off) and the starter button. The starter button is wired directly to the main power. This means we can turn the engine over, without having to have the igition system on, or fuel pumps running. Handy for compression testing and priming the oil system. The ignition swith is simply the power swith to the MOTEC computer system. The computer in turn feeds out the power to the associated accessories....like the fuel pumps etc.
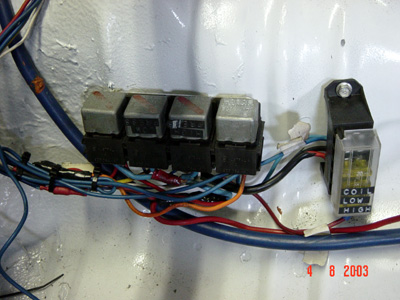
Just forward of the gearstick, I have mounted the fuse box and relays for the engine. I have placed them here for easier access at the track if something should fail. The relays cover both fuel pumps (one each), the motec, and the ignition system.
The learning curve for figuring out the mess the wiring was in, was very steep! Not having done much with auto elicals before, particularly EFI, I had to go right back to basic. Luckily, having two electricians in the family helped. It's amazing how much you pick up about things. Knowing how to read a schematic, and understandng how relays work etc. helped a lot. Without that basic knowledge, I would have been in all sorts of trouble!
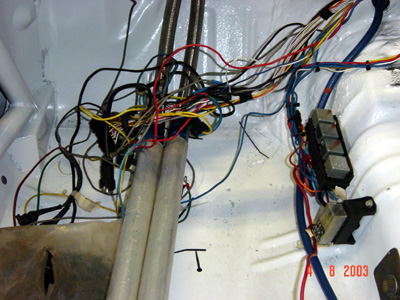
Although the majority of the wiring as been sorted out, we still have a small mess to be cleaned up. While this pic shows what looks to be a complete mess, allthe wiring in the pic is tagged, and just needs to be mounted or connected. This jumble of wire also conatians the main plug for the Motec, so every wire int he car associated with the engine runs to this point....no wonder it looks messy! The computer will be mounted inside the glove box for protection, and also to keep it away from prying eyes!
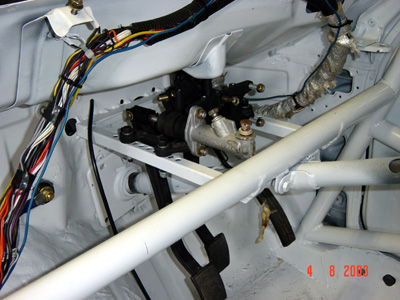
This picture of the pedal box shows the clutch master cylinder. I still have to source the brake master cylinders, but they will sit right along side the clutch one. Also there is an adjustable balance bar between the two brake master cylinders wich willbe adjusted from a dial on the dash. This allows adjustment of brake bias from front to rear.
Once the wiring is finished, the loom will be cable tied neatly under the dash. If you look towards the bottom left hand side of the picture, you can see a gold colopured nut, in the firewall. This is a shielded post which goes through the fire wall to provide power to the engine bay without having to run a cable through the fire wall. The position of this post is quite close to the starter motor also, so the length of cable need to run inside the engine bay will also be quite short.
STOP PRESS! (3/8/03)
Late breaking news......... after tidying up some of the wiring today, and wiring up both the ignition switch and starter button, I thought it would be worth having a go at powering up the ECU. First, I checked the starter button was functioning. At this stage I only have the wire to the solenoid connected, but the starter was throwing out as expected, just not turning yet. I still have to make two short power cables - one of which will connect the starter motor to the power post on the fire wall.
Having had success with the starter button, I decided to have a crack at the ECU. I had to connect up a couple of earths on the relays, and then with fingers crossed, I turned the power switch on, and then the ignition switch on...... at least on of the relay's clicked....a good sign....and none of the fuses had blown...... I then checked that power was getting to the ECU plug.....and it was! WOOHOO.
Now for the big test! Power off, then plug the ECU into the loom! This time, hoping that the ECU wouldn't get damaged, I turned both the power and ignition switches on. All the relays definately clicked this time, and then after about three seconds, the fuel pump relays clicked again. This is set in the ECU so that, if the engine is not running the fuel pumps stop after a set time.... apparently about 3 seconds!
With everything going along so well, I plugged the laptop in and connected to the ECU. The live read out page was working perfectly. While I could not check many functions, I tested the Throttle position sensor, and this worked fine. Plus, I could also read Ambient Air temp, ECU temp, Lambda, battery voltage and a couple of others. Looks like everything is going to work just fine.
The next step is to now make the two power cables that I need, then plumb in the rest of the fuel system, and add the blow off valve. I still need to also source a couple of sensors, and also sender units for the Gauges in the dash. The last step will be to then wire in all the gauges in the dash, and then hit the start button! We are getting closer every week!
The engine turns over!(19/8/03)
The weekend saw some really exciting events. Fistly I finished off the main power cables. This allowed me to connect up the starter motor and the battery to the main power switch, permanently. After dropping a little bit of oil down the bores, I pushed the start button and the engine turned over - WOOHOO! Removing the spark plugs, made this a lot easier, and the engine seems to turn quite freely.
With the wind in my sails, I took some measurements and then jumped into the car to get some more supplies. First stop, was my local Auto one parts store, these guys have been great through the whole project to date. I picked up some fuel line, both high pressure for the feed line and normal fuel line for the return line. In total, close to 10m of fuel line was used. Also purchased was an EFI fuel filter, as used in most model Commodores.
After Auto One, I jumped back in the car and headed towards Pirtek, a local hydraulic line company. With me I had the oil pressure guage and the "T" piece that extends from the block. The gauge is a Smiths pressure gauge, which has a threaded connection on the back of the gauge. After a quick chat with the guys at Pirtek, it wasn't long before I was heading home with a freshly made pice of braided line, with the appropriate fitting attached.
After arriving home and installing these new parts, I sat down and figured just how much we need to do before attempting to fire the engine. The answer....NOT MUCH!!!! A few sensors, a coil and some ignition leads and we will be ready to fire the engine. Hopefully this can happen in the next few weeks. One of the difficult things will be to get hold of some AVGAS, as you need a special "passbook" now to buy it. Naturally, I don't have one yet as I didn't need it in the past. I am sure we will find a way around that one though.
Stay tuned for more pics of the latest developments real soon.
So Close I can smell it! (18/9/03)
Well, we got some avgas and fired up the fuel pumps, you got to love the smell of avgas! Good news, no leaks anywhere. At first I temporarily wired up the fuel pressure gauge, and it showed that we had good fuel pressure also.... another job well done!
With this job done, I also ordered and received the remaining sensors that I needed and have fitted them also. Since the last update, I have made quite a bit of progress. The dash is almost completely wired up, only tacho left to wire in. Also, i have now mounted the Motec computer in the glovebox, connected up the road speed sensor, thermo fan and water temp sensors. The coil and ignition leads have also been purchased and installed, alternator is mounted and wired up, oil pressure warning light fitted and wired up and all the wiring tidied up under the dash.
There are still a couple more things left to do prior to starting, hopefully these jobs can be finished quickly. I should have the dry sump pump back next week. It's being modified to stop the front seal from popping out and leaking oil everywhere. Also, while it is being modified, I am having the oil temp sender fitted to one of the oil tubes which run through the car, this should also be finished early next week. On top of these jobs, I still need to change the oil filter and low pressure fuel filter, and fit the top to the oil tank properly. All small jobs, but lately the problem has been finding the time to get out to the garage to continue the work. Hopefully I will have it running in the next couple of weeks.
I know I keep promising pictures, it just comes down to time..... I will try and get some more posted as soon as possible.
Updated Pics (27/9/03)
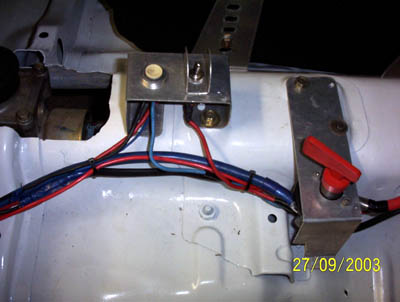
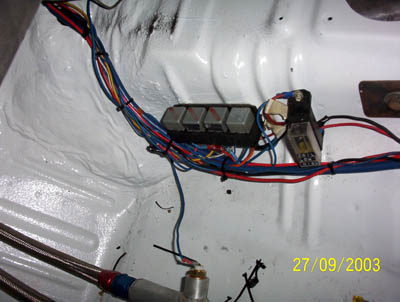 Left: Starter button and switches with wiring completed.
Right: Wiring is now cleaned up, and looking much more respectable. Also you can see the oil temperature sender positioned in the oil line at the bottom of the pic.
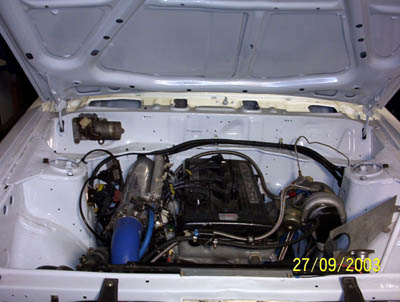
 Left: Latest engine bay picture shows everything in place basically ready for a start.
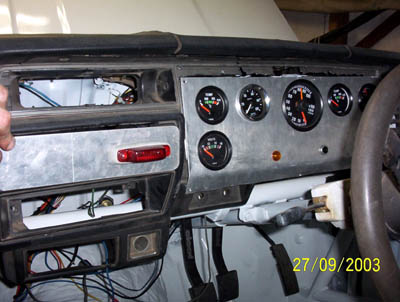
Right: Dash board is wired up, including charge light (orange) and shift light(green). Next to the dash panel is a large red light to warn of low oil pressure.
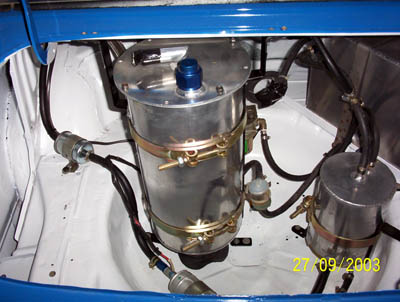 As can be seen by the pictures, the car is really starting to come together. The only thing left to do now prior to starting the engine, is to re-fit the dry sump pump. I picked up the pump today, after having a small modification performed to stop the front seal popping out. Before re-fitting the pump to the car, I need to check the pulley will clear the new bolts which hold the retaining plate. This should happen this week, after getting the Pulley back from a friend who has been using it on his car at a race meeting this weekend.
The plan this week is to re-fit the oil pump, then remove the spark plugs, and crank the engine to prime the oil system. This may take a bit of cranking, as the entire oil system is empty, including the cooler, and lines running to the rear of the car. Once we get oil pressure from the cranking, I will re-install the spark plugs, switch on the ignition and see if we can fire the engine. Hopefully things will go pretty much according to plan, and we will not face any major hurdles. When the car starts, it will be very loud as we do not have a complete exhaust system at this stage. For now, I am only running a short exhaust, with no muffler. This is being done to simply get the hot exhaust gases away from the engine bay.
We have Oil Pressure! (7/10/03)
Over the weekend I re-fitted the oil pump, checked all the oil lines and then filled the system with oil. I initially put some oil in the normal filler cap, to make sure the dry sump pump had something to draw from. The rest of the ten litres went into the oil tank in the boot. Before cranking the engine over, removed all the spark plugs to reduce the load on the starter motor and the battery.
After only a couple of minutes the battery was nearly flat as it had been sitting around for quite sometime, so it was placed on charge over night. My concern was, that we had not achieved any oil pressure at all, and so I checked the pressure line from the tank to the engine, and it was still dry. I assumed from this, that I need to somehow prime the pressure pump, which is inside the engine! By this stage, I had flat battery and it was getting late, so I packed up for the night, and left the battery to charge over night.
The next morning, I headed down to my local Auto One parts store and picked up another 5 litres of oil. I disconnected the oil feed line to the engine (at the tank end) and proceeded to fill the line with oil. Once I had some oil in there, I blew down the line in hope of pushing some oil into the pump. I did this twice before filling the line completly and turning the engine over. Thankfully this seemed to work, the pump started sucking the oil from the line, now we were making progress.
With the battery re-charged and installed back in to the car, I re-connected the oil line and hoped it would work. I added some extra oil to the oil tank, and measured the level using a dip stick. This was my reference as to wether or not the pump was sucking the oil through. After just a minute or so of cranking, the needle on the pressure gauge started to move....WOOHOO!!!! I checked the oil level, and the level in the tank had dropped, this shows the system is starting to fill. So far I have put around 12 litres into the oil system, I think it will probably need at least another 1-2 litres once completely filled.
The next step is start the engine. I am waiting on one more part (the new blow off valve - Turbo Smart V-Port) to be fitted to the existing inlet pipe. Once I get this back, I simply need to fill the cooling system, and add part of the exhaust. I intend to have a new exhaust system fitted prior to tuning, but for now, I will use part of the system which was supplied with the car. The idea being, to get the hot exhaust gasses out of the engine bay for now, so not to do any damage to paint or wiring.
Also, I aquired the master cylinders for the car last week. I have decided to run the AP master cylinders. They are by far the smallest, measuring only 80mm from the face of the bolting surface to the rear of the cylinder. This will give me maximum adjustment of the pedalbox, and maximum pedal travel if necassary. The braking system will be installed as soon as the engine is running
On to the brakes! (7/11/03)
After having some problems getting the engine to fire. The problem is in the timing and it was decided to wait until I could take the car to somebody to make sure the timing and other electronics have been installed correctly. As a result of speaking to Motec, it seems as though we may have a set-up problem with the optical sensor in the distributor. Not being familiar with the set-up of these devices it was felt that I should leave it to someone who knows what they are doing. Damaging the engine is the last thing I want to be doing. With this decision made, it was onto the braking system.
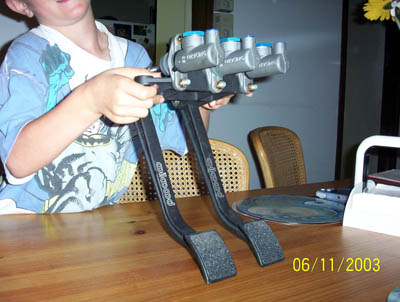
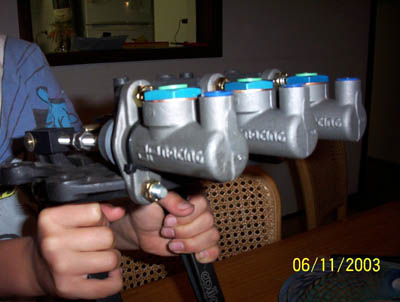
First I removed the pedal box from the car and tried mounting the Master Cylinders. Due to them being so short, I had to cut down each of the top stud's as they fouled on the cylinders. After doing this, I also cut down the cylinder push rods also to make them suitable for the pedal box. These pictures show all three master cylinders installed in the pedal box as a unit.
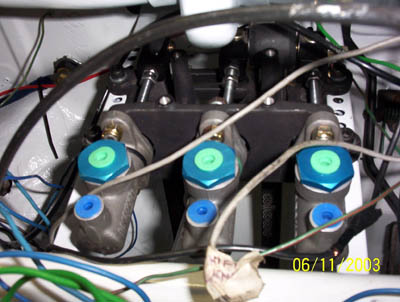 In this pictue you can see that the master cylinders only just fit. The white bar across the bottom of the picture is the cross bar for the roll cage which sits under the dash. There is only a few millimeters of clearance betweent he end of the cylinders and the cross bar. It is for this reason we had to go with the AP Master Cylinders - as a bonus they are also one of the best master cylinders available on the market.
The next step will be to mount the brake and clutch fluid reservoirs. This is still a bit of a puzzle, as I am trying to figure out the best place for them to be mounted. I have norrowed it down to two options. Either uunder the bonett sitting next to the inlet manifold - OR - inside the cabin, protruding from the centre of the dash. I will trial fit the reservoirs under the dash first, as this is the preferred position, space is the only problem however.
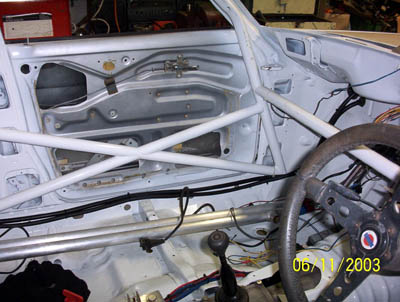
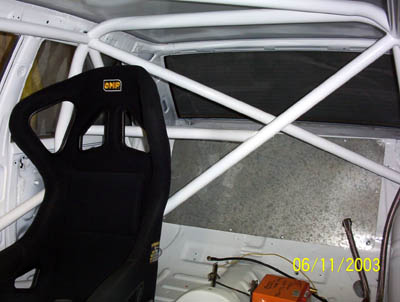 Just for good measure I took a couple of pictures of the roll cage also. These pics show how substantial the cage is. This cage gives great strength to the chassis of the car. Also a good shot of the seat.
Happy New Year! (13/1/04)
With a new year comes new enthusiasm. This WILL be the year for the Sunny to hit the track. Since the last post very little has been completed on the car, but this is all about to change. Last weekend I picked up another Sunny to be used as a parts car. Obvious things such as panels and lights are always useful, but also the entire wiring loom for the lighting and accessories will also be laid into the race car.
I have had the car for two days, and already I have transplanted the door, boot and fuel flap locks. This will allow me to lock the race car when being left overnight at a race track. The front brake lines have been fitted, the only thing left to do is put kits through the calipers and adda piece of braided line between the master cylinder and the block where the front lines split to left and right. In the next few days I hope to have the rear line fitted also. I have also started transplanting the door trims. This makes such a huge difference to the appearance of the car, it's actually starting to look more complete.
Once all the parts are removed from the spares car, the shell will be taken to a scrap metal yard, but there will not be much left!
Progress continues! (23/1/04)
The wiring for the rear lights is in the car. I basically pulled the loom from the parts car and laid it in the original position. I have also removed the forward part of the loom in the spare car, with the intention of transplanting it also into the race car. This idea had been abondoned due to so much extra wiring in the actual loom. Instead, I will use the fuse box, relevent plugs and the controls off the steering column and rewire the lights myself.
I have also removed the door rubbers from the spare car, and installed them in the race car, at least now the car wont fill with water when it gets washed!
Also, the rear Spax Adjustable Shocks have been installed, although the bushes will need replacing down the track.... but at least we can get the car on the track for some testing the way it is.
This weekend I hope to fit up the lines for the rear brakes. Then all that will be left to do is fit the flexible sections which will be made up of braided hose.
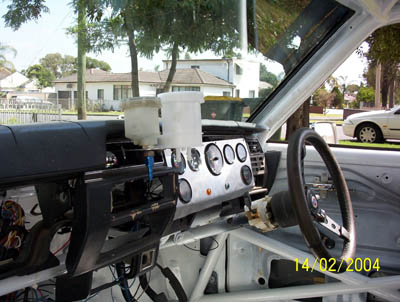
Slowly but surely! (16/2/04)
The spare car proved to be very worthwhile. The solid brake lines are now all installed, all that is left is to run lines from the reservoirs to the Master Cylinders and then lines from the Master cylinders to the splitter block. Also the rear lines need to be made, so far the standard solid lines are in place, I just need to make three more braided lines, one to go from the body to the diff housing, then two lines from the splitter to the calipers. This should happen in the next few weeks.
The picture on the right shows the position for the reservoirs. Final mounting is not yet finished, but this is where they will be.
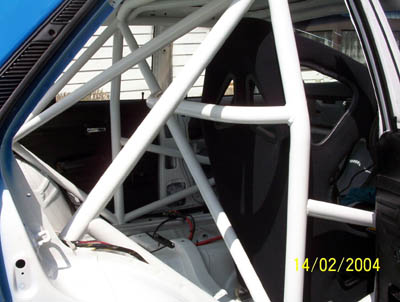

Here are some pics of the inside of the car. On the left is a picture of the rear part of the cage, looking from the rear passenger door.
On the right is the seat that is fitted, it's a nice snug fit - better not put on any more weight!

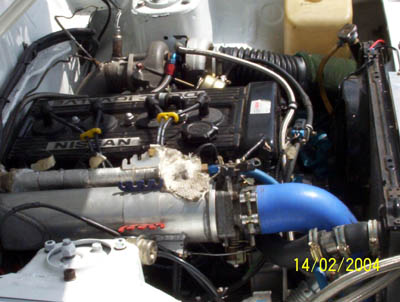 Here are a couple of more recent photos of the engine bay. I think everything is now in place, apart from the heat shield that will be installed to attempt to shield the intake from the hot air under the bonnet.

 The car is really starting to look like the finished product. Only changes to come prior to hitting the track are signwriting, and bonnet clips. After we get on track, both front and rear spoilers will also be added. I want to get some testing done first though without the spoilers, this way I will be able to judge just how much affect they have on the car.
 Brakes almost finished! (22/2/04)
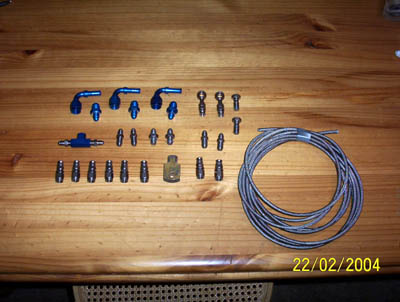
This weekend I have been working hard on the braking system. The picture on the right shows what $500 worth of brake parts looks like prior to being put together! A quick visit to Motorsport connections in Seven Hills and I walked out with lighter pockets, but most of the parts I needed to finish off the braking system.
As can be seen in the picture, all new lines for the brakes are made from braided lines. While this is expensive, when it comes to brakes, I want to know they are nor going to let me down. I am also told that the braided lines give a better/firmer pedal as they do not expand like the original rubber lines do.
 This picture is a great shot of the rear end, including the new brake lines.
The diff is a Nissan H190 from a Nissan Gazelle. Sometimes it is referred to as the "10 bolt" diff, as there are ten bolt holding the centre in. The centre is an LSD Nismo centre from the Datsun Stanza's used in the Rally Scene some years ago. Ratios are 4.11 and 4.875, the axles had to be resplined to suit. On the other end of the axles are Nissan Pintara rotors (slotted from DBA), with VL Commodore rear brake calipers mounted on a custom caliper bracket.
Also visible is the pick up for the dry sump system. From here the lines work towards the front of the car.
The newly installed SPAX shocks are easily seen, as is the adjustable lower control arm set-up. This allows to adjust the pinion angle of the diff, hopefully to optimise the amount of traction we are putting down on the exit of corners.


These pictures show some closer details of the rear end set-up. You can easliy see the adjustable spring set-up on the left and the custom made caliper bracket and slotted DBA rotor on the right.
The only things left to do to complete the braking system are, rebuilding of the calipers, new brake pads, lines from the reservoirs to the master cylinders, a brake light switch and then add fluid and bleed! Hopefully I will have the brakes finished in the next couple of weeks.
Brakes are finished (1/3/04)
After a marathon effort on Saturday, the braking system is finally finished. I purchased new seal kits for all four callipers, plus new pads for the rear brakes.
The first job was to rebuild the callipers. This is a fairly simple procedure, but is quite time consuming. After the callipers were rebuilt, I bolted them back on to the car, and attached the brake lines to them. From there I fitted the hoses between the rervoirs and master cylinders.
Now the system is complete. I filled the system with brake fluid and bled all brakes successfully. There were a couple of small leaks to begin with, however these were soon sorted out. I have a second hand set of pads in the front atthe moment, but they will be fine for the initial test day - which will be at a very reduced pace - just to iron out any bugs that may pop up.
Next step is to get the tailshaft made. I am dropping it off this week to Sydney Drivelines in Greenacre. Hopefully I should have it back next week. I also need to organise to have a couple of days off in a few weeks time. Once this organised, I will be taking the car for a new exhaust system and to have both the front and rear windows fitted. Once all this is done, it will be off to the tuner to have the car started and re-tuned.
At this rate we should hopefully hit the track by mid year.
New Tailshaft (5/3/04)
I have received the tailshaft back today from Sydney Drivelines, based in Greenacre. The guys there were excellent to deal with and reasonably priced. The shaft that I had was about 5cm too short, so it had to be re-tubed. This effectively involved cutting the ends off the original tailshaft I supplied them, and fitting the old ends to a new piece of tube. The original uni-joints were fine and have not been replaced. I plan to have the tailshaft installed into the car tonight.
Next on the list of things to do is to have the front and rear windscreens installed and a new exhaust system made. I am planning on having a couple of days off work to get this done, sometime around the 18th & 19th March. After that, the car will be ready to go on the dyno to be started and tuned. Then..... it will be off to Wakefield Park for a test day soon after that. It's getting exciting!!!!!
Quick Update (8/3/04)
The tailshaft is in the car and fitted perfectly. Thanks go to the guys at Sydney Drivelines. Also, while I was looking through my cupboards for some parts, I found a set of brand new Bonnet Pins! I must have got them with a whole heap of other parts at some stage. Anyway, I spent the afternoon fitting them to the car so now it looks even more like a race car - standing still! I'll get some pics up soon, but it may be a couple of weeks before I can get them on line.
Also, the Windscreen fitter has been booked for Thursday 18th March, and Liverpool Exhausts will be fitting the new exhaust system on Friday 19th March. Then we will be ready to get it started - hopefully next month.
Exhaust is done (20/3/04)
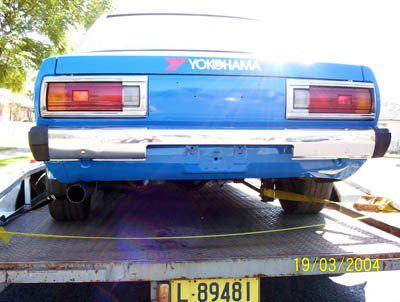
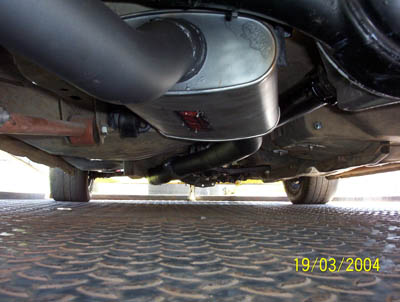 After 5 hours at Liverpool Exhaust, the exhaust system is finally done. Alex at Liverpool Exhaust did an awesome job of this system. It is 3" from the dump pipe all the way through. All bends are mandrel bends, and the system is flanged at the gearbox to facilitate easy removal of the rear half of the system when I need to drop the diff down. The system stays close to the floor, to give as much ground clearance as possible. Originally I thought we would run the exhaust out the side of the car, however this would have limited the ground clearance and made it very difficult to get the car on and off the trailer.
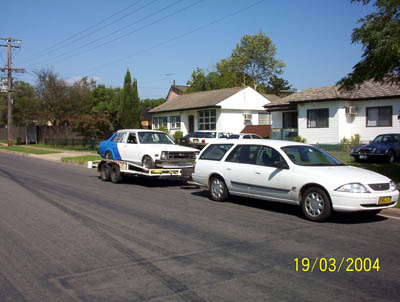 Also completed was the fitting of both front and rear windows. Dale from Prospect Auto Glass came out to the house and fitted the window's on site. The next step is to get the car started and then tuned. I have contacted a guy who specialises in installing and firing up Motec equipped cars. While he doesn't tune then as such, he does get them started, and ready to go on to the dyno. He will becoming out to the house on April 5th to have a look at the job. If it is simple enough, we may have it runnin gthat night, however, if it proves to be too difficult - I will be taking the car to his workshop so that he can spend some more time on it. Fingers crossed for the April 5th!
Still No Fire! (22/4/04)
Well April 5th has come and gone, so to has a second full night of chasing problems with the wiring harness. Anton from Anton's Race Electrics has been great, but as yet we have not been able to isolate the problem. In total we have spent 9.5 hours testing things, re-routing wires and scratching our heads. We have also spoken with the guys at Motec, who have been very helpful, but still there is no fire in the engine.
We have made some progress though. We now know that the timing is correct, and we have re-wired some of the relays to allow for the auto cut off of the fuel pumps after 5 seconds with out the engine running. As a test, we also sprayed some Aerostart into the inlet manifold and the engine fired up with out hesitation - and I couldn't wipe the grin off my face! It didn't cough or splutter, just ran smoothly until we stopped spraying the aero start. This led us to believe the problem was related to fuel.
What we have managed to determine is that for some reason, everytime an injector fires the 'ref' wire on the ECU picks up some electrical noise (spike). After putting a scope on the injectors, we also found that there is not enough power getting to the injectors to drive them. Problem is, when we tested each wire individually, there is no short anywhere. This has been extremely frustrating, and the next step is to take the car to Anton's workshop for him to spend some more time finding the problem. Hopefully the car will be at Anton's this weekend.
We still have a couple more ideas to try before we give up, but if the car is not running very soon, I will be asking Anton to re-wire the entire loom from scratch. This will be costly, but may work out cheaper than chasing a problem for an indefinate period of time.
More news as it come to hand
No good news yet! (17/5/04)
Just a quick update. The car has still not fired, and it has been extremely frustrating! I dropped the car off to Anton's workshop yesterday to be completely re-wired. Every single wire in the car will be stripped out and the whole car will be re-wired from scratch. This includes all new switches, circuit breakers and anything else related to the electrical system.
Some of the things we will be doing is adding a plug at the firewall for anywiring that goes to the engine. This will allow me to disconect one plug to facilitate removal of the engine. Also, all wiring for the gauges in the dash will also be through a plug, again allowing quick and easy removal of the dash panel. This is particularly handy in case I need to get to the brake master cylinders.
The re-wire will take quite some time, up to two months. I will add posts as we make progress.
We have Ignition! (27/6/04)
Last night for the first time, the car started and ran - all be it rough! Anton, from Anton's Race Electrics wanted to try one more trick prior to removing the old wiring harness. He placed a resistor across two of the wires, which stopped the spike from occuring. This in turn allowed the injectors to receive enough power to drive them. This solution however is not what I want. I see this as a "Band-aid" fix, the problem is still there - somewhere - we have just covered it up. I have asked Anton to continue with the complete re-wire, which includes a brand new Motec harness.
Although the car has started, we still have a few problems to track down. Firstly, the car would not start with all the inlet plumbing connected, this is very strange. The only conclusion that I can come to is that at some stage during the re-assembly, I may have left a rag in part of the inlet tract. I will be going to the workshop this afternoon to remove all the inlet piping from the turbo through to the plenum, to double check that we do not have any obstructions. At this stage, the car runs in naturally aspirated form, hopefully it is something simple.
The second problem is that we believe the crank case/rocker cover may be pressurising. I had sealed off the breather on the rocker cover as we are running the dry sump system. The dry sump is designed to scavange the oil at twice the rate that it is pumped in. This should result in a vacuum being formed in the crank case. I will have a closer look at this tonight. My first thoughts are, that due to the length of time this engine has been sitting idle, we may have some issues with valve's sealing or rings sealing perfectly. As the engine was re-built prior to storing, I am hoping that this issue may rectify itself to some degree with some running time on the engine. Until then I will set up a breather can from the rocker cover also.
As for the re-wire, progress is coming along well. The centre switch panel has been completed, as has the new dash panel. The glove box has also had all the relevant fuses and relays added. We are getting very close, but it will most likely be another 4-6 weeks before I can bring the car home, and get it to the dyno for a tune. I hope to take some pictures tonight - stay tuned.
More news as it comes to hand.
Update on Engine Problem (6/7/04)
After some more testing, we have diagnosed the problem with the engine as being the rings. It looks at this stage as though we will be pulling the engine out as soon as it gets back from Anton's. Once it is out, we will strip the engine, inspect and rebuild with new rings and gaskets. We may also replace the bearings if necassary, although we hope this will not be needed.
The re-wire is still progressing nicely. At this stage we hope to get the car back in approximately 3 weeks time, or at the latest by the end of July.
Home Page
Sunny Specifications
Sunny Diary - Page 1
Sunny Diary - Page 2
Sunny Diary - Page 4
Sunny Diary - Page 5
 The Electricals are getting sorted! (3/8/03)
  From the battery we move forward to the main power switch. This switch disconnects the entire cars electrical system from the battery. The switch is actually three switches in one, although we only need to use two of them. On the base of the main switch there are two other switches, one normally open, the other normally closed. I will connect the alternator charge wire through one of theses switches and then back the batter side of the main power switch. The reason we do this is to stop the alternator from supplying the system with power once the main power switch is turned off. This in turn stops the engine.


 Left: Starter button and switches with wiring completed.
 Left: Latest engine bay picture shows everything in place basically ready for a start.
 As can be seen by the pictures, the car is really starting to come together. The only thing left to do now prior to starting the engine, is to re-fit the dry sump pump. I picked up the pump today, after having a small modification performed to stop the front seal popping out. Before re-fitting the pump to the car, I need to check the pulley will clear the new bolts which hold the retaining plate. This should happen this week, after getting the Pulley back from a friend who has been using it on his car at a race meeting this weekend.

 In this pictue you can see that the master cylinders only just fit. The white bar across the bottom of the picture is the cross bar for the roll cage which sits under the dash. There is only a few millimeters of clearance betweent he end of the cylinders and the cross bar. It is for this reason we had to go with the AP Master Cylinders - as a bonus they are also one of the best master cylinders available on the market.

 Just for good measure I took a couple of pictures of the roll cage also. These pics show how substantial the cage is. This cage gives great strength to the chassis of the car. Also a good shot of the seat.


 Here are a couple of more recent photos of the engine bay. I think everything is now in place, apart from the heat shield that will be installed to attempt to shield the intake from the hot air under the bonnet.

 The car is really starting to look like the finished product. Only changes to come prior to hitting the track are signwriting, and bonnet clips. After we get on track, both front and rear spoilers will also be added. I want to get some testing done first though without the spoilers, this way I will be able to judge just how much affect they have on the car.
  Brakes almost finished! (22/2/04)
 This picture is a great shot of the rear end, including the new brake lines.


 After 5 hours at Liverpool Exhaust, the exhaust system is finally done. Alex at Liverpool Exhaust did an awesome job of this system. It is 3" from the dump pipe all the way through. All bends are mandrel bends, and the system is flanged at the gearbox to facilitate easy removal of the rear half of the system when I need to drop the diff down. The system stays close to the floor, to give as much ground clearance as possible. Originally I thought we would run the exhaust out the side of the car, however this would have limited the ground clearance and made it very difficult to get the car on and off the trailer.
 Also completed was the fitting of both front and rear windows. Dale from Prospect Auto Glass came out to the house and fitted the window's on site. The next step is to get the car started and then tuned. I have contacted a guy who specialises in installing and firing up Motec equipped cars. While he doesn't tune then as such, he does get them started, and ready to go on to the dyno. He will becoming out to the house on April 5th to have a look at the job. If it is simple enough, we may have it runnin gthat night, however, if it proves to be too difficult - I will be taking the car to his workshop so that he can spend some more time on it. Fingers crossed for the April 5th!