All strips are cut on the crosswise grain,from selvage to selvage. Pair up the Light A strips and the Dark A strips, the Light B strips with the Dark B strips, etc as they are cut.
Fabrics will repeat throughout the blocks because the strips are cut from four (4)
fat quarters at a time.
Simply choose any four (4) fat quarters for each set of strips.
Some can be used more than once. For instance one fat quarter
will generally yield at least 15" of length, so it's
possible to cut a 4.5" strip and a 6.5" strip and a 2.5"
strip from the same fat quarter. Or, cut a 2.5" strip and an
8.5" strip from the same fat quarter. Just mix things around.
Cut on the crosswise grain, beginning at the selvage edge.
{All seam allowances are ¼".}
Wind two or three bobbins before beginning to piece--saves time and aggravation.) Begin with
the A set of strips. Pair up each light strip with a dark
strip, matching the edges at the beginning of the seam, and sew
together. Repeat with the B, C and D sets. Using a
dry iron and Granny's Lift and Thump Method, press each
strip set so that the seam lies under the dark fabric. (Tip: Place the
strip set on the ironing board with the dark strip on top.
Press the seam as it lies, then pick up the dark fabric and
smooth the set open. Press again. As long as the dark
is on top at the beginning, the seam allowances will lie where
they should.)
Now, trim one end of each strip set so that it is
square, then slice each set into 2.5" sections. Each
set should yield about 30 sections.
A Strips and Sections
Light A - 8.5" strips; Dark A - 2.5" strips

B Strips and Sections
Light B - 6.5" strips; Dark B - 4.5" strips

C Strips and Sections
Light C - 4.5" strips; Dark C - 6.5" strips

D Strips and Sections
Light D - 2.5" strips; Dark D - 8.5" strips

Cut the Dark E (10.5") strips into 2.5" sections also.

Block Construction:
Piece the blocks beginning with the A and B
sections. Place the two sections right sides together, carefully
lining up all edges, and sew with a ¼" seam allowance.
Keep feeding sections through the machine until all the pairs are
sewn together. Don't clip between each pair.
This little trick saves time and thread. (Tip: Begin the
seam so that the lights are at the top and the darks are at the
bottom. This way, the presser foot doesn't push the
seam allowances out of position.) Take the resulting string of
sections to the ironing board and press each pair open.
Continue adding sections according to the picture.

Setting Together:
Now comes the fun part--deciding on a
setting for these blocks. It's possible to use almost
any setting which might be used for a regular Log Cabin quilt.
Consider any of the settings below. It's also possible
to set the top together as if the blocks were big triangle-squares.
Do whatever looks best. There are no Quilt Police!

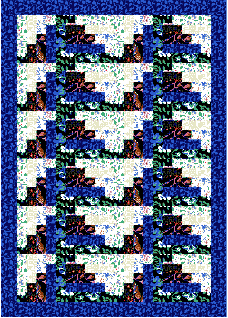
Delectable Mountains
Number of Blocks: 24 (or any even number)
Set: 4 blocks, 6 rows |

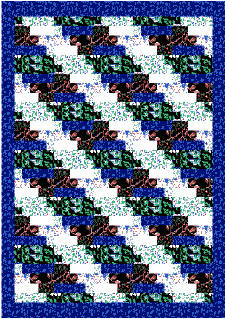
Ridge and Furrow
Number of Blocks: 24 (can use an odd number)
Set: 4 blocks; 6 rows |

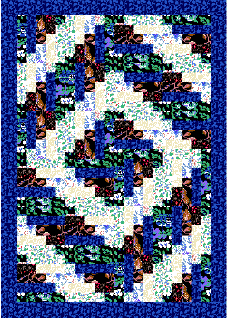
Barn Raising
Number of Blocks: 24 (or any even number)
Set: 4 blocks; 6 rows |

Flying Geese
Number of Blocks: 24 (or any even number)
Set: 4 blocks; 6 rows |