

The following is an introductory assignment/orientation to Macromedia Flash 5. You are given my permission to make changes as you see fit. Flash 5 combines web creation elements as well as animations and while I am still learning, it seems like the application to acquaint high school students with.
Course: Communication Technology I or II: Animation Unit #1
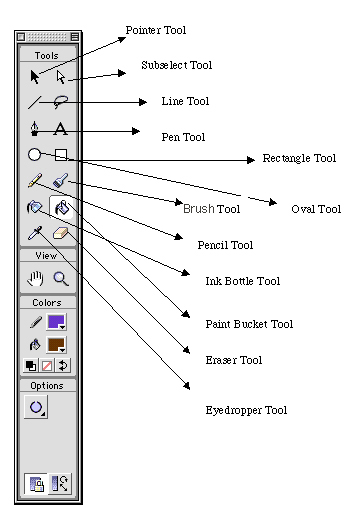
Lesson Title: Drawing with Flash
Objectives: At the end of this lesson, the student will be able to: 1. Draw with Flash 5
2. Distinguish and recognize all tools within Flash's toolbox
References: Mohair, James. L. Flash 5: Graphics, Animation and Interactivity. Onward Press: Phoenix. 2002.
Wilson, Scott. et al. Flash 5: Inside Macromedia. Onward Press: Phoenix. 2002.
Equipment/Materials for this activity:
* Teacher Handout: Provided here for your use
* Computer: (either Mac or PC)
* Flash 5
Anticipatory Set: The world of animation is much more than what Walt Disney, Charles Schultz or even Mel Blanc could have anticipated. Movies like Toy Story, A Bug's Life, and now Shreck have taken animation to a level of depth, body character, as well as expression that intrigues us as we see more of these movies. Where do this animators start? Well most started or still use applications life Flash in order to create simple movies, which convey ideas or begin new movies.
Students need to understand that before the creation of a "cool" movie, the basics must be learned. Students will meet with a great deal of opposition. Encourage them to think about the basics and that if they master these, the basics then become a strong foundation for which everything becomes easier.
Purpose: The purpose of this lesson is to familiarize students of the tools in the Toolbox. While these tools as you see appear to be similar to those of Adobe Photoshop and Pagemaker, there are some subtleties which you and the students will learn.
Model: I hand out the following activity at the beginning of the lesson plan. My teaching philosophy with computers is one of letting the learner learn. I try to facilitate and to observe, but I remain detached from the learner to let them experience the software for themselves. While I answer questions, I don't like to answer them all as I've found that students stop learning and latch onto me for success.
Guided Practice: The students will be given a self-paced activity, which allow students through repetition to achieve a predetermined object. This object is the same that you could do.
Closure: Knowledge in knowing how to draw in Flash 5. How will I know that students understand these concepts? By being able to observe students after this activity. If students understand the concepts than I will notice quality work faster from them than those who do not will
Activity: Drawing in Flash 5 (FOR STUDENTS)
1) Locate Macromedia Flash 5 (Under C: (Windows) or as a directory (Mac). Please open the Macromedia Flash 5 application.
2) To start off, we need a new file to work with. We do this be selecting the Menu Option File/New.
3) Now take a look at the Toolbox and get to work. In the Toolbox select the Line Tool.
4) With your mouse button, click anywhere on the Stage (the stage is the work area that at 100% looks like a rather small photo) and continue to hold down the mouse. Drag out from where you started and create a line about 250 pixels long. Release the mouse to create the line.
5) Look at the Color section on the bottom portion of the Toolbox. The first option is the Stroke Color Modifier. Click on the small box and continue to hold down the mouse button to bring up the Color Well. Use the Eyedropper Cursor to select a color. Try drawing a few lines with this new color.
6) Let's make our lines a little bit thicker. Select the Menu Option Window/Panel/Stroke. What this will do is open the Stroke Panel. There are options, which include for changing the type of line (solid or a variety of dashed lines), in the first pull down menu. Draw a line or two with this new style.
7) The next option in the Stroke Panel is for line width. Click on the pull down arrow. A pull down menu appears. What this will allow you to do once you've selected a line is change the weight or thickness of the line.
8) We won't save this work, so select Edit/Select All and then Edit/Clear.
Circle Tool
1) In the Toolbox select the Circle Tool.
2) With you mouse button, click anywhere on the Stage and drag out a circle about 200 pixels to form an oval. Release the mouse. Notice that your Stroke options have remained the same since when you last worked on the line activity.
3) Look at the Color section of the Toolbox again but this time, look at the second option, Fill Color. Click on the small box and continue to hold down the mouse button to bring up the Color Well. Use the Eyedropper Cursor to select a color. Try drawing a few circles or ovals with this different color.
4) Now let's create another oval�but first hold down the shift key and continue to hold it down as you click anywhere on the Stage and drag the mouse away from the point of origin. Notice something? A Perfect circle is created.
5) Let's use another tool to modify this circle. In the Toolbox select the Arrow Tool. Click anywhere along the Stroke (outline) of your circle. Click and drag on that Stroke, then release. Only the Stroke has been selected and moved, not the Fill.
6) Select the menu option Edit/Undo. Click anywhere within the inner area of your circle. Now click and drag the selected fill. Notice that only the fill has been selected and moved, not the Stroke. If the Stroke is moved, then you need to readjust to get the fill.
7) Select Edit/Undo.
8) Double click within the fill of the circle. Notice that both the Fill and the Stroke have been selected. Click and drag to move both the Fill and Stroke.
9) Take some time here to practice drawing circles and ovals with the Circle tool. Don't forget the Fill and Stroke options either. Now, let's examine the Pen Tool.
Pen Tool
1) Select the Pen Tool
2) With the Pen selected, click anywhere and release the mouse. After some navigation, click again. Notice that Flash automatically connects the 1st and 2nd anchor points.
3) Now do the same thing but this time instead of ending with releasing the mouse drag and see what happens. You will be able to create curves and the size of the curve is dependent on how far away from the line you drag.
4) Now let's use a new tool: the Subselect Tool.
5) Click on either the anchor points of the straight or curved line. Notice the additional handles. By clicking and dragging the degree of curvature is changed.
6) After changing the degree of curvature, remember the Pen Tool and Subselect Tool. Also keep in mind how the subselect tool is able to change any curve.
Rectangle Tool
1) With the Rectangle tool selected, click anywhere on the Stage and drag to form a rectangle. As with the circle tool, by holding down the shift key when creating a Rectangle, you create a perfect square.
2) Now look at the bottom of the Toolbox at the options section. The only option currently is the Round Rectangle Radius Modifier. Please click on that. This will open up the Rectangle settings dialog window, allowing you to set the Corner Radius for a rounded rectangle.
3) For example, type if 30 and click OK. Draw a few rounded rectangles. Change the Stroke and Fill options. When done, please clear (Edit/Select All, Edit/Clear).
Pencil Tool
1) Please select the Pencil tool. Notice folks that there is not one but three options: straighten, smooth, and ink. Choose Straighten and click anywhere on the Stage.
2) We could call this the Shift rule, but as in the other cases by holding down the Shift key you will create what type of lines?
Using the Eraser tool with the Circle Tool
1) Select the Circle tool, select the Stroke Color and set the color to black. The select the Fill Color Modifier and set that color to yellow. Draw a circular shape anywhere on the stage.
2) Now select the Eraser tool (named that for what it does and how it looks) and you notice in the Options box that there are several ways you could erase items: Erase Normal, Erase Fills, Erase Lines, Erase Selected Fills, Erase Inside. There was also Faucet, and Eraser Shape in the options box.
3) When you start out, both the stroke and fill will be erased in Normal mode.
4) What the Faucet allows you to do is erase an entire area of color - either a fill or a stroke with just one click!!!
5) Take a few moments to experiment with the other options as well as the other modifiers. When finished, please clear. We're almost finished, but now we'll use the Circle tool to show you how to use the Paint Bucket, InkBottle, and Brush Tools.
6) Select the Circle tool. Now select the Stroke Color and set that to black. Look at the Colors section of the Toolbar. There are 3 additional modifiers under Colors: Default, No Color and Swap Colors. Default returns both Stroke and Fill to default colors. No Color sets the fill so that it will have no color. Swap Colors swaps Stroke and Fill Colors with each other.
7) Select the No Color and draw a circular shape anywhere on the Stage.
8) Select the Paint Bucket Tool. Take a look at the options of the Paint Bucket: Gap Size, Lock Fill, and Transform Fill Modifiers. Select the Fill Color options and then select Yellow from the palette.
9) Click anywhere within the circular shape to assign the yellow.
10) Please experiment with the paint bucket, but do not throw the shape away.
11) Select the InkBottle Tool.
12) Select the Stroke Color and select red from the palette.
13) Click anywhere within the shape to assign the red color to the stroke.
14) Take some time to explore this tool. Get to know its capacities.
15) Select the Brush Tool. Note the Brush Options: Mode, Size, Shape, and Lock Fill. Select the Brush Mode and Paint Normal.
16) Select Fill Option and select a color that contrasts with the color you have been working with.
17) Click and hold the mouse down and drag the Brush Tool across the stage to paint a line. As you seen before, by holding down the shift key it will create a straight line.
Eyedropper Tool
1) What I would like to do is create two separate shapes with two different fills. Once you've done that then select the Eyedropper tool.
2) Move the eyedropper over the 1st shape and hold the mouse down and then release. You see in the Colors menu that the background colors have changed. You also have the Paint Bucket at your disposal.
3) With the Paint Bucket chosen, you can change the color of the second shape to be the color of the 1st shape. This could also be in reverse where you go from the second to the first shape.
While this is may be basic to some, for me I am learning about Flash 5 and look to implement the program into my program next year. I have no evaluation for this particular activity except that I will be able to tell which students have picked up this material and which have not. Since we already work with PhotoShop 6.0 most of these buttons can be learned.
