
The Bismarck class battleships were a class of battleships built by Germany around the onset of World War II. In terms of full-load displacement, the Bismarck-class ships were the third-largest battleships ever completed, behind the Japanese Yamato class and the American Iowa class. 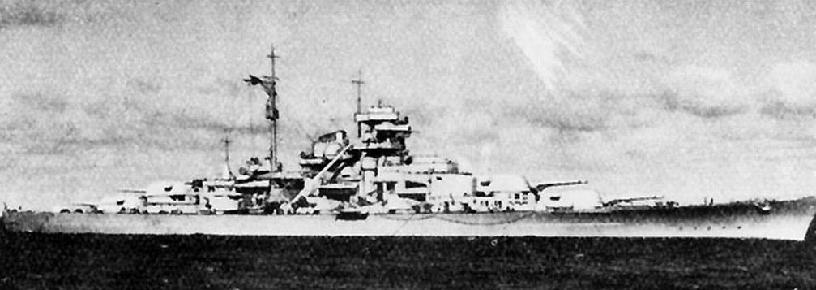
Kreigsmarine BattleShips - Bismarck Class ==========================================================================
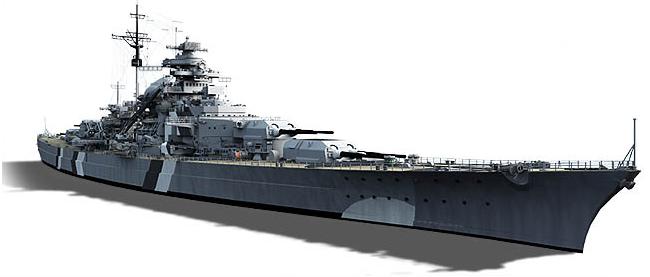
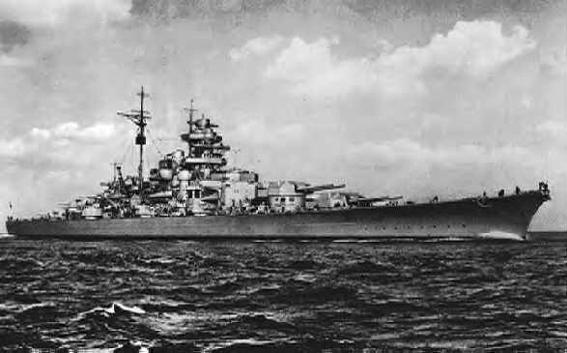
The German battleship Bismarck is one of the most famous warships of the Second World War. The lead ship of her class and named after the 19th century German chancellor Otto von Bismarck, Bismarck displaced more than 50,000 tons fully loaded and was the largest warship then commissioned. Her chief claim to fame came from the Battle of the Denmark Strait in May 1941 during which the battlecruiser HMS Hood, flagship of the Home Fleet and pride of the Royal Navy, was sunk within several minutes. In response, British Prime Minister Winston Churchill issued the order to "Sink the Bismarck", spurring a relentless pursuit by the Royal Navy.
Two days later, with Bismarck almost in reach of safer waters, Fleet Air Arm aircraft torpedoed the ship and jammed her rudder, allowing heavy British units to catch up with her. In the ensuing battle on the morning of 27 May 1941, Bismarck was heavily attacked for nearly three hours before sinking.
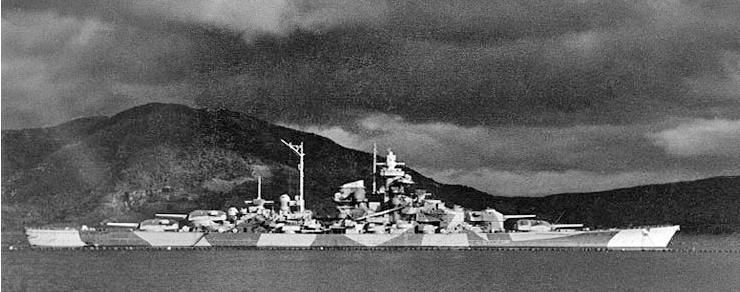
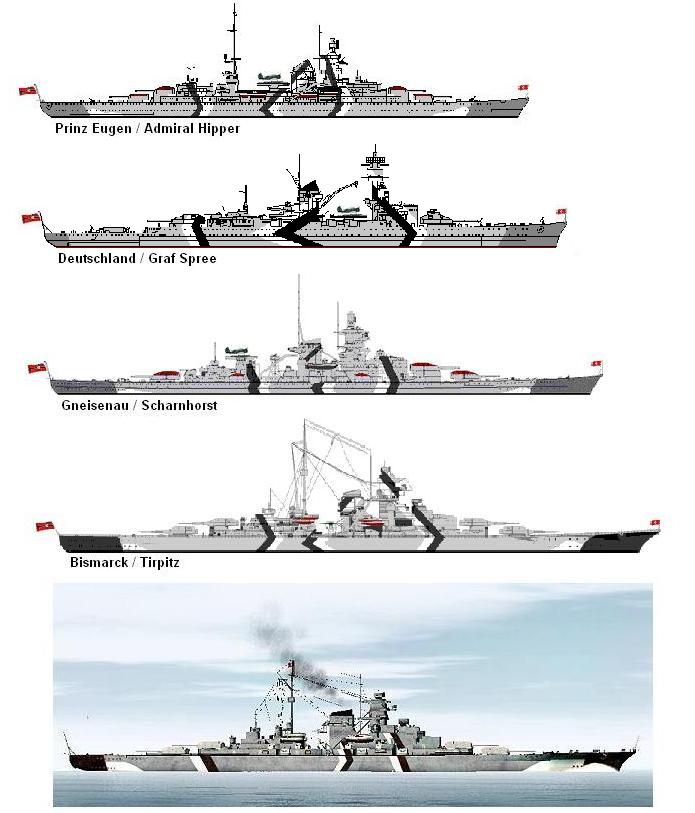
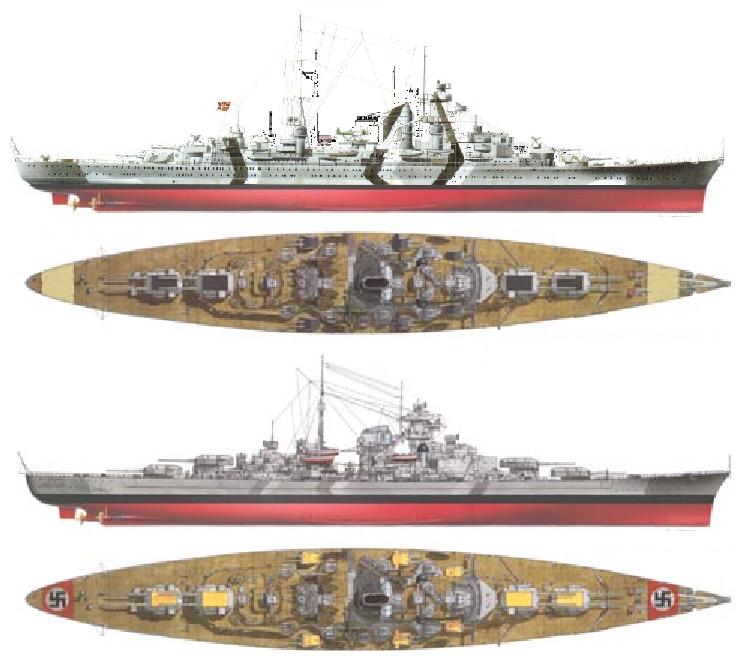
The Bismarck and the Tirpitz, the only two ships of this class, were laid down in 1936 and launched three years later, nominally 35,000 tons each in accordance with the 1923 Washington Naval Treaty after the tonnage restriction set in place by the Treaty of Versailles was effectively lifted by the Anglo-German Naval Agreement. They were a follow up to the Scharnhorst battlecruisers, being quite similar in design, armour, and outward appearance; however, the Bismarcks had an additional turret and were armed with 38 cm (15 in) guns at the onset, making them full fast battleships, as opposed to the 28 cm (11 in) guns of the Scharnhorst.
In reality, both were considerably heavier, weighing in at 42,000 tons. Although Bismarck and Tirpitz were nearly identical insofar as basic configuration and dimensions, Bismarck has become something of a naval legend while Tirpitz led a comparatively unglamorous life.
According to the prewar German naval program, Plan Z, the Bismarcks were to operate in conjunction with the Scharnhorst / Gneisenau class battleships (considered battlecruisers by the British) as a homefleet set against the Royal Navy. Operationally, they had to be used in attacking merchant shipping, because the planned H-class battleships were still nowhere near completion when hostilities commenced. Both Bismarck-class ships were lost during the Second World War. Bismarck was scuttled in combat with the Royal Navy in the North Atlantic. The Tirpitz capsized at its anchorage in Norway after an aerial attack from Royal Air Force bombers.
Design of the ship started in the early 1930s, following on from Germany's development of the Deutschland class cruisers and the Scharnhorst class "battlecruisers". To keep parity with the armament of new French battleships, Bismarck's displacement was increased to 41,700 tons. Officially, however, her tonnage was 35,000 tons to suggest parity with ships built within the limits of the Anglo-German Naval Agreement (1935) that allowed Germany to build up to five 35,000-ton battleships, the maximum displacement agreed by the major powers in the Washington Naval Treaty of 1922. Fully laden, Bismarck and her sister-ship Tirpitz would each displace more than 50,000 tons. The prototype of the proposed battleships envisaged under Plan Z, Bismarck's keel was laid down at the Blohm + Voss shipyard in Hamburg on 1 July 1936. She was launched on 14 February 1939 and commissioned on 24 August 1940 with Kapit�n zur See Ernst Lindemann in command.

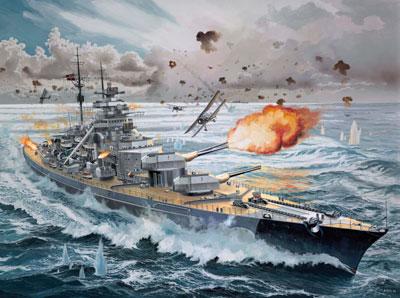
Bismarck was a formidable ship, the largest warship then commissioned, and was initially intended to be part of the Plan Z battle fleet. However, with the outbreak of war in 1939 and the increased demands on the German armament industry, Plan Z was no longer practical, and had to be scrapped. As a result, Bismarck was to be used as a commerce raider. For this purpose, the ship was reasonably well suited, as it had a broad beam for stability in the rough seas of the North Atlantic and fuel stores as large as those of battleships intended for operations in the Pacific Ocean. On the other hand, the ship's steam propulsion system, chosen in preference to diesel engines, ate heavily into its fuel supply and limited the ship's operational range. Still, with eight 15 inch main guns in four turrets, substantial welded-armour protection and designed for a top speed of not less than 29 knots (she actually achieved 30.1 knots (55.7 km/h) in trials in the calmer waters of the Baltic, a significant advantage over any comparable British battleship), Bismarck was capable of engaging any enemy battleship on reasonably equal terms. Bismarck's range of weaponry could easily decimate any convoy, should she break out into the spacious waters of the North Atlantic, where she could refuel from German tankers and remain undetected by British and American aircraft, submarines and ships.
Following the success achieved by the surface ships in the Atlantic during the winter of 1940-1941, the German Naval High Command decided to launch a much more ambitious operation. The idea was to send a powerful battle group comprised of the battleships Bismarck, Tirpitz, Scharnhorst and Gneisenau into the Atlantic to attack Allied merchant shipping. However it was not possible to use Scharnhorst and Gneisenau due to damage caused by British air attacks and mechanical failure. Instead the Germans decided that their newest heavy cruiser, Prinz Eugen, should sail together with Bismarck.
Bismarck completed preparations for her Atlantic sortie in the Bay of Danzig, refuelling almost to capacity and leaving the port of Gotenhafen (now Gdynia) on her first and only mission, codenamed Rhein�bung (Rhine Exercise) in the early hours of 19 May 1941. She was accompanied only by the heavy cruiser Prinz Eugen. Other capital ships, including the battlecruisers Gneisenau and Scharnhorst, that were to have participated in the sortie were unavailable because of mechanical problems and war damage. Moreover, plans to use Bismarck's sister ship, Tirpitz, were shelved because she had not yet finished sea trials. Despite these setbacks, the mission went ahead under the command of Admiral G�nther L�tjens. The Germans had various objectives: destroy as much Allied shipping as possible and force the British to suspend convoys, even temporarily; compensate for their weak submarine presence in the Atlantic; divert British naval forces from the Mediterranean to reduce the risks of the planned invasion of Crete and to allow supply and reinforcement to Rommel's Afrika Korps in Libya; and to wear out British warships forced to extended patrols. For the first part of the journey, as far as Norway, the route from the Baltic was chosen in preference to a North Sea breakout via the Kiel Canal.
The British had learned from Ultra intelligence (deciphered Enigma code messages) of current German air surveillance near the Denmark Strait and of the Royal Navy's home base at Scapa Flow, and of a recent (April 1941) delivery to the Bismarck of charts for the Atlantic. (However, the British decrypted no Enigma messages from or to the Bismarck squadron during Rhein�bung.) British radar-equipped cruisers, able to refuel in Iceland, were sent to patrol the Denmark Strait. Unequipped to refuel battle squadrons at sea, the Home Fleet awaited a firm sighting report before its ships deployed. On May 20, 1941, the Swedish seaplane-cruiser Gotland encountered and tracked the German battle group steaming north-west past G�teborg. A Norwegian officer in Stockholm learned of the sighting from a Swedish military intelligence source and informed the British naval attach�, who promptly radioed the Admiralty: "Most immediate. Kattegat today 20th May. At 15.00 two large warships escorted by three destroyers, five escort craft, ten or twelve aircraft passed Marstrand course north-west 2058/20th May 1941. B-3 repeat B-3". "B-3" indicated uncertainty about the report's validity, since this information was more precise and timelier than anything the naval attach� had obtained in a year at his station.
Alerted by this report, at 03.30 on 21 May the Admiralty requested air reconnaissance of the Norwegian coast. A Spitfire reconnaissance aircraft found and photographed Bismarck in a fjord (Grimstadfjorden, near Bergen) at 13.00, only two hours after Bismarck and Prinz Eugen had arrived. With this hard information, the British Home Fleet despatched the new battleship HMS Prince of Wales and HMS Hood towards Iceland. Cruisers covered other approaches to the North Atlantic.
Some books about the Bismarck operation mention a sighting report supposedly radioed by Norwegian agents on 20 May and acknowledged by the British. This story apparently originated in the 1967 book The Greatest Gamble, which lacks source citations and other authentication. No evidence, either direct or circumstantial, supports this story. British and Norwegian authorities deny that secret agents (i.e., HUMINT) were involved before or during the Bismarck operation, and that the Norwegian resistance had radio or other near-real-time communications with Britain and Sweden in May 1941. (Radio links between Britain and the Norwegian resistance were established in 1942.)
Both German ships had intended to refuel in Bergen but while Prinz Eugen did so, Bismarck failed to. This was later to have very serious consequences for Bismarck, especially as she had sailed from Gotenhafen with tanks less than brimful and had already used up about one-ninth of her full load during the voyage to Norway. L�tjens knew that an oiler, the Weissenberg, was waiting for him in the Arctic at least a day's sailing away. It was strange that, even with this information, he did not take this opportunity to refuel Bismarck for what could be a hazardous voyage. Moreover, his decision to stop in Bergen overturned any previous decision to head straight for the Arctic and the Weissenberg. It also wasted a day and exposed him to detection by British air surveillance.
At 19:45 on 21 May L�tjens again put out to sea, detaching his destroyer escort early on 22 May. Heading north, then north-west at 24 knots (44 km/h), the German fleet made good and largely uneventful progress across the Norwegian Sea towards Greenland and the Denmark Strait between Iceland and Greenland, the gateway into the Atlantic. This circuitous course went against Group North's recommendation to steam directly for the Atlantic between Iceland and the Faeroe Islands. It was also too far south to rendezvous with the Weissenberg to refuel Bismarck. Nevertheless, while in waters to the north of the Arctic Circle, Bismarck and Prinz Eugen remained undetected by British air reconnaissance, which was too far south. With a mind on convoy-raiding, L�tjens was hopeful of an easy breakout into the Atlantic, aided by foggy weather, but his plans were to be frustrated.
Air reconnaissance by the Royal Navy Fleet Air Arm under clouds on 22 May ascertained that the Bismarck had sailed from Bergen. With this intelligence the Home Fleet Battle Fleet, including the battleship HMS King George V and the aircraft carrier Victorious, put to sea. The Battlecruiser Squadron already bound for Iceland was ordered to cover the Denmark Strait. A bombing raid on 22 May by the RAF proved fruitless, as the Germans had already left.
On the evening of 23 May, the German force was detected by the radar-equipped heavy cruisers HMS SuffolkTemplate:WP Ships HMS instances and Norfolk, that had been patrolling the Denmark Strait in the expectation of a German breakout. The rival ships exchanged fire and Norfolk had a near miss when a German shell bounced off the water and struck the bridge of the ship, but did not explode or inflict any casualties. The heavily outgunned British cruisers sensibly retired to a safe range and shadowed the enemy while their own heavy units drew closer. However, Bismarck's forward radar had malfunctioned as a result of her heavy guns firing during this skirmish, and L�tjens was obliged to order Prinz Eugen to move ahead of Bismarck in order to provide the squadron with forward radar coverage. This decision later confused the converging British forces as to the identity of each German ship, their silhouettes being similar.
At approximately 05:30 on Saturday 24 May, as the German squadron was about to leave the Denmark Strait, Prinz Eugen's hydrophones detected the presence of two additional ships some distance to port. By 05:45 both were in sight, although the German force had not yet identified the enemy force. It turned out to be a British battle-group comprising the new battleship Prince of Wales, and the battlecruiser Hood, under the command of Rear Admiral Lancelot Holland. Prince of Wales had only recently been completed and was still being worked up (indeed, she sailed to meet Bismarck with about 100 civilian workers still onboard completing her fitting-out). Hood had been built as a battlecruiser and modified to give her protection more like a battleship, but still had relatively weak deck armour. The Germans were not surprised that they had been detected by British ships, but that they would turn out to be capital ships was an unexpected development.
At 05:49 Holland ordered fire to be concentrated on the leading German ship, Prinz Eugen, believing it to be Bismarck. Fortunately for the British, the captain of Prince of Wales was soon to realise the error and changed his target. Holland amended his order on the correct ship to be engaged but this did not reach Hood's gunnery control before the first salvo. Hood fired the first shots of the battle at 05:52, in daylight, followed very soon afterwards by Prince of Wales. The range to the German ships was c. 12.5 miles (20.1 km). The first salvo from Hood landed close to Prinz Eugen, causing minor shell splinter damage near the aft turrets.
More than two minutes went by without a reply from the German ships, before Captain Lindemann ordered fire to be returned on the lead British ship. This was Hood, which the Germans had identified only when the British squadron made a turn towards them at 05:55. This manoeuvre was undertaken, it appears, in an attempt to place themselves in the "zone of immunity", an area inside which both plunging fire, in particular, and direct enemy fire is relatively ineffective. Closer in, Hood would be less vulnerable and the advantage of superior German gunnery control would be lessened. The disadvantage was that, during the dash, eight of the eighteen British heavy guns could not be brought to bear.
Both Bismarck and Prinz Eugen opened fire on Hood, at a range of 11 miles (18 km). The early gunfire from the German ships was very accurate and within two minutes Hood had been hit by at least one 8″ shell from Prinz Eugen. Prinz Eugen hit Hood three times during the engagement. It struck the British ship near the mainmast and caused a large fire which Hood's crew tried to bring under control. However, Bismarck had also been hit by Prince of Wales, causing a fuel leak from the forward tanks; therefore L�tjens ordered his cruiser to switch its guns towards Prince of Wales, which his own secondary guns were now targeting.
At 05:54 the range was down to 22,000 yards (20 km), at 05:57 it was down to just 19,000 yards (17 km). Bismarck then fired a fourth salvo which was slightly long and astern of Hood. At the same time Holland had ordered " 2 Blue", a 20 degree turn to port. Before the ship began a turn to port Hood fired a fifth salvo at 05:59:30.
At 06:00 Hood, which was in the process of turning to port to bring her full weight of armament to bear on Bismarck, was hit amidships by at least one shell from Bismarck's fifth salvo at a distance of under nine miles (16,500 yards). Very shortly afterwards observers on both sides saw a huge jet of flame race skywards, followed by a rumbling explosion that split the huge ship in two. Splinters rained down on Prince of Wales, 400 yards (370 m) away. Hood's stern rose and sank shortly before the bow, all within three minutes. Admiral Holland and 1,415 crewmen went down with the ship. Only three men (Ted Briggs, Bob Tilburn, and Bill Dundas) survived. They were rescued about two and a half hours later by the destroyer Electra. The British Admiralty later concluded that the most likely explanation for the loss of Hood was a penetration of her magazines by a single 15″ shell from Bismarck, causing the subsequent catastrophic explosion. Recent research by submersible craft suggests that the initial explosion could have been in the aft 4″ magazine, followed by the aft 15″ magazine and that it may also have spread to the forward 15″ magazines via the starboard side ammunition passage.
Prince of Wales had to turn towards the German fleet to avoid hitting the wreckage left by the flagship and was hit a number of times by gunfire from both German ships. Still, her own gunfire had caused damage to Bismarck. The British battleship turned away, laying smoke, her aft turret firing briefly under local control. She had received seven hits (three of them from Prinz Eugen) and mechanical failures had left her with all but one of her main guns out of action. At 06:03 Prinz Eugen, which at that point had fired 183 20.3 cm shells, reported propeller noises to starboard, bearing 279� and 220�. Bismarck and Prinz Eugen were forced into emergency manoeuvres and sighted a Sunderland flying-boat shortly afterwards. Although Captain Lindemann wanted to chase Prince of Wales and "finish her off", Admiral L�tjens ignored his suggestions since delay risked the possibility of encountering other heavy enemy ships. In a battle lasting less than 20 minutes Bismarck and her consort had seen one enemy capital ship destroyed and another withdraw, an action almost unknown in the Royal Navy.
At 08:01 Bismarck made a transmission to Group North:
Sections XIII-XIV. Electric plant No. 4 broken down. Port No. 2 boiler room is making water but can be held. Maximum speed 28 knots (52 km/h). Denmark Strait 50 nautical miles (93 km) wide. Floating mines. Two enemy radar sets recognised. Intention: to put into Saint-Nazaire.
Faulty intelligence had led the Germans to believe that Prince of Wales was not yet ready for action, therefore reports from Bismarck referred to her as King George V, the first of that class, which had been active for some months.
Despite the jubilation onboard Bismarck, the battleship was not safe. The British knew her position, her forward radar was out of action and she had received three hits. (Baron Burkard von Mullenheim said the hits were scored by Hood with her third salvo[18]), one of which caused water to leak into and contaminate fuel oil in storage. From then on, she had to reduce speed to a maximum of 20 knots (37 km/h) to conserve fuel. L�tjens eventually decided that he would have to head for the French coast (the dry-dock in Saint-Nazaire) for repairs, while ordering Prinz Eugen to continue commerce raiding alone. The British continued to shadow her, Prince of Wales having rendezvoused with Norfolk and Suffolk. To enable his consort to escape, L�tjens turned on his pursuers and forced them to turn away, thus allowing Prinz Eugen to steam on out of British radar range. The plan was to be executed on the signal "Hood". L�tjens first attempt failed. However at 18:14 a second attempt succeeded, the two German ships parted and Bismarck signalled "Good hunting".
Determined to avenge the sinking of Hood, the British committed every possible unit to hunt down Bismarck. During the early evening of 24 May an attack was made by a small group of Swordfish biplane torpedo bombers from 825 Naval Air Squadron of the aircraft carrier Victorious. One hit was scored resulting in a single fatality (Bismarck's first); however, the blast caused only superficial damage to Bismarck's armoured belt.
The effect of the attack reopened the Bismarck's earlier "wounds". The collision mats which had been used to block further flooding in the bow region had come loose due to constant jarring from evasive action and the firing of the anti-aircraft guns. The packing of the damaged bulkheads was also loosened leading to the complete forward flooding of the forward port boiler room, which was abandoned. This caused the bow to go down further, L�tjens thus ordered speed to be reduced to 16 knots (30 km/h) while the mats were repaired.
For some time Bismarck remained under long-distance observation by the British. At about 03:00 on 25 May, the ship took advantage of her opponents' zig-zagging and performed an almost three-quarter clockwise turn behind her pursuers to escape towards the east and then south-east. Contact was lost for four hours; however, perhaps in awe of British radar capabilities, it appears that the Germans did not realise their good fortune. L�tjens, for reasons that are unclear but possibly believing that Bismarck was still being tracked (despite a communication sent by Group West telling him the opposite), transmitted a half-hour radio message to HQ, which was intercepted thereby giving the British time to work out roughly where he was heading. However, a plotting error made onboard King George V, now in pursuit of the Germans, incorrectly calculated Bismarck's position and caused the chase to veer too far north. Bismarck was therefore able to make good time on 25/26 May in her unhindered passage towards France and protective air cover and destroyer escort. By now, though, fuel was becoming a major concern to both sides.
The British had a stroke of luck on 26 May. In mid-morning a Royal Air Force Coastal Command Catalina reconnaissance aircraft from 209 Squadron, which had flown over the Atlantic from its base on Lough Erne in Northern Ireland across Donegal through a small corridor secretly provided by the �ire government, spotted Bismarck (via her oil slick) and reported her position to the Admiralty. From then on, the German ship's position was known to the British, although the enemy would have to be slowed significantly if heavy units hoped to engage it out of range of German aircraft protection. All British hopes were now pinned on Force H, whose main units were the aircraft-carrier Ark RoyalTemplate:WP Ships HMS instances, the old battlecruiser HMS Renown and the cruiser SheffieldTemplate:WP Ships HMS instances. This battle-group, commanded by Admiral James Somerville, had been diverted north from Gibraltar.
At dusk that evening, and in atrocious weather conditions, Ark Royal launched its Fairey Swordfish for another attack at 19:25. The first wave mistakenly targeted the Sheffield that was by now shadowing the quarry. Although precious time was lost by this incident, it proved beneficial to the British in that the magnetic detonators on the torpedoes used against Sheffield were seen to be defective and for the following attack on Bismarck were replaced by those designed to explode on contact. In a final attack, almost in darkness at 21:05, a hit by a single torpedo (launched by Sub-Lieutenant John Moffat) jammed Bismarck's rudder and steering gear. This rendered Bismarck virtually unmanoeuvrable, increased her list to port and she was able only to steam in a large circle in the general direction of King George V and Rodney, two frontline battleships that had been in pursuit from the west. After extensive efforts to free the jammed rudders, the fleet command finally acknowledged their by-now impossible position in several messages to naval headquarters. L�tjens promised that the ship would fight until the last shell was spent. The cost to the attacking British had been four Swordfish damaged, and another damaged beyond repair.

Throughout the night of 26/27 May, Bismarck was the target of incessant torpedo attacks by the British Tribal-class destroyers and the Polish Piorun. Bismarck inflicted some damage to the British destroyers. Aboard Zulu a sub-lieutenant in the gunnery control tower lost a hand to shell splinters while a shell landed on the destroyer's forecastle, but did not explode. Cossack had its radio antenna sheared off by a shell. The constant worrying tactics of the British helped wear down the morale of the Germans and deepened the fatigue of an already exhausted crew.
Both Ark Royal and Renown had a lucky escape during the night. The British ships were unaware they had come within firing range of Kapit�nleutnant Herbert Wohlfarth's U-556. However, U-556 was returning from a combat patrol and had spent its torpedoes. This was particularly galling for Wohlfahrt, as U-556 and Bismarck had exercised together in the Baltic, Bismarck was dubbed the submarine's "bigger brother". U-556 continued to shadow the British forces, reporting their position and guiding other U-boats to the area.
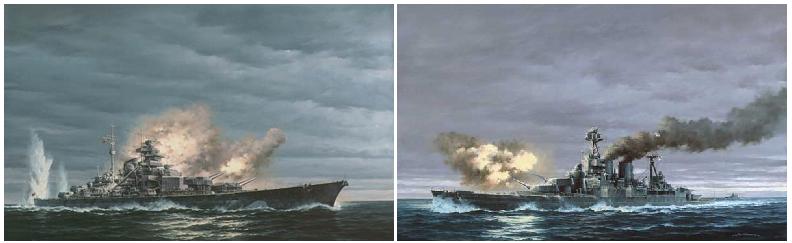
Around 08:00 on 27 May, Rodney and King George V closed to within 21 nautical miles (39 km) of Bismarck, with their enemy well illuminated by the morning sun in the background. At this point visibility was only 10 nautical miles (19 km) and the sea state at 4-5. High winds were blowing in 320 degrees from the North West at a force of 6-7. Rodney steered to the north so that her gunfire would work the length of Bismarck, while King George V took the side. They opened fire at 08:47. Bismarck returned fire, but her inability to steer, and her list to port, adversely affected her shooting accuracy. Her low speed (seven knots) also made her an easy target, and she was soon hit several times, with heavy cruisers Norfolk and DorsetshireTemplate:WP Ships HMS instances adding their firepower. At 09:02 an 8-inch (200 mm) shell from Norfolk hit the main gun director, killing the gunnery officer, Adalbert Schneider, who had been awarded the Knight's Cross in the early hours of the same morning for his part in sinking Hood. At 09:08 a heavy shell from Rodney hit both of Bismarck's forward turrets, Anton and Bruno, disabling the latter; this was followed by another salvo which destroyed the forward control post, killing most of the senior officers. The aft turrets, Caesar and Dora, continued to fire locally. At 09:21 Dora was knocked out. The crew of Anton managed to fire one last salvo at 09:27. At 09:31 Caesar fired its last salvo and was then knocked out. This salvo straddled Rodney jamming the ship's torpedo tubes. Bismarck's salvoes throughout the battle were directed at Rodney, the older ship (perhaps in the hope of achieving a success similar to Hood). When Admiral Guernsey observed this, he remarked: "Thank heavens she's shooting at Rodney". The closest Bismarck came to threatening King George V was when Freiherr von M�llenheim-Rechberg, under local fire control, zeroed in on the enemy but had his director blown away by a direct hit before fire could be directed at the British battleship.
Within 44 minutes, Bismarck's heavy guns were all silent. Rodney now closed to point-blank range (approximately three km) to pound the superstructure, while King George V fired from further out.
Bismarck continued to fly her ensign. With no sign of surrender, despite the unequal struggle, the British were loath to leave Bismarck. Their fuel and shell supplies were low, a demonstration of how difficult it was for a battleship to sink a similar unit, even in an unbalanced engagement. However, when it became obvious that their enemy could not reach port, Rodney, King George V and the destroyers were sent home. Norfolk had used its last torpedoes; therefore, Dorsetshire launched three 21-inch (533 mm) torpedoes, which may have hit Bismarck at comparatively short range. The battleship's upper works were almost completely destroyed but her engines were still functioning, although Johannes "Hans" Zimmermann (a boiler room stoker who survived) confirms salt water had entered the boiler feed lines causing the engineers to reduce speed to seven knots, fearing an explosion, and the hull appeared to be relatively sound; therefore, rather than risk her being captured, survivors have said the order to scuttle and then abandon ship was given. Many of the crew went into the water, but few sailors from the lower engine spaces got out alive. As Captain Lindemann was presumed killed with all officers after the bridge was hit by a 16-inch (410 mm) shell, it is unclear whether he could have given the order to scuttle. Some of the survivors, though, strongly maintain they saw him going down alive with his ship.
Bismarck went under the waves at 10:39 that morning. Unaware of the fate of the ship, Group West, the German command base, continued to issue signals to Bismarck for some hours, until Reuters reported news from Britain that the ship had been sunk. In Britain, the House of Commons was informed of the sinking early that afternoon.
Dorsetshire and Maori stopped to rescue survivors, but a U-boat alarm caused them to leave the scene after rescuing only 110 Bismarck sailors, abandoning the surviving crew in the water. The next morning U-74, which had heard sinking noises from a distance, and the German weather ship Sachsenwald picked up 5 survivors. In all of the 2,200 crew, 1,995 German sailors had lost their lives.
After the sinking John Tovey wrote in his memoirs, "The Bismarck had put up a most gallant fight against impossible odds worthy of the old days of the Imperial German Navy, and she went down with her colours flying". The Admiral had wanted to say this publicly but the Admiralty replied: "For political reasons it is essential that nothing of the nature of the sentiments expressed by you should be given publicity, however much we admire a gallant fight".
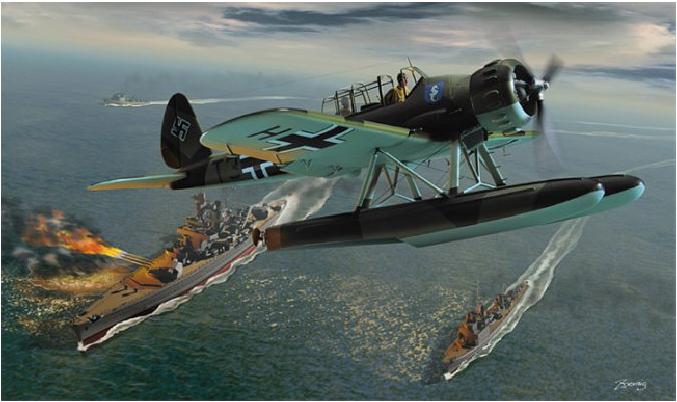
At 07:10 on the morning of the final battle, L�tjens, with Bismarck now doomed, requested that Group West send any U-boats in the area to retrieve the ship's war diary. U-556 was now low on fuel and had passed its shadowing duties and communication with Group West to U-74 which had just arrived (albeit damaged by depth charges and unable to fire torpedoes). Thus U-556 was underwater when L�tjens sent out the request to retrieve the war diary. An earlier attempt to send the diary via the Arado Ar 196 float aircraft had also failed, due to the damage the catapult had received from Prince of Wales at the Denmark Strait battle (the Arado was dumped overboard and its floats pierced to ensure it sank). However, by this point (08:00) it was far too late for a U-boat to reach Bismarck.
The Luftwaffe came under heavy criticism from Hitler for failing to help Bismarck on the morning of her final battle. Luftflotte 3 had been apprised of Bismarck's intentions as early as May 24, and its units, mainly equipped with Heinkel He 111s, could have been positioned to help the ship. On May 26 Bismarck was within 700 miles (1,100 km) of the French coast (as reported by Flying Officer Dennis Briggs flying a Catalina of No. 209 squadron). An attack by the He 111s, with a maximum range of 1,750 miles (2,820 km), could have slowed down Ark Royal and prevented the Fairey Swordfish attack which crippled Bismarck. As it was, the Luftwaffe appeared over the battle area an hour after Bismarck had sunk. 17 Kampfgeschwader 28 He 111s attacked Ark Royal but their bombs missed. Only 218 sorties were flown by the Luftwaffe in support of Rhein�bung with KG 100, KG 1, KG 54 and KG 77. The only casualty of these raids was the destroyer Mashona, which was sunk by Kampfgeschwader 77 on 28 May off the west coast of Ireland. A Focke-Wulf Fw 200 Condor had sighted Rodney but was unable to communicate the position accurately without radar, reporting her as 200 miles (320 km) further from the French coast than was the case. Thus a possible chance for the Luftwaffe to attack the British battleship was lost. Meaningful missions did not start until 03:00 on May 27, by which time Bismarck's fate was already sealed.
While Bismarck was a powerful ship, the long hiatus in German capital ship building from 1919 until 1933 led to a conservative design that was flawed and outmoded. The ship's design borrowed from the design of the World War I Bayern class battleships, as the ship was completed with some of her vitals above her armoured belt. This particular weakness left many communication systems, including her main damage control centre and foretop fire control director, open to destruction which contributed to her relatively rapid silencing in her final engagement. Three features the designs had in common were their armament, three-shaft propulsion plant and the armour layout.
A close study of the ship's layout, however, reveals that all fire-control and damage-control rooms are doubled and beneath the main armour deck and the cables from bridge and range finders were all leading through the three armoured shafts between these stations and the rooms beneath the main armoured deck. It was through one of these narrow communication shafts that Adolf Eich, Franz Halke and Heinz Jucknat escaped from their post in the aft computer room, to the aft fire control station.
A further example of outmoded design was the provision of both a secondary armament of twelve 5.9-inch (150 mm) guns and the inclusion of a separate battery of sixteen 4.1-inch (100 mm) high-angle (anti-aircraft) guns. This fitting of two types of weapons lagged behind the dual-purpose secondary armaments of Allied ships that allowed them to engage both air and surface targets, thereby saving on weight used elsewhere in their designs, eliminating the need for carrying two sizes of secondary ammunition and facilitating superior fire-control systems.
A critical weakness of Bismarck was the relative fragility of its stern section. On discovering the wreck, it was discovered the whole stern section had broken away. Due to the fact it was not near the main wreckage, and has not yet been found, it can be assumed this did not occur on impact with the sea floor. The missing section came away roughly where the torpedo hit was made, raising questions of possible structural failure. The stern area had also received several hits increasing the damage caused by the torpedo hit. This coupled with the fact the ship sank "stern first" and had no structural support to hold it in place suggests the stern became detached at the surface.
In 1942 Prinz Eugen was also torpedoed in the stern, after which her stern collapsed. This prompted a strengthening of the stern structures on all German capital ships.
The Bismarck class embodied much of what made Germany's World War I battleships outstanding combat vessels, and their design was broadly influenced by the last German battleship classes of World War I. The general disposition of the main battery, armour, and machinery was similar to the Bayern class.
However, the Bismarck also represented the limitations of practical design experience, as well as the compromises forced by designing individual large warships that were arrayed against a numerically superior adversary. The most serious problems were the location of fire-control systems, particularly for the anti-aircraft battery; the inability of the Germans to develop a suitable diesel propulsion system (a problem not limited to the German Navy); and the general weakness of the mixed-calibre secondary battery against aerial attack (which was mirrored in contemporary Italian, Japanese, and Soviet capital ship designs). While the preceding Kaiserliche Marine of World War I had an established institution of expert designers, it was effectively disbanded following Germany's surrender. The reformed Kriegsmarine was thus disadvantaged, but the Bismarck and Tirpitz were generally well-regarded ships, being a reasonable example of design compromise, and suited to the European theatre of operations.
The original design for the warships provisionally dubbed F and G (the Bismarck and Tirpitz, respectively) was as a fast commerce raider with 33cm guns, and slightly thicker armour than was eventually used on Bismarck. Crucially the machinery was intended to be diesels, giving a range of 16000 nmi at 21 knots, which would have permitted 5 week cruises. This would have allowed the ships to criss-cross the North Atlantic in search of targets, even allowing for the 1500 nm trip from Kiel to the main transatlantic shipping lanes. However, as the design was refined and reality intervened, the design was upgunned, and a high-pressure steam plant was used instead of diesel engines, which were considered too novel. This reduced the cruising range by almost half, to 8525 nm, along with a substantial reduction in cruising speed, to 19 knots.
The Bismarck class was poorly suited as a commerce raider, due to their short operational range but at least they had sufficient speed to elude any pursuit. The Bismarck class' top speed was greater than any opposing British capital ship, including their largest battlecruiser Hood (due to her age) and new King George V-class battleships.
Germany, in an inferior naval position compared to Britain, could never meet the Royal Navy in a traditional battle such as Trafalgar or Jutland. Therefore, pending the completion of Grand Admiral Erich Raeder's "Plan Z" (designed to built a fleet that could fight the British on equal terms), the existing battleships, plusincluding Bismarck and Tirpitz, were to be used for hit-and-run raids.
The Bismarck class, with its design compromises, was intended merely as an interim design that would eventually be supplemented in the German main battle line by a larger and more capable design, the H class battleship. Raeder had in mind ships in the 60,000 ton category, armed with eight 40.6 cm (16.0 in) guns, but the outbreak of war�and the subsequent tertiary status given the Kriegsmarine compared to the rest of the Wehrmacht�prevented any of these grandiose schemes from coming to pass.
The Bismarck class included Krupp steel armour; the side belt armour was nearly 320 mm (13 in) thick amidships. The main belt was continued along two-thirds of the ship's waterline length, with lighter protection (60 mm) forward for the ship's bow. This design ran contrary to the "all or nothing" armour scheme adopted post-1918 by the Royal Navy and United States Navy. It was chosen to reduce the risk of excessive bow or stern trims due to flooding produced by shell hits near the waterline; the loss of the battlecruiser L�tzow at the Battle of Jutland influenced this decision. This choice meant trading off additional protection for the central part of the ship, particularly for the command and control centres; the vulnerability of "soft" ends was later demonstrated in the loss of the Japanese battleship Musashi.
The basic layout of the horizontal protection was more questionable, in light of lessons learned in World War I, particularly at Jutland. This had emphasised that multiple thin layers of horizontal armour were less effective than a single thick layer. This vulnerability was accentuated in long-range plunging fire. Postwar tests by the United States Navy showed that the Bismarck's main armoured deck was penetrable at any distance greater than 11,000 metres by the USN's 16-inch (406 mm) / 45 caliber gun. However, the magazines and propulsion plant were far better protected (immune to a range of 25,000 m). The dual armoured decks were chosen by the Kriegsmarine to guarantee that shells and bombs burst upon contact with the upper armoured deck, rather than penetrating deeper into the ship's vitals.. The main armour deck angled down to support the lower edge of belt, as originally proposed by White in 1880; however, this has the effect of forming a shell trap, which had been identified as a dangerous feature in WW1 battleships. Thus, the Bismarck class's protective arrangements provided extensive close-range protection, while leaving the ship more exposed to plunging fire.
The main fire control system was located above the (comparatively thin) main armour deck of the vessel. This made it more vulnerable to shellfire from large and intermediate calibre guns than comparable British and American vessels. British and American capital ships mounted their main fire control systems underneath the main armour deck. This was proved all too true in the Bismarck's final battle, when the main fire control was knocked out of action early in the fight. This again was a known problem: the two armoured decks and the belt tended to constrain and intensify explosions.
The main battery turrets were reasonably well-protected, but armour thicknesses were less than those of contemporary British (King George V) and French (Richelieu) designs. Conversely, the secondary battery was better-protected than most rivals.
Another anachronistic design feature was a 145 mm belt of citadel armour, rising from the top of the main armour belt to the main deck. This was a contradiction of the all-or-nothing principle adapted by British and American battleships; the practice of citadel armour was only mirrored in the Italian Vittorio Venetos. The weight of this armour could have been used for thicker deck armour instead. The citadel armour concept was retained by the Germans due to their concerns over close-quarters battle with British cruisers and destroyers in confined seas, such as the North Sea.
The underwater protection system was built around a single torpedo bulkhead of 45 millimetres thickness, coupled to an outboard void space; no bulges were fitted. This system was design to prevent critical damage from a 250 kg torpedo warhead. A multiple-bulkhead system, a staple of US capital ship design, could not be accommodated on the Bismarck class because of beam restrictions. The depth of the system was further limited by the change from turboelectric drive to steam turbines, which necessitated bulkier machinery. However, the propulsion plant was extensively sub-divided, such that a serious hit would still disable only two of the ship's boilers.
Immune zone analysis of the armour scheme shows that it was inferior to that of all RN battleships built from 1920 onwards. The good points were that the Bismarck class had a very broad beam (if not broad enough to fit a multiple bulkhead torpedo protection system), making it very stable as a gunnery platform and making it, together with the extensive subdivision of the ship, very torpedo resistant, in part. In the final mission and battle half a dozen torpedo hits against the main armour belt were absorbed virtually without causing any damage, except for the single hit which damaged the rudder. In the final battle only four heavy shells penetrated the armour belt (two through the upper citadel and two through the lower thicker main belt) and none penetrated the main armour deck. This was mainly due the fact that the duel was fought at medium and short ranges.
The third survey of the wreck of the Bismarck [see below] found no underwater penetrations of the ship's fully-armoured citadel and only four direct hit holes on it above the waterline, all of them on one side, as delivered by the Rodney's 16-inch (406 mm) guns. Huge dents showed that the 14-inch (356 mm) shells fired by the King George V bounced off the Wotan-type German belt armour.
The American expedition estimated that Bismarck could still remain afloat for at least a day when the British vessels ceased fire and could have been captured by the Royal Navy. They concluded the direct cause of sinking was due to scuttling: sabotage of engine-room valves by her crew, as claimed by German survivors.
In all 2,876 shells of various calibres were fired by the British ships. Approximately 300�400 hit. Only two hits fully penetrating the main armour were located. These holes were on the starboard side, suggesting that they were 16-inch shells from Rodney. Two other penetrations were found on the port side, above the main armour belt, and appeared to be by 14-inch shells. In all 714 14-inch and 16-inch shells were fired by the two battleships, of which about 80 hit the Bismarck. In successive hits main gun shells destroyed or silenced A turret, B turret, each of the three directors, D turret, C turret and the conning tower/ bridge.
The Bismarck class rudder has been criticized as being too small to effectively turn the ship quickly, and excessively vulnerable compared to the double rudder setup of the American Iowa class. These latter criticisms are justified by the single torpedo hit scored on Bismarck's rudder by Fairey Swordfish torpedo bombers during the British pursuit of the vessel.
An additional flaw is the choice of only three screws instead of a more common four as in most American, British, and Japanese battleships of the time. The central shaft of the three-screw setup compromises the strength of the keel particularly where it emerges from the hull. A four-screw setup allows greater flexibility and maneuverability. It would have also allowed the Bismarck more effective steering "by propeller revolutions" after her rudder was disabled by a torpedo. However, the triple-screw arrangement required a lesser beam (an important consideration, given the constraints of the Kiel Canal) and left space for the torpedo-protection system.
The problems in steering Bismarck with propellers alone became obvious during her Baltic sea trials. The rudders were locked in a neutral position and an attempt was made to steer with differential power on the propellers. The propellers' effect was minimal. This may have been due to the port and starboard propeller shafts being aligned along converging lines with the center shaft, which would have reduced their capacity to turn the ship by asymmetrical thrust. No thought was given during trials to seeing what would happen if the rudders were locked hard over. This would have grave repercussions for Bismarck during its only combat mission.
The armament of the Bismarck class is sometimes criticized as being less devastating than it ought to be for a ship of its size. For instance, the American Iowa-class battleships had approximately the same standard displacement (45,000 tons) but had more and heavier guns�nine 16-inch (406 mm) guns in three turrets, to eight 38 cm (15 in) guns in four turrets�whilst a similar armament to the Bismarcks was carried by British ships of smaller size (the Revenge and Queen Elizabeth classes). In addition, the Nelson class mounted nine 16-inch guns on eight thousand tons less displacement. However, the Nelsons were of a much earlier design, subject to extensive weight-saving compromises, and limited to a top speed nearly seven knots slower than the Bismarcks.
This disproportion between firepower and overall tonnage is due in part to the Bismarcks use of four twin turrets (the 4 � 2 configuration), a design practice that harkened back to the First World War. Almost all other post-1921 capital ships had triple or even quadruple turrets, which allowed for additional heavy calibre guns, while reducing the number of turrets. Although triple turrets were considered for the Bismarcks, there were concerns that the extra barrel would lower the overall rate of fire in each turret, along with fears that a single well-aimed hit could disable a larger proportion of the ship's firepower. It was also felt that four twin turrets allowed for a better field of fire and a more effective sequence of salvoes. Therefore, twin turrets were retained.
The Iowa class represented a later design than the Bismarck class, being a post-Washington Treaty fast battleship design whereas the Bismarck was treaty-limited to an extent. The earlier North Carolina and South Dakota ships were also Treaty-restricted but were slower and had a lower displacement, while their guns had a heavier broadside but shorter range.
Additionally, the Germans had experience with 38-cm naval guns; a 40.6-cm weapon would have had to have been designed from scratch. The Bismarck was also authorized prior to the breakdown of the London Naval Treaty and the invocation of the 45,000-ton, 406-mm main gun escalator clause; building 40.6-cm battleships would doubtless have seemed provocative, especially to the United Kingdom. As it was, the 38-cm main battery of the Bismarck class compared well to their contemporaries, outranging almost all of the 380-mm and 406-mm guns of contemporary navies (with the exception of the Italian 381-mm gun, which suffered exceptional bore erosion as a consequence). The German gun was superior to the World War I era BL 15 inch /42 naval gun (381 mm) of the Royal Navy in both range and penetration.
The secondary armament of the Bismarck class was a split-battery system, and was criticized for being unnecessarily complex, and incurring a severe weight penalty, while still providing an inadequate aerial defense.
Second World War-era capital ships had four classes of artillery: the heavy main battery, intended to engage opposing battleships and cruisers (356 mm (14 inch) or greater); a secondary battery for use against enemy destroyers of 127 to 155 mm (5 to 6.1 in); heavy anti-aircraft guns of 90 to 127 mm (3 to 5 in), which could create barrages to knock out aeroplanes at a distance; finally, light rapid-fire anti-aircraft batteries (A/A) to track and bring down aircraft at close range. The light A/A was dispersed throughout the ship and included both automatic cannons (20-40 mm) and heavy machine guns.
An innovation of the US Navy and Royal Navy was that they combined the secondary battery with the heavy anti-aircraft guns, creating a dual-purpose secondary battery. They discarded the dedicated, anti-ship secondary batteries altogether, because a battle-line fleet would be screened against cruiser and destroyers most of the time. Also, it was deemed unlikely that a battleship would be simultaneously facing both rushing destroyers and aircraft, and it would take up too much space to have separate types of guns to deal with both threats. Rather, the British and Americans replaced them with turret-mounted dual purpose guns that could be used against both aircraft and ships. The space saved from combining the two types of guns added to simplification of supply, increased deck armour coverage, stowage of other equipment, a larger light anti-aircraft battery, and other needs. For example, a Royal Navy battleship of the King George V class had sixteen 5.25-inch (133 mm) guns that could engage either enemy ships or high level aircraft, as necessary. This arrangement was far more efficient, and was deemed adequate to meet anti-surface and anti-aircraft needs under most circumstances.
The Kriegsmarine, in a practice similar to the other Axis navies (as well as the Soviet fleets), adopted a mixed-calibre secondary battery, with dedicated anti-ship guns, coupled with smaller-calibre heavy anti-aircraft batteries, instead of adopting dual-purpose secondaries like the British or Americans. The French Navy used a mixed-calibre system, as well, but their secondary battery was dual-purpose, as per Royal Navy/USN practice. This practice tended to complicate ammunition supplies and render certain armament useless in some situations.
The Bismarck had a battery of twelve 15 cm (5.9 in) cannons that were designed to be used against ships only. The Kriegsmarine supplied time-fused shrapnel shells for these guns to put up a long-range curtain of fire against approaching bombers. They were useless against high-flying fast bombers and torpedo bombers skimming the surface. They could not be elevated sufficiently and, at six rounds per minute, fired too slowly to be effective. Sixteen 10.5 cm (4.1 in) weapons were mounted to counter aerial threats. In order to accommodate both sets of guns, the numbers of both guns had to be compromised, reducing the anti-ship and anti-aircraft broadside. A serious flaw was that the ships' designers did not give each gun mount its own fire director. This meant that when fire-direction instructions were relayed, the forward C31 gun fired at the target, and the aft C37 gun fired at a point behind the target..
While a dual-purpose, single-calibre secondary battery was considered by the Kriegsmarine, it was not adopted. When the Bismarcks were designed, the Germans did not have a 128-mm range weapon with the requisite hitting power, range, and rate of fire to adequately defend the ship. Moreover, the Germans were particularly concerned about the large numbers of heavy destroyers used by the Royal Navy at the time, and concluded that a larger-calibre secondary battery was a necessity, so as to disable attacking destroyers in the shortest possible time. However, even when a 128-mm weapon and mount more suitable to dual-purpose work was developed, it was never incorporated into later German capital ship designs, even in the final paper design, the H-44 class.
Despite the approach the Germans took in giving the Bismarck class its firepower, the air threat was still underestimated (as indeed the increasing air threat to capital ships in much naval doctrine of the time was) and even the (for its time) extensive antiaircraft defenses of the Bismarck class were inadequate to meet the technological advances made by World War II.
The light anti-aircraft battery consisted of two weapons. Sixteen 3.7-cm guns were distributed in twin, stabilized mounts. With a much greater rate of fire (30�40 shots/minute) than the 10.5-cm heavy AA battery, the 3.7 cm were designed to provide medium-range defense to a maximum range of 6,750 metres. The smallest weapons were the 2.0-cm (20 mm) autocannons. Bismarck carried twenty of these in two quadruple and twelve single mounts. After the ship sank, the Germans decided to augment the AA battery on the Tirpitz, and additional 20 mm were specified for their ease of installation; first 50, then 78 eventually were fitted in Tirpitz by 1944. This augmentation was typical of most navies during the war, although several (especially the Japanese) took pains to augment the heavy AA battery as well.
The flak-direction center, based on the revolving ring system, was mounted on a 40-ton revolving base. When engaged against hostile aircraft, the movement of this unit tended to affect the ship's stability. Most importantly, the base was extremely sensitive to underwater hits. The slightest damage could cause the ring to break, resulting in a total system breakdown. Through a curious oversight in the design of the Bismarck's AA gun directors, obsolescent Fairey Swordfish biplanes were able to penetrate its heavy flak screens and deliver torpedo attacks without casualty. This was due to the aiming devices not being built to allow for such slow flying aircraft; the lead sights had been designed assuming the enemy would deploy faster, newer aircraft. The Bismarck's AA guns also could not depress sufficiently to hit the low-flying Swordfish.
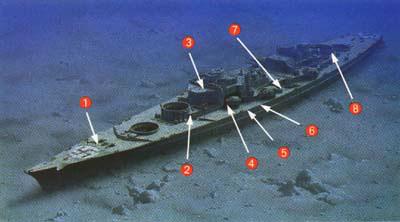
Over the years, the ship achieved near mythological status and was popularised in 1960 by the film Sink the Bismarck! and Johnny Horton's hit song of the same title. The wreck of Bismarck was discovered on 8 June 1989 by Dr. Robert Ballard, the oceanographer also responsible for finding the Titanic. Bismarck rests upright at a depth of approximately 4,791 m (15,700 ft)[36] about 650 kilometres west of Brest, France. The Bismarck struck an extinct underwater volcano, which rose some 1,000 metres (3,300) feet above the surrounding Abyssal plain, triggering a 2 kilometre (1.25 mile) landslide. Bismarck slid down the mountain, coming to a stop two-thirds down.
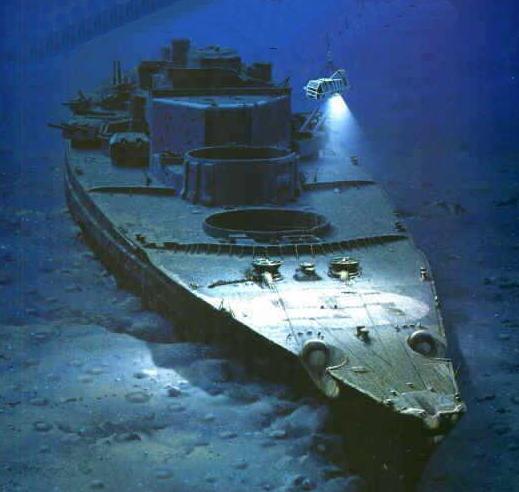
Analysis of the wreck showed extensive damage to the superstructure by shelling and some minor damage to the hull by torpedo hits, but also suggested that the Germans scuttled the ship to hasten its sinking. This has never been proven by marine investigators but is confirmed by survivors. Ballard has kept the exact location of the wreck a secret to prevent other divers from taking artefacts from the ship, a practice he considers a form of grave robbing.
A later dive on the wreck also identified the location, and brought back further images, as part of a documentary sponsored by the British Channel 4 on Bismarck and Hood.
The documentary film Expedition: Bismarck (2002), directed by James Cameron and filmed using MIR submersibles, reconstructs the events leading to the sinking of Bismarck. His findings were that there was not enough damage below the waterline of the ship to confirm that she was actually sunk by shells and torpedoes. In fact, upon close inspection of the wreckage, it was confirmed that none of the torpedoes or shells penetrated the second layer of the inner hull, supporting the Germans' story of having scuttled their own ship.
The second Bismarck expedition in 2001 was Anglo-American and funded by a British TV channel. It followed-on from the same team's prior discovery of the long-lost wreckage of Hood which was located and filmed for the first time. An Anglo-American team, consisting of David Mearns, Bill Jurens and Professor Eric Grove, used the information that Bismarck was resting at the foot of the only undersea volcano in that area, to locate it. They then used ROVs to film the hull externally and concluded that the ship sank due to combat damage, having received numerous artillery and torpedo hits. David Mearns claimed significant gashes were found in the hull: "My feeling is that those holes were probably lengthened by the slide, but initiated by torpedoes."
A new American expedition visited the site using smaller and more agile ROVs. These provided some interior shots of Bismarck for the first time, which were aired as part of a one-hour documentary film on the National Geographic Channel (NGC). James Cameron, the leader of the expedition, put forward a theory for the "gashes". Cameron suggests that Bismarck suffered a "hydraulic outburst" when it hit the bottom. Cameron said the belt held, but inner forces caused the sides to bulge out and break in places. Cameron sent small ROVs into the gashes and into the ship's interior. Twice they came upon torpedo holes at the ends of long gashes. But upon sending the tethered robots even deeper into the ship it was discovered that the torpedo blasts had failed to shatter its armoured inner walls. All that was destroyed was an outer "sacrificial zone" of water and fuel tanks that German engineers had created to absorb torpedo hits and keep interior spaces flood free. "The inner tank walls are untouched by any explosive force", "So the armor worked." Cameron concluded that the torpedoes caused "no significant flooding."
The third survey found no underwater penetrations of the ship's fully-armoured citadel. Eight holes were found in the hull, one on the starboard side and seven on the port side, all above the waterline. One of the holes is in the deck, on the starboard side of the bow. The angle and shape indicates it was fired from Bismarck's port side and struck the starboard anchor chain. The anchor chain has disappeared down this hole. Six holes are amidships, three shell fragments pierced the upper splinter belt, and one made a hole in the main armour belt. Further aft a huge hole is visible, parallel to the aircraft catapult, on the deck. It is unclear whether this was a result of a internal magazine explosion due to a shell penetration of the ship's armour. The submersibles recorded no sign of a shell penetration through the main or side armour that could have caused this. It is likely that the shell penetrated the deck armour only.
Huge dents showed that a considerable number of the 14 inch (356 mm) shells fired by King George V bounced off the German belt armour. Interior ROV footage showed that the "terrible destruction" the Anglo-American expedition reported was in fact the torpedo bulges, which were designed to absorb the energy of torpedoes and plunging shells. Underneath the torn bulge sheeting, the ship's 320 mm (12.6 inch) thick main belt armour appeared to be intact. Of the shell holes pictured in Bismarck's armour, it cannot be confirmed by Ballard that they were full penetrations.
Furthermore Ballard's expedition revealed there were no signs of the implosions that occur when an air-filled compartments succumb to outside water pressure. This suggests that Bismarck's compartments were flooded when the ship sank, supporting the scuttling theory.
The American expedition's final conclusions were strikingly different from the findings of the Anglo-American team estimated that Bismarck could still float for at least a day when the British vessels ceased fire and could have been captured by the Royal Navy, a position supported by the historian Ludovic Kennedy.[45] Ballard found the hull sound, adding: "we found a hull that appears whole and relatively undamaged by the descent and impact." They concluded the direct cause of sinking was due to scuttling: sabotage of engine-room valves by her crew, as claimed by German survivors.
In all 2,876 shells of various calibres were fired by the British ships. Approximately 300-400 hit. In all 714 14-inch (360 mm) and 16-inch (410 mm) shells were fired by the two battleships, of which about 80 hit Bismarck.
=================================================================================
NB: The above text has been collected / excerpted / edited / mangled / tangled / re-compiled / etc ... from the following online sources :
KM - German BattleShip Bismarck - wikipedia article #1
KM - Bismarck Class BattleShip - wikipedia article #2
KM - Atlantic Commerce War: - www.warcovers.dk