Map and Compass Fundamentals
for
Search and Rescue
Part 2
Rick Howard
San Jose Search and Rescue
Taking a Bearing
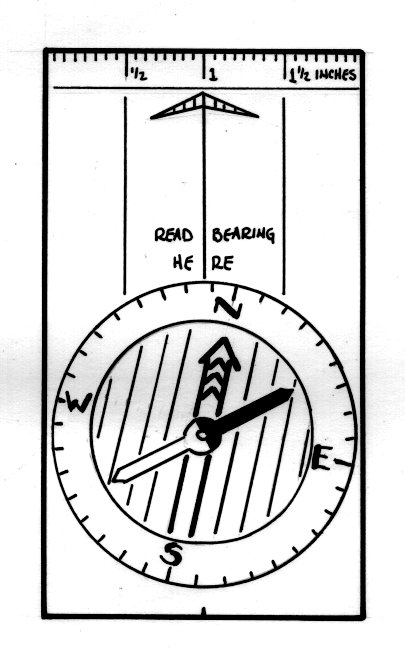 Our compass of choice is either the protractor compass, made of a
compass bezel mounted on a transparent rectangular plate, or the sighting
compass, like the former but with the addition of a mirror on a hinged
compass cover. With the first, one would normally hold the compass out
in front, high enough to sight the desired target over the arrow on the
front of the plexiglas baseplate. Holding the compass steady and level,
and sighting your target, rotate the bezel until you "box the needle" -
that is, place the red north end of the needle in the red box.
You can then read the bearing along the line you are sighting at the
index mark (the compass may even say "READ BEARING HERE" on the baseplate).
(Click here for a full-sized
view of the compass.)
Use of the sighting compass is similar, but with a little more work.
Open the cover about 45° to 60° and hold it up near eye level out in
front of you, sighting the desired object in the "V" notch of the mirror
cover. Adjust the mirror angle for a good view of the compass in the
reflection. Keeping the target in the notch, turn the bezel to box the
needle. Lower the compass and read your bearing at the index mark near
the hinge of the cover.
Suppose you wish to know the bearing of the line from the object to you,
rather from you to the target. This would be the same bearing if you
moved to the target and sighted back along the line you just traveled,
and is called the backsight. The backsight is +/-180° from the
foresight. Many sighting compasses have a mark on the side of the bezel
near you which reads the backsight, that is, the bearing from the target
to you. This feature saves you from having to add or subtract 180° to
determine what your backsight would be - you can read it directly from
the compass.
Sighting a Given Bearing
Now suppose you have been given a bearing that you are supposed to follow
in the field. Just turn the bezel until the index mark ("READ BEARING
HERE") is aligned with the desired bearing. Raise the compass and turn
around until the needle is boxed. Hold the needle boxed and walk out
your designated bearing. Often it's smart to pick out an object at some
distance on the line you have sighted; then you can move ahead to that
point without trying to hold up the compass. Once you get to that
landmark, just raise the compass, take another sighting, pick out
another object on line, and move ahead.
Obtaining the Course from a Map
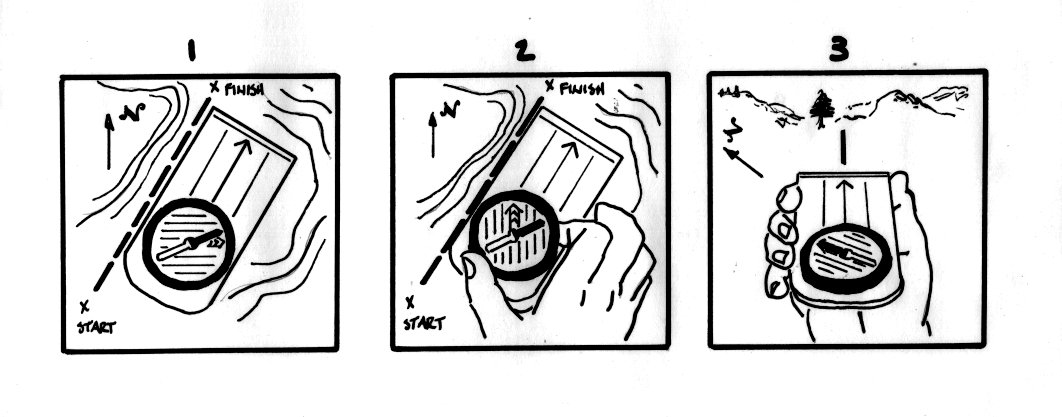
You are in the field with a map, you know your location, and you have
a destination to get to on the map. First, draw a line between your
position and the destination. Place the side of the baseplate along
this line with the sighting direction of the compass from your position
toward the destination. Turn the bezel until the meridian lines (the
lines parallel to the needle box on your bezel) are lined up with the
meridian lines on the map (ignoring the needle). In other words, the
red north box of the bezel is pointing north on the map. Note that
true north is referenced by setting the meridian lines of the bezel
parallel to the sides of the topographic quadrangle. Now read the
bearing at the index mark ("READ BEARING HERE"). This is your bearing
referenced to true north. Convert to magnetic north, set the correct
magnetic bearing on the compass by moving the bezel to account for
the declination, and follow the bearing in the field as described above.
(Click here for a large
view of the three figures.)
Orienting the Map in the Field
Often you may want to position the map in the field so it matches what
you see. All you need to do is to turn the map with the help of a
compass so the top edge of the map is facing (true) north. Since we're
using the compass, we need to be sure to account for the declination.
There are two common methods.
A) The first approach is to use the magnetic north arrow located in
the margin at the bottom of you map. Turn the bezel so 0° or "N" is
at the index mark. Place the compass on the map with one of the sides
of the baseplate lying along the magnetic north arrow. Then rotate the
map and compass together until the needle is boxed. Doing this, you can
see the magnetic needle of your compass is parallel to the magnetic
north arrow of the map. The map is now oriented.
B) In the second approach, turn the bezel until you have subtracted
the easterly declination from 360°: so you will set about 343° at
the index mark for us here in our part of California. Now place the
compass on the map with one edge of the baseplate lying along one of
the borders of the map (a true north line). Rotate the map and compass
together until the needle is boxed. You should see that the compass
needle (now boxed) is parallel to the magnetic north direction of your map.
Once the map is oriented (and safely secured on the ground!), you can
easily take bearings from the map, because the map is just like what
you see in the field. You can lay the compass along a sight line,
turn the bezel to box the needle, and read the bearing, just like you
would sight on the object itself. In fact, that is what you would do
next. Raise the compass, turn around to box the needle, and you should
be looking at the object in the field, and have a direction to follow.
Likewise, you can take a bearing measured in the field as described
above, set the compass on the map with one side of the baseplate at
your known location, turn the baseplate to box the needle, and follow
the sight (the side of the baseplate) to the object on the map.
Triangulation
You may find yourself in the field, in view of visible landmarks,
and want to use these objects to help you place your exact location
on the map. To use the intersection of two or more bearings from
known landmarks is commonly called triangulating your position.
Actually, "triangulation" involves determining the three angles of
a triangle (tri-angle: three angles) to locate points in the field,
which requires a surveying transit capable of measuring angles.
What we are really doing with bearings is called "resection" -
plotting the location of our position by taking sights of known points.
Due to its common usage, we'll call it triangulation. The third
method of using field measurements to find your location is trilateration,
which is measuring the lengths of the sides of a triangle to determine
position. GPS units use trilateration - determining the distances
from satellites of known position - to tell you where you are.
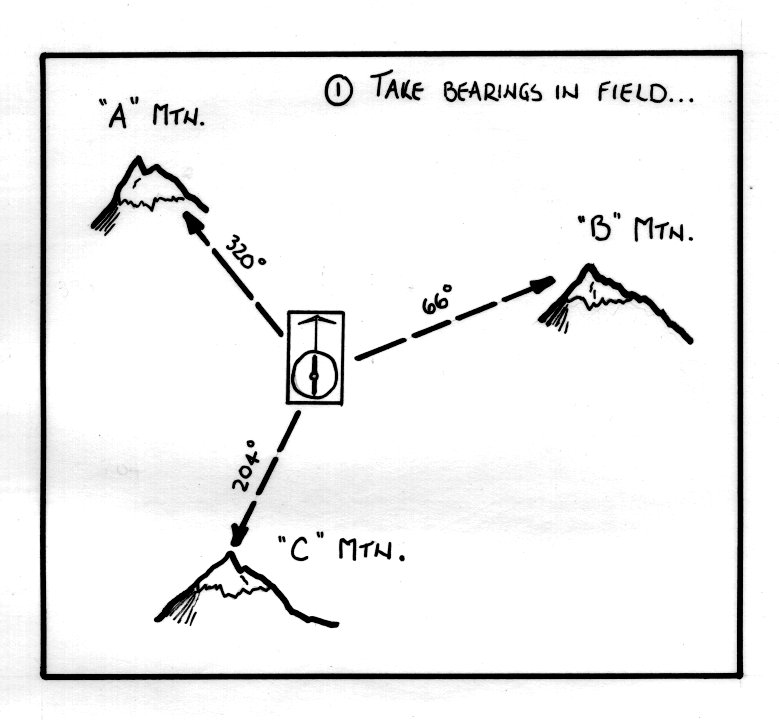 Two landmarks are all you need, but three will give you added accuracy.
Begin by taking a bearing on a landmark and drawing that bearing as
a line through that landmark on your map. If the map is oriented, then
after you take your sight on the object, just drop the compass to your
map and turn the compass to box the needle with one side of the baseplate
touching the object on the map. If the map is not oriented, be careful
to draw the correct bearing on your map. Since the map is reference
to true north, it might be easiest to take the field bearing, convert
to true, and plot the true bearing using your compass as a protractor.
Also note that the actual bearing you want to plot will be from the
landmark to you, so the backsight bearing from the landmark is the one
you want. (Click
here for a large view
of the figure.)
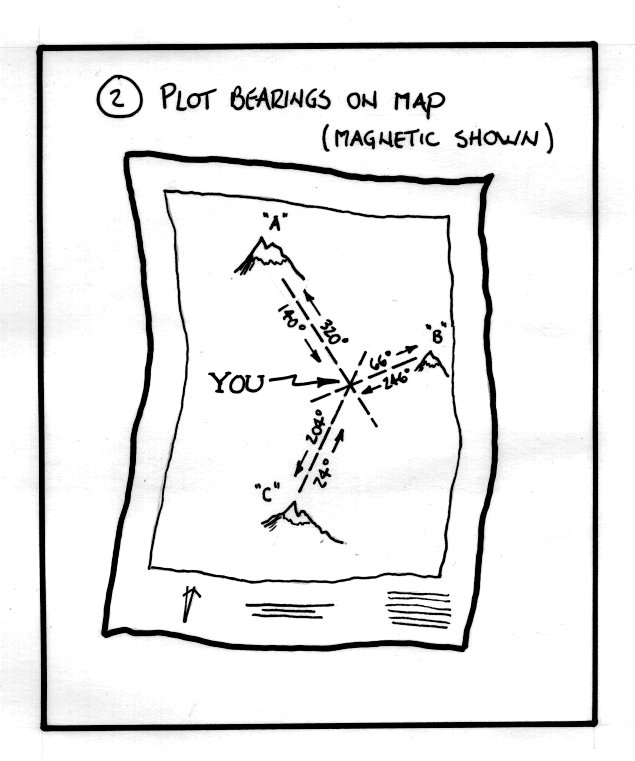 Repeat for a second landmark and for a third, if you have one. All of
the lines drawn should pass through a single point - your position.
If possible, choose landmarks that give about 90° between them for
greatest accuracy. (Click
here for a large view
of the figure.)
Navigating Obstacles
We've seen how to extend a line: we can pick out a landmark on our desired
bearing, then get to it any way we can if the way is blocked, then take
another bearing from that landmark when we reach it, and continue on our way.
What if we just come to an obstacle (it could be a large rock, a building,
or a marshy wet area) and we want to detour around it? The best way is to
change course to one side by a certain angle for a certain distance, then
change course by the same angle in the opposite direction for the same
distance. You must estimate the distance, and counting paces is probably
the best way to mark a distance.
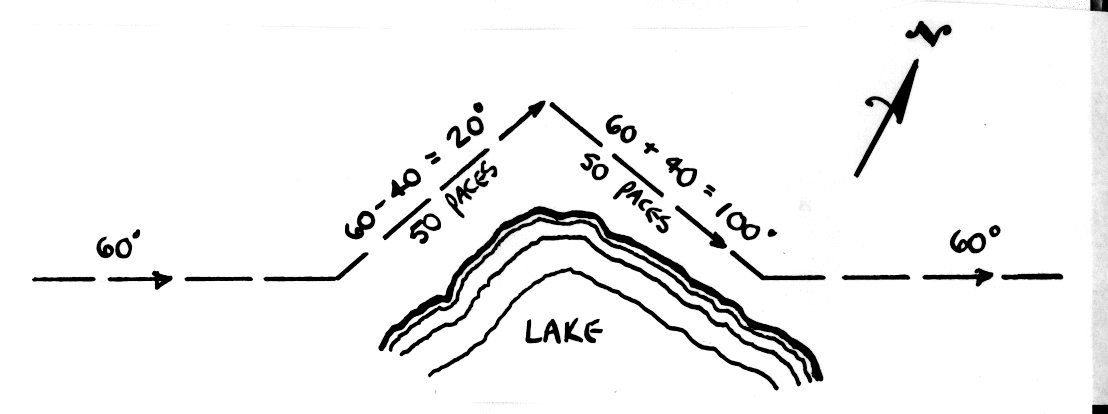 Say you're on a bearing of 60° and find you must detour around a lake.
You could turn 40° to the left, and follow a bearing of 60° - 40° = 20°
for 50 paces. Then turn back 60° + 40° = 100° and follow a bearing of
100° for 50 paces. This detour should bring you back to the original
line. Now set 60° again and continue on your original course. (Click
here for a full-sized view
of the figure.)
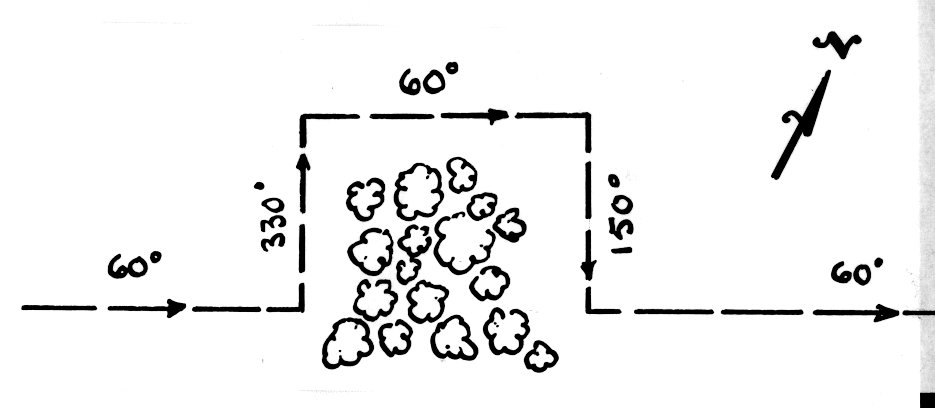 A variation on this method is to make two right-angle course changes.
You might decide to turn 90° to the left to a bearing of 60° - 90° + 360° =
330° and follow this bearing for 30 paces. Then you would follow your
original bearing of 60° for whatever distance it takes to move past the
obstacle. Now turn back to the right to 60° + 90° = 150° for 30 paces to
intersect your original line, from which point you would again set your
original bearing of 60°. This approach is commonly called an offset, and
allows you to easily move past the obstacle whatever distance you need to
before turning back to your original line. (Click
here for a full-sized view
of the figure.)
You should now be able to read and understand maps, take a bearing, sight a given bearing, obtain a course from a map, orient the map in the field, triangulate to find your location, and navigate around obstacles. All that's left is PRACTICE!
Resources
W.S. Kals, Land Navigation Handbook, Sierra Club Books, San Francisco, 1983.
Bjorn Kjellstrom, Map and Compass, MacMillan, New York, 1994.
US Geological Survey, "Finding Your Way with Map and Compass,"
http://www.usgs.gov/fact-sheets/finding-your-way/finding-your-way.html.
"More About Compasses," REI website,
http://www.rei.com/OUT_THERE/CLINICS/CAMP/backpacking2/comp.html.
Copyright 1998 by Richard M. Howard, San Jose Search and Rescue. Permission granted to reproduce for non-profit,
non-commercial purposes with proper credit given.
Email: seadog@dog.com
 Our compass of choice is either the protractor compass, made of a
compass bezel mounted on a transparent rectangular plate, or the sighting
compass, like the former but with the addition of a mirror on a hinged
compass cover. With the first, one would normally hold the compass out
in front, high enough to sight the desired target over the arrow on the
front of the plexiglas baseplate. Holding the compass steady and level,
and sighting your target, rotate the bezel until you "box the needle" -
that is, place the red north end of the needle in the red box.
You can then read the bearing along the line you are sighting at the
index mark (the compass may even say "READ BEARING HERE" on the baseplate).
(Click here for a full-sized
view of the compass.)

 Two landmarks are all you need, but three will give you added accuracy.
Begin by taking a bearing on a landmark and drawing that bearing as
a line through that landmark on your map. If the map is oriented, then
after you take your sight on the object, just drop the compass to your
map and turn the compass to box the needle with one side of the baseplate
touching the object on the map. If the map is not oriented, be careful
to draw the correct bearing on your map. Since the map is reference
to true north, it might be easiest to take the field bearing, convert
to true, and plot the true bearing using your compass as a protractor.
Also note that the actual bearing you want to plot will be from the
landmark to you, so the backsight bearing from the landmark is the one
you want. (Click
here for a large view
of the figure.)
 Repeat for a second landmark and for a third, if you have one. All of
the lines drawn should pass through a single point - your position.
If possible, choose landmarks that give about 90° between them for
greatest accuracy. (Click
here for a large view
of the figure.)
 Say you're on a bearing of 60° and find you must detour around a lake.
You could turn 40° to the left, and follow a bearing of 60° - 40° = 20°
for 50 paces. Then turn back 60° + 40° = 100° and follow a bearing of
100° for 50 paces. This detour should bring you back to the original
line. Now set 60° again and continue on your original course. (Click
here for a full-sized view
of the figure.)
 A variation on this method is to make two right-angle course changes.
You might decide to turn 90° to the left to a bearing of 60° - 90° + 360° =
330° and follow this bearing for 30 paces. Then you would follow your
original bearing of 60° for whatever distance it takes to move past the
obstacle. Now turn back to the right to 60° + 90° = 150° for 30 paces to
intersect your original line, from which point you would again set your
original bearing of 60°. This approach is commonly called an offset, and
allows you to easily move past the obstacle whatever distance you need to
before turning back to your original line. (Click
here for a full-sized view
of the figure.)