|
Netscape users may 'right click' on any image and select
"View Image" to view the image larger. Then click on
your "Back" button to return.
One thing to keep in mind is that there are no instructions available to do the retrofit. There are plans available to make the MKII canard from scratch, and note in the newsletter claims that one can follow those plans to do the retrofit. A phone call to Patrick Taylor proved to be necessary. He was very helpful. The plans call for cutting the foam as you normally would, and using a hand saw, you remove a section of foam and glue the gear box in it's place. Then 2 layers of uni are placed (one at 45 degrees, the other parallel to the spar) over the gear box prior to installing the spar cap or shear web. Since I could not do this in this order, as the wing is built already, the reinforcement has to be placed over the existing glass. Additionally, since the 3 layers of uni which make up the final glassing schedule of the canard had been cut, along with the drag spar, the reinforcement has double the duty of reinforcing the gear box area and repairing the skin. |
|
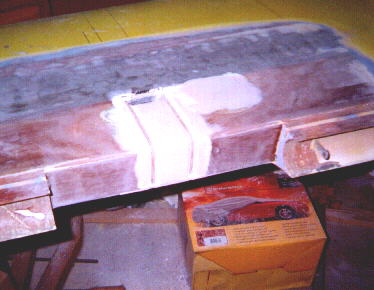
As I stated before, there must be a structural bond between the ribs of the gear box and the canard's upper and lower skins, sheer web, spar cap and drag spar. This image shows that the ribs are buried in filler, and cannot be attached to the reinforcing skin nor the drag spar.
|

So I took my grinder and removed the filler, to expose the plywood ribs These slots that were produced were filled with flox just prior to laying up the glass. This completed the connection between the ribs and the skin.
|
I wanted to lay up both sides of the canard at the same time, so I built a jig to support the canard on end, at a good working height.
|
The jig is visible in this image. |
Here's where the lack of plans caused me to do perhaps a bit of overkill. I was REAL worried about cutting the drag spar. So I devised a glassing schedule which does a very good job (in my opinion) of repairing the drag spar. I figured if a little is good, more is better. The plans call for reinforcing the gear box with 2 layers of uni. Since I already planned on using 3 layers to repair the breach of the skin, I figured I'd cut the class in such a way as it also reinforces the drag spar.
|
|
I made a template of the shape, and cut each piece to size. |
I cut 12 pieces of uni to this shape. 4 at 45 degrees left, 4 at 45 degrees right, and 4 parallel. The shape is so that the reinforcement area, also becomes the drag spar. |

I sorted the pieces and laid them out in such a manner that I could keep track of them.
|
I was too busy to take photos while I was laying up the glass, as I did all 4 surfaces at one time. This drawing shows how the glass was laid to make the 6 ply drag spar.
|
|
|
As usual, I used the sun to cure the epoxy. The black bag really works in cold tempratures. |
|
Esse site foi ideia de Patrick Panzera de Hanford California EUA.