
undefined
TANTIVE IV'S ASTROMECHS


R4-M9 & R2-Q2
Often identified as Imperial droids brought on board to search for the Death Star plans, it seems more likely that these two astromechs served alongside R2-D2 aboard Princess Leia's ship, the Tantive IV. Notice that they are leaving the ship right in front of the rebel crew. There are stormtroopers in front of the droids, and behind the rebels, so it seems pretty clear that they are being escorted into captivity the same the human crew is.
R2-Q2, who shares a dome with the R2 unit used by Biggs Darklighter (pictured below), is on the left, and R4-M9, who shares a dome with the astrodroid used by John D. Branon (also pictured below), is on the right. Not being clever enough to use the same method to escape that R2-D2 did, they were both captured by the Empire and presumably had their memory banks searched. They were then probably reprogrammed and used by the Empire, thus sparing them the fate of the rest of the crew of the Tantive IV.
BATTLE OF ENDOR

GRIZZ FRIX'S R5

During the attack on the Death Star in Return of the Jedi, we get a quick glimpse of a rebel X-Wing pilot, Grizz Frix, and his R5 unit right before they get blown up. It has a white dome with tan markings on the sides of its dome.
WEDGE ANTILLES' R2


The last droid we can make out from the battle of Endor is that of Wedge Antilles. It is a different color than the one he used at the Battle of Yavin (pictured at the bottom of the page), but it is again an R2 unit. I really had to go over this scene carefully to make it out, as it is only shown for a few frames. You can see that it has a dirty white appearance, with black panels along the base of the dome. Of particular note are the nifty pinstriped rectangular decoration right above them. Presumably there is one on either side of the central "eye" panel. It also appears that while the main "eye" lens of the R2 unit is standard black, the raised square panel in which it is set (which is blue on R2-D2 and yellow on Dorovia Bold's, below) is the same white color as the rest of the dome. A very cool and interesting droid that you are seeing here first!
NEW!
Keith K. has sent in some pics he found of ROTJ droid wrangler Roger Nichols posing with some R2 units. Amongst them are R2-Q5, and what looks to be Wedge's Battle of Endor droid!
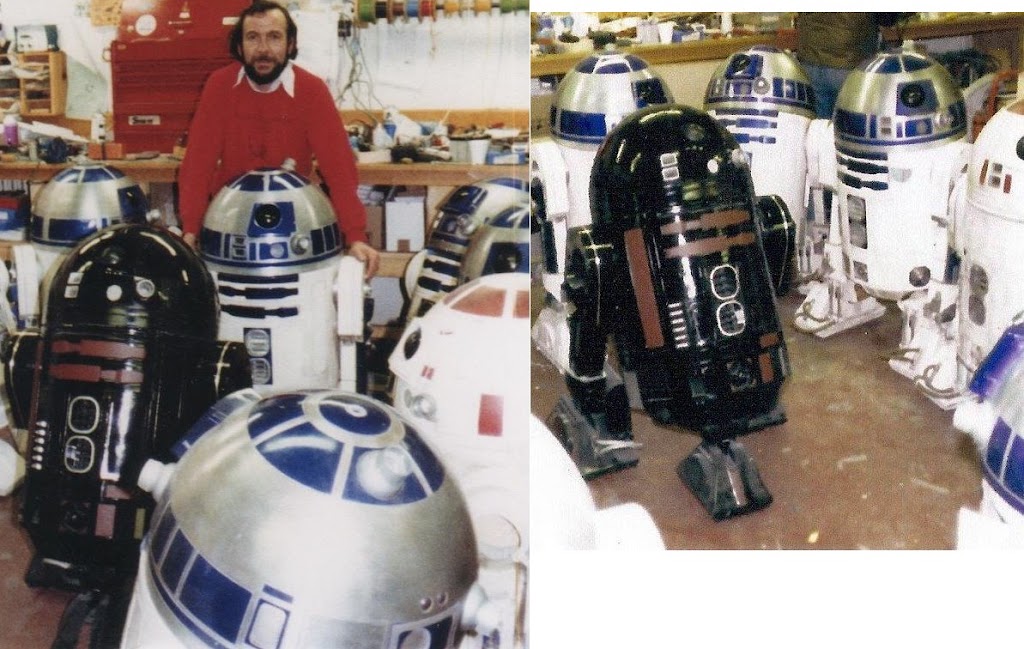
Whilst the details don't quite match up exactly, it's a pretty good certainty that there weren't too many white R2 domes used during filming, and you can see some of the front paint details match up between the workshop photo & the action photo of Wedge's cockpit. At what point during filming the workshop image was taken I don't know, and whether this means Wedge's droid actually had red details instead of black I can't really say either, since obviously at least some details (the pinstriped square outline) was either added before or after filming Wedge's scene. It is also entirely possible that Wedge's droid was this one painted over in black, and this red version appeared somewhere else altogether in the movie where he has still yet to be spotted! It's sure fun to speculate, and a really unexpected surprise for us droid fans!
DOROVIA BOLD'S R5


The above image is of Dorovia Bold. You can just spot her behind Lando during the briefing scene above. The cockpit shot is from a cut scene of her during the Battle of Endor. UPDATE! What I long thought was a white domed R2 unit with yellow trim, turns out to actually be an R5 unit, almost exactly matching Grizz Frix's R5 pictured above!

This was found by the experts over at the Astromech Collection facebook page: The Astromech Collection! Notice that behind her in the cockpit photo you can see that her R5 unit is white with yellow trim. According to the little silver 'blip' button shown at the bottom center in the film, what appears to be the black 'eye' is in fact one of the cutouts on the side of the dome. Go over and watch the video! Very cool!
HOME ONE'S ASTROMECHS

The planning for the assault on the second Death Star and the forest moon of Endor was planned on Home One, the Mon Calamari flagship battlecruiser. The briefing itself takes place in a large circular room, which, in the film, we only see part of. In the collection of photos above, I have attempted to combine screencaps I took along with an image that was sent to me by the great astromech fan Alejandro. This photo is so great because it solves two big astrodroid mysteries. One, it shows us that there were in fact 4 astromech droids in the briefing scene, two type "R3" and two type "R5" droids. The other is that we finally can pin down where the brown & silver marked R5 actually showed up in the trilogy.


Above you can see a close up I made from the original image that first appeared on the official Star Wars website. I want to make very clear that these two droid are not the same two that actually appeared onscreen. Not only are they on the opposite side of the set during filming, which is clear by the presence of the cast members I indicated in the top photo montage, but they actuall have different markings!

The famous three "Binocular" R5 droids!

Check out the comparison collage I put together above. I noticed that the Home One R5 pictured had the "Binocular" 2-eyed dome while going over my pics one day when I was looking for new info. It is perfectly clear that this droid has the same dome used by the Imperial droid in Return of the Jedi. I hope this is of some value to you customizers out there!
HOME ONE Orange R3 Droid!
Besides the R5, you can see that the R3 unit has what appears to be all white legs, while the color image of the R3 clearly shows orange markings!


Here is a bigger image of the two droids that made the final print. You can see that the R3 unit has noticeably orange markings on the legs and lower torso, and gray horizontal ports on the body. You can just make out orange accents on the dome and outlining the front vertical panels. The next two photos above were taken from the book "Star Wars: The Action Figures Archives," and show a cool shot of the interior of the hangar of the Home One. At the top of the photo you can see the back of what appears to be the same orange R3 unit seen during the briefing scene. Thanks for the scans Justin!
HOME ONE WHITE R3 DROID!
Site visitor Keith K. has been on a youtube kick recently, and has sent in some interesting links and pics to what he's found there. The biggest find is the sequence below from The Making of the Return of the Jedi, in which we get a full-frontal of the elusive, and rarely discussed (outside of this page!), "all white," or "white-legged" R3 unit, which so far has only been seen in the single Black & White picture posted above. You can see him in the background just below Admiral Ackbar's hands. Er, claws. Or whatever.


Well, thanks to Keith K.'s sharp eyes, we now have a new, color image of this guy to kick around! In these screen caps, you can just make out his famous all-white leg, and in addition to that, you can see that the front vertical side panels are painted either dark blue or black. Interestingly, the rest of the droid seems to be white, with the exception of the standard silver/metallic-colored circular ventilation ports in the lower center of the front of the droid, and the small vertical panel just to the right of these, which is the same color as the taller panel on the left side of the droid.
Great stuff! Thanks for sending that in!

Above is a nice color image of the R5 unit that shows up just offscreen. I originally identified this as being a droid from the hangar on Hoth, due to the fact that you can see a crew member in a blue parka of the type that was worn by the crew during the filming of The Empire Strikes Back. The background also seemed to me to be of the irregular type seen in the snow caves on Hoth. However, after closer examination, you can see in the comparison below that the color image was, in fact, taken on set during the briefing scene in Return of the Jedi.

SURVIVING LUCASFILM R3 MODELS THEORY
Droid enthusiast "Green Oaks" sent in this interesting observation concerning the astromech droid models on display at Disneyland's Star Tours ride through the early 2000s:
"After studying the photo really closely of 'Home One's ASTROMECHS' and having just done a custom of the Disney Startours for which I searched for photos of him from ALL ANGLES it appears to me as if they could be the same droid.
The RIGHT FRONT LONG PANEL on THE STARTOURS DROID WAS WHITE for a long time, it has more recently been painted with a thin copper colored stripe but is still mostly white, this panel is White on the Home One droid as viewed from the front right side. Also, THE STARTOURS DROID DOES APPEAR TO HAVE A SINGLE ONE OF THE THREE SHORTER BACK PANELS PAINTED FROM ONE PHOTO I FOUND, THE SAME PANEL THAT IS PAINTED ON THE BACK OF THE Home One unidentified droid.
Also the Dome markings of STARTOURS Red R3 appear similar to those on the Orange R3 in the home one picture though slightly adapted.
You will also notice that The Other Startours Droid now known as R3-D3 HAS SOLID WHITE LEGS like you mentioned that the Black-and-White photo Home One other unidentified R3 astromech has. (the solid white legs on R3-D3 are in your own photo of the startours droids on your site, he has since undergone two paint updates one that made his leg posts bright blue and another sloppy one that made them silver which I think happened at the same time as the copper points added to the red one) I attached a photo of Startours Red Droid where he is partly blocked by R3-D3 but you can see the top of his right panel is white from the same side as your great photo of the Home One Orange droid."


These two droids do match up well with the Home One R3s. Notice the unique all-white legs on one of the droids, with the only difference being the sloppy blue spray painting which is obviously not done by Lucasfilm, and the corresponding orange markings on the other two. I think "Green Oaks" has definitely nailed it! It certainly makes sense that the two R3 droids used in the filming of Return of the Jedi would turn up in a Disney Park. Lucasfilm famously gave Disney all of its non-R2 astromech model props for use as ride decoration when they signed the contract for the Star Tours rides. You can see them at the two U.S. parks in California and Florida, though there is some question of their fate now that both rides and their queue areas were redone in 2010.
BATTLE OF YAVIN

Astromechs present during the briefing before the Death Star assault. It can be assumed that all of these droids fought in the battle.
"The Making of Star Wars," by JW Rinzler has a lot of great info in it on changes made in the editing room to the Death Star assault. Three squadrons of rebel fighters were actually filmed attacking the Death Star in the Battle of Yavin: Red Squadron in X-Wings, Blue Squadron in X-Wings, and Gold Squadron in Y-Wings. However, in the process of finishing the special effects at ILM after all the cockpit closeups and dialog was finished filming, it was discovered that the Blue Squadron X-Wing models were partly disappearing against the bluescreen they were filmed in front of due to the blue stripes on them. George then decided to mostly scrap all shots showing Blue Squadron fighters and pilots, leaving us with only quick glimpses of the Blue Squadron pilots here and there. Luke was also filmed actually making two separate trench runs, but these had to be combined to save time. Likewise, many additional shots and dialog of Red & Gold Squadron pilots were also edited out of the movie, even though dialog and cockpit closeups were filmed. Wouldn't it be great if this footage would be either restored to the movie or added as a bonus cut scene on a future DVD release?
Read more about Blue Squadron here: Blue Squadron!!!

GARVEN DREIS' R5-K6
GARVEN DREIS' R5-K6
This is a pretty popular little R5 unit due to his colorful paintscheme. He was carried by Red Leader in "red 1" during the Death Star assault. He can also be seen briefly in the rebel hangar briefing scene. The coolest thing about him, however, is that in a cut scene he can be seen rolling around the Death Star! His color scheme always did remind me of the Sith for some reason. Maybe he once belonged to Darth Maul?


R5-K6 can also be seen in a Y-Wing before the battle of Yavin, even though Red Leader flew an X-Wing!

And also standing right next to Chewbacca during the briefing scene! (You can also see the top of another R5 unit's pinstriped dome in the second image - that one is discussed below.)


UPDATE!!
Eagle-eyed droid fan Alejandro just checked in with this great pic he found in the official pix section of the Star Wars website. We finally know now that R5-K6's body was white with mostly red panels! Even though the photo is in b&w, we can deduce what colors the panels are on the body by knowing that the dome is black & red, and thus can interpret the greys on the body panels by comparing their tone with those on the dome. Since the tone of most of the body panels almost perfectly matches that of the red portions of the dome, we can conclude with virtual certainty that they are the same shade of red!
Since the R5-K6 that Hasbro recently made in it's Scramble on Yavin battlepack has a red body with black panels, it seems that it really only matches the R5 droid seen on the Death Star, which is pictured above in black & white from behind, and in context on my Imperial Droids page. It looks like Hasbro is going to have to take another shot at this guy, but at least we got the Imperial version!

WHITE REBEL BRIEFING R5


Some shots of an R5 unit seen in the rebel briefing scene on Yavin. A close up view of the black pinstriping on the top of this R5 can be seen in the in the image with Han next to R5-K6, and the behind-the-scenes picture with George Lucas, above. (Thanks to Keith K. for sending in the BTS George Lucas pic!)
UPDATED Christopher has written in with an additional screen cap showing a little more of the front of the body of this droid, and suggests that the vertical panel to the right of the center circular vents is painted black, and only appears grey due to reflected light. It is good to point out that this panel is not white, but I believe that it is probably painted in the grey color shown, and not in black due to it being adjacent to the very black outlining of the horizontal ports right above. If the light was reflected so strongly as to render some black panels grey, we should see a similar affect on a panel only an inch away. Of course, until a better photo emerges, we may never know the rest of this droid's appearance.
GREEN REBEL BRIEFING R2


A dark green marked astrodroid from the same scene. Notice that its body is seems to be entirely white except for the vertical panels on either side of its front.
UPDATE! Thanks to the continuing digging of Keith K., we now have another angle on this R2 unit to study. Sadly, it is in black & white, but you can still clearly see that it is was taken on the Yavin hangar set, and that the vertical side panel of this R2 droid (dome is just visible) is of a lighter tone than that of R2-D2's blue panels. The biggest new piece of info this picture offers is that the R2's leg panels are probably of the same blue color as R2-D2, since they are of the same darker tone.
BLACK R2 UNITS
Not only the Imperials used black droids. You can see a black domed R2 unit being used by the rebels in at least three places during A New Hope.
The first is during the briefing scene, just prior to the Death Star assault.


Later, the dome was used behind a rebel pilot during the actual cockpit filming of the final battle. We know this because reference photos were taken of the back of all of the astromech domes used in live action filming of pilots in the cockpit, which means that this droid definitely belonged to one of the pilots that took part in the Death Star assault. Unfortunately, that pilot still remains a mystery.

Notice the close up reference shot is of the back of this droid's dome. This conclusively identifies it as a dome used during the filming of a cockpit scene with a pilot. The picture was take of the back so that they would have a record of its appearance, since only the front would be visible behind the pilot during his scene. Shots like these were only made of those domes actually used as filming props in cockpit sequences.
Here's an image of a black domed R2 unit during the approach to the Death Star that I captured off the movie DVD. It is in the back of a Y-Wing fighter, and is seen facing the camera. It is difficult to say whether it is intended to be the exact same droid, but it is clear that it is has a black R2-style dome with panels that are either painted or outlined in silver or white, just like the one seen in the rebel briefing above. Another new image that you are seeing here exclusively!

The next image is a nice detail image of the above model Y-Wing & black R2 that was sent in by Keith K. More images of this droid will follow.

Here it is being prepped for filming.

I have found a prop reference photo of another black domed R2 unit, this time in the back of an X-Wing fighter marked as Red 1! This R2 unit also has what appears to be a black body with white panels! In further need of discussion is the fact that the fighter is clearly marked as Red 1, the X-Wing used by Red Leader, Garven Dreis, who is clearly shown to have used the red & black R5 unit pictured further up the page. An interesting conundrum undoubtably brought on by the vagaries of a hectic shooting schedule.

And here is the scene in which it looks like this black/white droid appears in the "Red 1" model in the movie during the trench run.


It is probably best explained by the fact that while Red Squadron had only 12 fighters, as many as 24 X-Wings were present during the Death Star assault, making it entirely probable that this is, in fact, not actually Red Leader's X-Wing, but rather Blue Leader's (or whatever the second squadron was actually called). Luke made two trench runs in the original filming draft, which was later cut in editing. Maybe he was accompanied by different pilots during his initial run, and this droid was to represent this unknown pilot's droid.
X-WING ASTROMECH DROIDS
or, That ain't Luke, so that ain't R2-D2.


Above are two images showing that at least one other X-Wing pilot besides Luke Skywalker flew into battle against the Death Star supported by an astrodroid with blue dome markings. The pilot is unidentified, but the image below of a "1" marked fighter seems to indicate that he is the leader of the second squadron of 12 X-Wings that took part in the attack. This was possibly the leader of Blue Squadron!!!
While possible, it is somewhat hard to believe that the the director could have made a "mistake" in leaving R2-D2's dome in position to be filmed behind a different pilot in the film. This is especially true when you consider the that it would have only required changing the angle of the shot by a few inches to obscure the dome completely from view, or even the dome itself, since we know they were laying all over the place, yet the dome is visible in at least two different shots from different angles. It is entirely likely that Lucas felt that it was entirely reasonable to assume that more than one R2 unit used by the Rebel Alliance had blue markings on its dome.

I have found some images of "Red 1" marked X-Wing models used in filming A New Hope. Not terribly surprising is the fact that the model droids do not match the full-sized live action prop. As I have mentioned before, this is probably due to the lack of good references and communication between the model shop f/x filming in California and the live action filming in England, combined with the hectic shooting and editing schedule.
Amongst the dozen or so "studio scale" (the large, detailed models that were about 2' long, or about 1/24 scale) X-Wing models filmed during the first movie, you can see that at least one "Red 1" had a black R2 unit, and one "Red 1" had a predominantly gray domed R2 unit. This may be due to the fact that the "Red 1" model was being used to represent one used by a different pilot than Red 1 in this shot, but that the model makers did not bother to repaint the wing markings for the shot and only replaced the droid instead. Check out how cool the black dome with white panels looks, and the body appears to be blue with white panels! A very cool and unique look that could very well indicate the appearance of a droid used by an unidentified pilot!


Another really cool image has surfaced of an astromech used in filming the first Star Wars movie. This shot has been in a private collection, and only recently has been shared with fans. What is so awesome is that it is a top-view of "Red 12", and shows a fully-decoed R2 unit that has an orange dome with dark red(?) panels! How cool is that? Thanks to Keith K. for letting me know when this one popped up!

Y-WING ASTRODROIDS
When you carefully watch Y-Wings in the movie, two things are immediatly evident. The first is that the Y-Wings in the trench run have empty droid slots, and the second is that Y-Wings in the hangar have astromechs on board. So what gives?
![]()
As you can see above, the droid slots in the Y-Wings led down the trench by Gold Leader are empty. No wonder they get shot down so easily! But at least five different droids are seen on board Y-Wings in the hangar before the battle, or during the battle itself (out of what was probably at least 7 Y-Wings that took part in the Death Star assault):
1. A completely grey domed R2 unit
2. A silver metallic domed R2 unit with black (or very dark blue or some other color) panels
3. R5-K6 (or his twin). It is possible that this "R5-K6" could be the one that has the white body with red panels, as seen during the briefing scene and is pictured further up the page.
4. A black domed R2 unit with some silver panels. This one is only seen in flight on the approach to the Death Star.
5. Either a R5-D4 clone, or an odd R2 unit with a white dome with two red stripes circling the top, and 3 blue circles across its "face".
First the grey R2 with dark panels:


An unidentified silver-domed R2 unit with black panels is seen in a Gold Squadron Y-Wing before the Battle of Yavin. The pilot of this craft is not known.
Second, the all grey R2 unit:


As you can see, a scale model was also built and filmed of this droid, so it was probably one of the ships that did not take part in the trench run. (In the "form up" scene before the battle, you can just make out astromechs in the back of some of the Y-Wings. The last pic is a new, larger, clearer image from the Blu-ray edition of the movie (thanks again to Sean L.!!!) which shows some nice detail of an (apparently) all silver/metallic/gray R2-style astromech droid during the approach to the Death Star.
UPDATE! -- A great interview with Angus MacInnes, the actor that played Gold Leader was posted at http://starwarsinterviews.blogspot.com/ (a really great site with *tons* of interesting and informative interviews with insiders from all eras of Star Wars productions - check it out!), and I contacted the site owners and they passed on my question to Angus about his memories of having an astrodroid! Check out his reply:
OK, that's a pretty rarified question for sure. Unfortunately I don't have a firm answer. I do have a video capture still from the moment before Gold One blows up but at 16 fps the image is too blurred to see though I do know that a few seconds later the R2 unit was an incandescent red as the ship explodes. I also have a very accurate model of Gold One done by Jay Chladek from New York who has the R2 unit as ship grey with red dot in the centre of the top surrounded by six equal red dots though I can't verify the accuracy of his interpretation. I would have thought there would be some gold on the unit though perhaps that's below the port into which the unit is slotted. I realise all this is pretty useless. Perhaps the art department at LucasFilm knows more. That's the best I can do.
I guess that is something of a confirmation that the completely gray-domed R2 unit seen above was, in fact, Gold Leaders! At least, until Lucasfilm or Hasbro chimes in to tell us otherwise!
Another look at the "R5-K6" dome on the back of a Y-Wing before that battle. maybe the one pictured in the briefing scene with a white body and red panels?
One that has only shown up in a model used at some point in filming so far is this odd looking droid with three "eyes" in the back of a Y-Wing marked as "Gold 5." In this case, the droid is probably supposed to represent R5-D4, whose full-sized prop dome ended up being used behind Porkins in his X-Wing, and who, in his entirety, appeared rolling around the hangar before the battle (pictures below). Another inconsistancy that is not evident in the final print, but is still notable to us!

Finally, another look at the black R2 unit which pops up in back of a Y-Wing during the approach to the Death Star. Of the 6 Y-Wings that took part in the Death Star assault, we can safely say that at least 3, if not 4, carried astromechs into battle.

The book "The Cinema of George Lucas" again mentions that about 15 minutes was cut from the Death Star assault sequence, mostly of "secondary characters." These were, in fact, aerial action as well as cockpit shots of the pilots of the other X- and Y-Wing fighters. Their dialogue and descriptions are in the original shooting script. This footage, while shot, has not been released or published, but would presumably help identify additional droids. Perhaps Hasbro could ask Lucasfilm to unearth and take stills from this footage for them to create new figures from?
JEK PORKINS' R5

Above you can see Jek Porkins and his R5 unit, R5-D8. R5-D8 has a dome similar to R5-D4's, if not actually identical to it.
"R5-D4" TWIN IN YAVIN HANGAR!!!

Astromech aficionado Rachel M. sent in the above image showing an unidentified droid servicing the nose of an X-Wing before the Death Star assault. Most incoveniently, its dome is obscured by the nose of the X-Wing. At first glance, one might assume that it is R2-D2 due to the white body and legs, but close inspection shows that the tall vertical panel on the front left of the droid's body is painted a dark color, whereas on R2-D2 this panel is white. The only other droid that has been positively ID'd rolling around the Hangar servicing starships is R4-D6, who we have seen is an overall dark blue color. I have not been able to capture a corresponding image of this droid from the finished film. Keep your eyes peeled!
Previous contributor Justin has written in to help solve the mystery. He has remembered seeing the above image as a jigsaw puzzle that was released years ago as X-Wing Fighters Prepare To Attack Puzzle, and has provided the above link to view the original box cover!

I cropped the image above from the puzzle's page at the SW Collectors Archives. Here are Justin's notes on what he remembers about the picture: The droid's colored panel is red and the legs have blue highlights; it reminded me of R5-D4 when I was younger, and knowing about the troubles the crew had with three-legged versions, I wouldn't be surprised if that is the R5-D4 body repurposed here instead of a different droid.

Above is a second version of the image Justin found in the file section of theforce.net.
UPDATE!!! Well, the pieces have certainly finally fallen into place on our mystery astrodroid. In the same week, no less than two previous contributors discovered and sent in images showing this droid in its entirety!
First up is the image Keith K. found on www.starwarsaficianado.com. This image clearly shows a droid that everyone instantly recognizes as R5-D4 in the foreground on the right side of the picture. He is hard to miss!

The second image was discovered hiding in plain sight by Trevor on the Behind the Magic CD-ROM. Even more useful is the fact that it shows the back of our R5-D4-like droid. Unfortunately, most of the back on the droid is obscured by the X-Wing cannon, so we really can't quite tell if the botton three back panels are painted or not.

This news settles not just one mystery, but very possibly a second one as well. As you can see further up the page, an R5 astromech dome identical to this one/R5-D4, can clearly be seen behind Jek Porkins during the Battle of Yavin. For many years I had a behind-the-scenes image showing what appeared to be an R5-D4 dome on top of R2-D2's body. This image was found long ago amongst other BTS photos taken from the set of Star Wars: A New Hope, and I matched it with Porkins due to it not really fitting anywhere else from that shoot. Keith K. has conveniently found a picture showing the R5-D4/R2-D2 bust-up on the set of the shoot in Tunisia. This, of course, means that the body Porkin's R5-D4-domed droid was probably *not* that of R2-D2. So bad news is good news, I suppose.
What also should be noted is that a filming model of a Y-Wing (seen above) featured what appears to be an attempt to mock up the R5-D4 dome by painting an R2 dome like R5-D4. So, since we A)See an R5-D4 dome behind Porkins, and B)Know a Y-Wing also had a droid with an R5-D4 dome, then logically there were at least -2- astromechs in the Battle of Yavin that had R5-D4 domes. (Kinda like how we've seen that there were at least two droids that had R2-D2 domes) So if we accept this logic, then we have to accept that either Porkins, or the unknown Y-Wing pilot, could have had the R5-D4 clone seen in the hangar. Or both. Or the other other one could still be left up to your imagination.

This image above is great as it shows Red Leader's cool black & red R5-K6 (1), Porkin's white with red pinstriping R5-D8 (dome identical to R5-D4), and Wedge's red with white markings R2 (2) units. A close up shot of Wedge's droid's dome is shown below. You can see it's predominantly red color in the middle area (grey on R2-D2), with the white panels just visible at the top and bottom of the dome (blue on R2-D2). It is identical to the one used on R3-T2 in Mos Eisley. (photo collage appeared originally at www.echostation.com)
WEDGE ANTILLES' R2

NEW! UPDATE! Take a look at this great picture Ricardo from Spain discovered and sent in, finally putting to bed what we've long known: That Wedge's droid, indeed, had the same dome as R3-T2 from Mos Eisley. Ricardo found clear reference shots of all of the Red Squadron pilots & their droids - check back to see the others soon!
Below are images of the R2 unit that Wedge carried with him during the first Death Star assault. The first two grabs are from the approach to the Death Star, and show only a sliver of the droid's red dome and white panels. The third grab is from the trench run itself when the droid come into view again for a couple of frames. The glare from the bright lighting in the scene keeps us from making out any detailed paneling in the photo, but again the droid's red color is distinctive. The fourth image shows Wedge and his droid during filming. Unfortunately, it is in black and white, and isn't as clear as we would like, but it does show the white panels at the top of the dome distinctly, and the darker tinting of the main body of the dome that can only be red.


Below is a reference shot taken of the back of Wedge's droid during the filming of the cockpit scenes. You can see that it, like most of the droids of Red Squadrons, is a repurposed dome that is seen elsewhere in the movie. In this case the dome was previously used for R3-T2 on the sands in the streets of Mos Eisley.

The shots on the left below were scanned from the excellent "Sculpting A Galaxy" book. You can clearly see Wedge's red domed R2 unit in action in the furthest X-Wing in the top photo, and in the closest X-Wing in the bottom photo. (In the first image, even though you can't see the "Red 2" wing markings, it must be Red 2 due to the fact that it is the wingman to the clearly marked "Red 5" of Luke Skywalker flying next to it.) You can also see the "Red 2" wing markings clearly in the second photo, though I need to get a bigger/clearer screen cap of that sequence when the fighters come up from the lower right in the Death Star approach. On the right you see an enlargement of a screenshot I took from the movie. It is clearly a red domed R2 unit with white panels. The last shot is also from Sculpting a Galaxy.


Below are two images of the actual model used in the "trench run" profile shot above. While the wing markings on the fighter are not evident, we must assume that it was intended to be "Red 2" by the fact that the markings on the fighter next to it are clearly visible as "Red 5," which was, of course, Luke's fighter, and we know that Wedge escorted Luke down the trench in "Red 2" and had a droid painted exactly like this one, red with white panels.


Further study is required, and if anyone comes up with more info, please let me know: greenalfonzo@yahoo.com
BIGGS DARKLIGHTER'S R2


 (Toy photo taken from the excellent photo archive at Rebelscum.com)
Next we have Biggs' R2 unit used during the Battle of Yavin. Like Porkins, Wedge, and John D., Biggs has a droid whose dome is very similar to one we saw earlier in the movie. In his case, it is very similar to R2-Q2, who was last seen leaving the Tantive IV and entering Darth Vader's star destroyer in the opening sequence of Episode IV. A toy has been produced of that unit by Hasbro as R2-Q2, pictured here. You can see some differences between it and the close up image of the dome of Biggs' droid above (most notably, the toy lacks the top white wedge outlines, and has an extra white stripe above the black stripe). Hopefully Hasbro will produce an accurate action figure of Biggs' astromech soon, based on these pictures. Since no image of Biggs' droid body is available, we hope that Hasbro & Lucasfilm design an interesting and creatively painted body that is very different from R2-Q2's.
JOHN D. BRANON'S R4


Once again we see a dome that was used elsewhere in the movie reappear for the assault on the Death Star. In this case, it appears that the same dome that was used on R4-M9 during the Tantive IV sequence at the beginning of the movie was reused for that belonging to Red 4. It is only visible for a few frames just as he is blown up. Again we see the reference shot of the back of the dome which clues us in that this was, in fact, a dome that was placed behind the cockpit of a fighter for the final space battle in the movie.
This one has been a long time coming, and is another brand new piece of astromech news exclusive to this site! UPDATE! A shot of an original f/x model of Red 4 has surfaced (still labeled as "Blue 4", after the original script) showing that even the model astromechs wre detailed to match the full size prop! This is a pretty groundbreaking development, because it proves that the model shop guys in California actually did attempt to match the details of the full size live action props that were being filmed in England! I will have more shots of models posted in the next few weeks - stay tuned!
R4-D6


R4-D6 can be seen twice rolling around the Yavin hangar. You can just see R4-D6 rolling through the background in the above shot while Luke & Han are talking in the rebel hangar. Look just under Luke's chin. You can also see him crossing in the shadows behind Leia as she enters the hangar right before the battle.

UPDATE! I finally found a moderately clear full-body shot of R4-D6 in the Yavin hangar. Unfortunately, it is in black & white, but is still very useful for showing R4-D6's stationary position against a pillar. I hope this is helpful for all you diorama builders!
R2-X2


R2-X2 is seen both in the briefing room conversing with R2-D2 (yes, really - watch it again), as well as in the hangar being loaded into an X-Wing. Unfortunately, we lose track of him after that, so we don't know whose X-Wing he is in during the battle.

Here's yet another cool pic from Rinzler's Making of Star Wars book. You can see a line up of 7 X-Wings, each around 2' long. Close inspection shows that each are weathered and marked differently. Unfortunately, we can't see any of the astrodroids except for the one closest to the camera, which has a white-domed unit with black pinstriping around the top. Being that the models were designed, built, and filmed at ILM in California, while the full size prop domes were painted and filmed in England, it is very difficult to imagine that many of the domes used on the models actually matched up with their full size counterparts. Also, the design of the dome would often vary between different sized models,(At least 47 X-Wing models were built and filmed for the first Star Wars movie, alone) as would the actual models used in different shots as the film was edited, so it is difficult to really assign a droid to a particular pilot based simply on a model. For example, next time you watch the trench run scene, notice that the droid slots on the Y-Wing fighters are all empty!
UPDATED:
Some guys that have been spending more time than I have thinking about the model props used in the movie, and what droid models were used in them, have been kind enough to take the time and share their findings with the rest of us astronuts.
First up, working from the approach of the full-sized prop domes, is Keith K.:

Keith is working from the idea that every pilot filmed would have had a unique full-size prop dome, and that all of the domes seen as full sized props were used elsewhere in the movie (Porkins - R5-D4; Wedge - R3-T2; etc.), and so would probably have a model miniature equivalent. This is how he came up with the clever association of R5-A2's dome (from Mos Eisley) with the orange & red dome used on a model. His theory is shown most clearly in the case of John D.'s R4 dome, seen previously on the Tantive IV as R4-M9, and in miniature on the Blue 4 model.

Next we have a great chart made by Brett F., who is taking the angle of identifying all the starfighter models used in making the film that had identifiable, or at least distinctly painted, droids:
"...my rule for what droid goes with what ship is to go by the full size cockpit prop and consider any droids on the models that do not match what we see in the cockpit shots as errors by the model makers. This works fine for Red leader through 6, but Red 10 and 12 don't have any evidence yet as to what droid domes they used. It also not useful for Gold squadron, as it is not clear if the Y-Wing cockpits even had a droid prop on them. So for now, I have to go with the black R2 for Gold Leader, the orange one for Red 12, and use the EU assignment of R2-X2 to Red 10. Gold 2 must probably have a gray domed R2 but not much else can be determined, and Gold 5 and Gold 7 will have to wait until Lucasfilm decides what droid they want to give them, like Gold 4. Since the the POTJ Y-Wing is painted after the MOM-Y which is called Gold 3 on the old model kit, I have assumed that the red detailed R2 in it is the proper droid (although when it appeared in ESB it had a droid similar to R2-D2 but with red body details instead, so I don't know if that should be considered Gold 3's droid, or the POTJ one and consider the blue and aluminum domed droid to be a new one for ESB). - Brett F.
So all of this is very enlightening. There is inevitably some speculation and conjecture here, and I can't say I agree 100% with some of the associations, but at least with Brett's chart we are finally getting a nice reference chart for what droid actually appears in which model, and Keith has produced an excellent diagram that associates the full size props with the miniature models. Well done gentlemen, and thank you!
More info is to come on these charts and the photos they use so check back soon!
Next: Droids of the Empire!!!
Back to Main Page - Star Wars Astromechs
