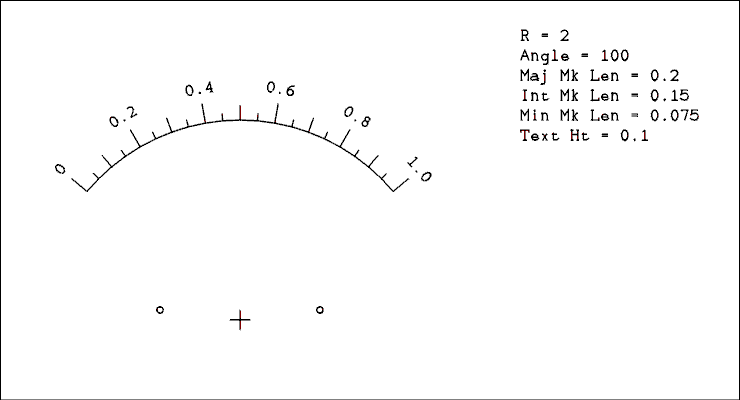
Figure 9.1 A Linear Version of the Nonlinear Scale to be Created.
Chapter 9
Making a Nonlinear Scale for a Meter.
There are times when you have no choice but to use a nonlinear scale. Some examples are; a resistance scale in an ohmmeter that applies a constant voltage and measures the current, a transistor beta meter that keeps the collector current constant and measures the base current, a dB scale on an audio level meter, or the output level meter of a signal generator in which the nonlinearity of the detector diode causes the scale to be compressed at the low end.This method requires that you have the project finished and operating. You need some kind of calibration standard so you can know what the value read by the meter actually is. The meter will come with a linear scale. You will use this scale to log a percent deflection for the standard values. The position of the actual points will be calculated from this data.
Note: In one case sited above there is a well known formula for the meter scale. That is a transistor beta meter.The first thing you need to do is collect the data of meter deflection versus value. We will use an example of a fictitious signal generator. To make things more interesting the original meter scale will be presumed to go from 0 to 250. The calculations are a bit simpler if the scale goes from 0 to 100 but I need to cover the most general case. Here is the fictitious data from the fictitious signal generator.IB = IC / Beta
The meter scale will have a one (1) on the right instead of a zero.(0). For beta values greater than 1, and they had better be or the transistor is burned out, The base current is lower which causes less deflection of the meter pointer and the function is a simple 1/x function.
Measured
Output
(Volts)Meter
Deflection1.0 250 0.95 234 0.90 218 0.85 203 0.80 188 0.75 173 0.70 158 0.65 143 0.60 128 0.55 113 0.50 98 0.45 84 0.40 70 0.35 56 0.30 43 0.25 31 0.20 20 0.15 12 0.10 7 0.05 3 0.0 0 Now that we have collected the data we can remove the meter and disassemble it. Next you will make a scale to determine the values of "Scale Radius" and "Total Angle". Also we need to know the location of the scale mounting holes and the center of the scale arc. The following procedure will give us that information.
- Carefully disassemble the meter and remove the metal plate which holds the scale. Reassemble the meter leaving the screws out so as to protect the works from dust and grit. Note: (A meter movement is similar to a watch. It doesn't take much to gum up the works and stop it from working.)
- Now here's the rub. There is no way to get a scanned image into MaxCAD. Make some measurements on the existing scale and use the measurements to make up a new one employing the scale editor that is built into MaxCAD. Place the scale on the drawing board and mark the center of curvature with two crossed lines. Also place two small circles to mark the mounting holes.
- Print out the scale on tracing paper. Lay the paper over the existing scale and figure out what you need to do to make it match the scale. Too much curvature? Make the radius larger. Curvature is right but the new scale overlaps the old one at each end? Make the angle smaller.
- Edit the scale and pay attention to the mounting hole markers as well. I have found this to be pretty much a trial and error process.
- Print out the changed design and compare it to the original scale again. Go through as many iterations as it takes to get it right.
Now you know the radius and angle. Write them down so you won't forget them, or better yet use the text command in MaxCAD to place the values on the drawing board. Place them outside the meter scale so they will be cut off after the scale is glued to the scale plate.
Now decide on the number and location of major marks, intermediate marks, and minor marks. In this example we will place major marks at 0, 0.2, 0.4, 0.6, 0.8, and 1.0. Intermediate marks at 0.1, 0.3, 0.5, 0.7, and 0.9. Minor marks at 0.05, 0.15, 0.25, 0.35, 0.45, 0.55, 0.65, 0.75, 0.85, and 0.95.
Set up the linear scale that is on the drawing board to follow this plan if you are working through the example, or set it up to match your actual project. The purpose is to adjust the length of the marks so the scale will look good. Write down, or enter as text, the length of each mark as well as the text height that looks right.

Figure 9.1 A Linear Version of the Nonlinear Scale to be Created.
Now delete the meter scale leaving the arc center cross marks, the circles indicating the location of the mounting holes, and the text information about the scale.Now draw an arc who's center is at the original arc center marked by the two crossed lines, and it's start point is the scale radius to the left of the center point, in this example, 2 inches. Enter the angle of the arc as a negative number which is the scale angle, -100 degrees in this example.
To give you some idea of where we are going with this, we will enter all marks at the lower end of the arc and then use the rotate command to place them in the proper part of the arc. Then the entire scale, marks, numbers, arc, and all will be rotated so it is a normally positioned scale. Stay tuned and you will see.
We will start with the mark at 1.0.
- Starting at the low end of the arc which should be at the point -2,0, draw a line from this point to the point -2.2,0.
- Set the snap to 0.05.
- Select the draw text command by typing T.
- Click the point -2.25,0.
- In the box at the top type the letter C to center the text.
- In the Text Angle box type 90.
- In the Text box type 1.0.
You should now see Figure 9.2 on the MaxCAD drawing board.
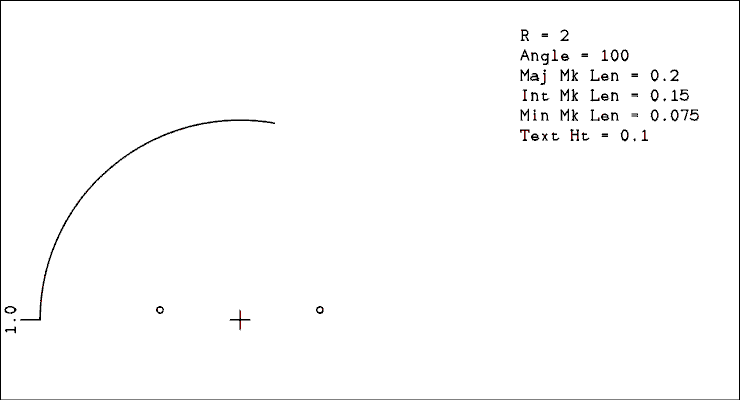
Figure 9.2 Nonlinear Scale Under Construction.
Obviously this mark and number belongs at the other end of the arc which is -100 degrees away.Now the contents of your drawing board should look like Figure 9.3.
- Start the Rotate command.
- Select the number 1.0 and the horizontal line
- Click at the center point of the arc.
- Type -100 in the Angle box.

Figure 9.3 Nonlinear Scale Under Construction.
Well, that one was easy because it had to move from one end of the scale to the other. But next we will put in the mark for 0.95 volts and we need to rotate it to its proper location on the arc. For that we need to calculate the angle through which to rotate each mark. The table above has been repeated here with a third column added which is the angle of the mark from zero, the lower end of the arc.Rotation Angle = -Angle x Meter Deflection / Meter Full-Scale.
Where "Rotation Angle" is the angle the marks and numbers will be rotated using the Rotate command.
"Angle" is the total angle of the scale, 100 degrees in this example.
"Meter Deflection" is the value taken from column 2 of the table.
And, "Meter Full-Scale" is the full-scale value on the meter, 250 in this example.
Measured
Output
(Volts)Meter
DeflectionRotation
Angle
(Degrees)1.0 250 -100 0.95 234 -93.6 0.90 218 -87.2 0.85 203 -81.2 0.80 188 -75.2 0.75 173 -69.2 0.70 158 -63.2 0.65 143 -57.2 0.60 128 -51.2 0.55 113 -45.2 0.50 98 -39.2 0.45 84 -33.6 0.40 70 -28 0.35 56 -22.4 0.30 43 -17.2 0.25 31 -12.4 0.20 20 -8 0.15 12 -4.8 0.10 7 -2.8 0.05 3 -1.2 0.0 0 0 Next we will put down the minor mark at 0.95. According to the data it is 0.75 inches long. Since we don't have snap set that small we will use keyboard entry for the second point of the line.
Now we will put in the intermediate mark for 0.90.
- Type L and click the low end of the arc.
- Type -2.075,0 and press TAB.
- Then type E and TAB.
- Type Control R and select the short line you just drew. Most likely the arc will be selected instead. Don't panic. Hold the shift while clicking the line. It will now be selected as well. Release the shift key and hold the control key while clicking the arc away from other objects. The arc will turn white.
- Click the center of the arc.
- Type -93.6 and press TAB. This is the angle from the 0.95 entry in the table.
Now perform the steps as above for the 0.95 minor mark except put in the 0.85 minor mark.
- Type L and click the low end of the arc.
- Right click the point -2.15,0.
- Type Control R and select the short line you just drew. This time you should be able to select only the line.
- Click the center of the arc.
- Type -87.2 and press TAB. This is the angle from the 0.90 entry in the table.
Now we will put in the 0.80 major mark.
You should now see this on the drawing board.
- Type L and draw a line from the low end of the arc at the point -2,0, to the point -2.2,0.
- Select the draw text command by typing T.
- Click the point -2.25,0.
- In the box at the top type the letter C to center the text.
- In the Text Angle box type 90.
- In the Text box type 0.8.
- Type R and select the number 0.8 and the horizontal line
- Click at the center point of the arc.
- Type -75.2 in the Angle box and press TAB.
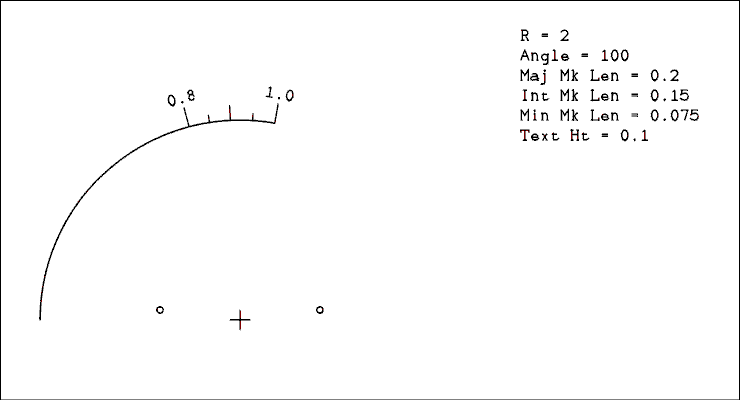
Figure 9.4 Nonlinear Scale Under Construction.
Now add the rest of the marks. It may seem easier to do all the minor marks one after the other and then all the intermediate marks. That is how I did it. If you do, be careful to always read the angle from the correct line of the table. After all marks have been inserted this is what you will see on your drawing board.

Figure 9.5 Almost Finished Nonlinear Scale.
Only one more step to finish. We must rotate the whole scale so it is in the normal upright position for a meter. The equation to calculate it is,Final Rotation Angle = -(180 - Angle) / 2
Where "Final Rotation Angle" is the angle to enter into the rotate command to bring the scale to the proper orientation,
and "Angle" is the angle of the arc 100 degrees in this case.
Final Rotation Angle = -(180 - 100) / 2 = -40 degrees.
Now your meter scale should look like this.
- Press Control R to start the Rotate command.
- Press Control W to select objects using the select window.
- Left click the first corner of the window.
- Right click the other corner so as to include the entire arc, all of the marks, and all of the numbers. If you missed on the first try, press the ESC key and try again.
- Hold the Control key and click the crossed center marks and the mounting hole circles to deselect them.
- Now click the center of the crossed center marks.
- Type -40 into the angle box and press the TAB key.
- Delete the text legend.
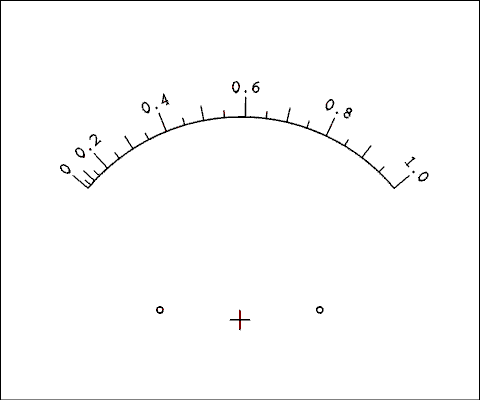
Figure 9.6 Finished Nonlinear Scale.
Making a nonlinear scale for a receiver dial is much the same except that the arc will subtend 180 degrees and you won't have to rotate it after you are finished. Here is how to get started.Use MaxCAD to make a linear scale that goes from 0 to 180 and subtends an angle of 180 degrees. The normal receiver logging scale goes from 0 to 100 but by using 180 you don't have to perform any calculations.
Choose calibration points; every 100 kHz, 1MHz, or 5 MHz, depending on the frequency band being tuned.
Log the reading for each point, in a table the same as for the meter in the example above.
After marking the center point, delete the linear scale and draw an arc 180 degrees long. Then place the marks and numbers on it the same as done above for the nonlinear meter scale.
Back to Fun with Transistors.
Back to Fun with Tubes.
Back to Table of Contents.
Back to top.