
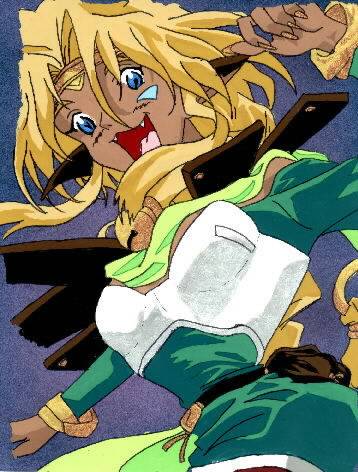
 Step 1: Initial Base Drawing Duh. You'd better have a picture that you've already drawn (or printed. Whatever.) that you want to make into a cel. :P Otherwise you're in a bit of trouble, 'cause it's kinda hard to do a cel with no picture! Here, I'm using a pic I drew of Aisha from the volume 3 video cover.
 Step 2: Sharpies and Acetate Here we go! I like to cut the acetate into sheets that are the same size as the picture I'm using (and since I do nearly all of my drawings on printer paper, it's cut into 8.5" x 11" sheets). You put the acetate sheet over the drawing/printout/picture and simply trace over the lines with extra-fine-point Sharpie pens (I bought a multi-color pack of 8, this just makes it easier) Now, an important note that I'd like to add it that you want to also put lines where the colors change shades (highlights and shadow outlines and so forth). Just so you can see that I did that, you can click here for a close-up of the cel scan (Unfortunately, Aisha didn't have very many Sharpie color lines when I scanned her, mainly just the folds in the green part of her suit and her little brown hip-pouch. >_<). If you do these color lines in colors that are very close to the paint that will be put in that area, they will almost be invisible.
 Step 3: Time to make a mess!! WHOO! ^_^ (In other words, let's start painting) Perhaps the most important part of doing cels is painting them.....obviously. :P I recommend painting the intricate little details first (in this case, things such as eyes, teeth, jewelry, etc.). Then, start on the larger places, like skin areas and clothes (see where those color lines are coming in handy now?) Also, very, very few professional cels are painted completely to the edge of the plastic. It's not really necessary for you to do that, unless you want to, of course! Note: A fun little thing to do is to do any shiny parts (eyes, jewelry, etc.) in metallic paint. It just looks cool. ^_^
 Seeeeeeeee? Sehr gut, ja? ^_^ After the cel dries overnight, flip it over (don't put it on a background until about 2 days later, it still has a big chance of sticking to the background!) If you have any paint that went over the lines, just take your fingernail (or carefully and gently use a pocketknife because it will scratch the acetate) and scrape it off. Neat!! Looks good! :)
The background is completely up to you! I'd recommend using something like construction paper, or, if you want, you can paint your own! Almost anything will do just fine! Just go crazy with it! ^_^ It's whatever you think looks good!
|
