
 Pencil and paper ready (if you're using pen for this, you should be beaten)? Okay good! Let's begin...
 Step 1: Four-Eyes 2 slightly vertically-elongated circles with tiny squares in them (triangles, if you decide to make him freaked out). Could this possibly be any easier? Just be sure to do the eye that's farthest away from you (the one in the background) as a thinner oval (this helps to show distance and the curviture of the face)
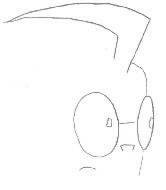 Step 2: "Look at me! I'm Dib, with my pointy hair! POINTY HAIR!!!!" Put a line between the lenses, toss in a tiny mouth, and slap on a half-square nose. Wow! Now for Dib's most obvious trait: that pointy hair of his. Start about mid-way between the eyes (just estimate where the top of his head would be for right now) and I recommend doing the front edge first. Do that, then just sweep it back (with a light curve, if you'd like)! Then do that other vertical-ish line (almost parallel to the front edge) and sweep it back again! Simple, huh? For the face line, I start at the hair, do a tiny line forward, then just go straight down to the eye. Then go down to about equal to where the mouth is for the front of the face. Looks a lot like Dib already, doesn't it? :)
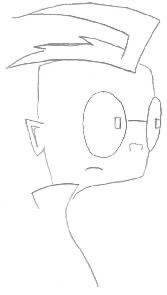
 Step 3: Hair/Ears/Back of the head Let's start with the ear here. Make it about an eye's width from the larger eye. It's just a simple half-square (like the nose) with a pointy "P" thing in it to show the folds in the ear (you can shade the "P" thing in black or you can just leave it as an outline, it's your preference). Here, we finish up the hair, and I like to start with the line farthest to the bottom. Just sweep it back (kind of parallel to the pointy thing) and just do a zig-zag to the back edge of the pointy thing! From there, it's just a slightly arched line for the back of his strangely-large head!! Cool!
 I got a coat like this for Christmas! ^_^ *slap* Okay, back on subject... I prefer to do the collar first, since it helps to position everything else. Start with the top line and draw the back edge of the collar. Then, start at that top line you just did and go towards the neck/chin area, but don't totally connect the collar line and the chin line (we're gonna put his shirt there. You'll see what I mean later). Take the line going forward and sweep it in a bit of a loose "S" shape (to simulate his coat blowing in the wind)
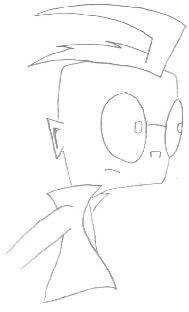 Add in Dib's shirt (just a simple slightly-curved line) and the other collar. Simple, no? Just put a tiny curve where the shoulder is and make a straight line back. Then toss in another line to form the bottom of the sleeve (make it just a little more narrow at the wrist than at the shoulder) Lookin' good!
|
