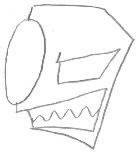
 All together now... "Ooooooooh!" Okay, pay attention now. There will be a quiz after this session (okay, no, not really. I don't want to scare anyone off.)
 Step 1: Eyes First, draw an oval. Easy enough, eh? Then, draw the upper eyelid for the squinty eye from the corner inside the face to the outside, and do this about halfway down the oval. (Did that make any sense???) Then do the lower eyelid, about a quarter way from the oval's bottom. Then, toss in those 2 vertical-ish lines (make sure to curve them just a little!)
 Step 2: Front face line/Mouth Starts getting a little trickier here! First, draw a tiny line sticking up from the top of the oval (this is his forehead...sorta.) Do another at a slightly more vertical angle from the bottom that's about the same length (upper lip). From here, you can go any way you want to with the mouth, but I'm doing this one as a maniacal evil grin. In this case, bring the upper lip back to just below the squinty eye, down, and back out, almost to the line from the oval.
 Step 3: Pearly whites (aka- teeth)/Back of the head If you're drawing his mouth closed, you can probably just skip part of this step (lucky you!). Actually, this is easy. Just draw a line from the point of the lower lip up (it looks a little better if you curve it outward just a little). From there, just toss in a squiggly line for the teeth! Now comes the fun part: the back of the head. Start from that short line from the oval and just draw straight back (you can add a slight curve to it if you want). Stop about 1/4 of the way from the edge of the squinty eye and go diagonally down a little (to just behind the eye). Now, draw a long line that connects the bottom jaw to the diagonal line with a slight curve inward. (He really doesn't have a neck, just kind of a point!) Bingo!
 Now comes the arm. I like to do the arm closest to the foreground first (it's just easier). I recommend doing the shoulder triangle-thingy first though, since it sort of shows you where to do the neck triangle, and where to put the arm in. So just draw a little triangle, then another for the collar (the neck one). Easy! Okay, now, I like to put the glove on first, so just do a little fist about where his waist would be (this helps to make the arm the right length). And don't worry about being picky, just do the outline. After all, when you color the thing black, fingers won't show up anyways! Then, do the cuff of the glove (in other words, the rest of the glove). It's just a simple triangle that should angle outward and should go up to about halfway to the shoulder triangle. From there, just draw 2 lines going from the cuff to the triangle. No problem!
 Do I really need to explain this? Okay, fine. I will. Just do a line for his back (don't put it on the very edge of the fist, make the fist break the line. Otherwise, it'll look really strange) Then draw the front of his shirt (actually, in this pic, I really didn't make the part near the shoulders & collar narrow enough, but that's okay) and just connect the 2 lines! Simplicity at its best, folks.
|