
--------------------------------------
BW - Screeching Area
--------------------------------------
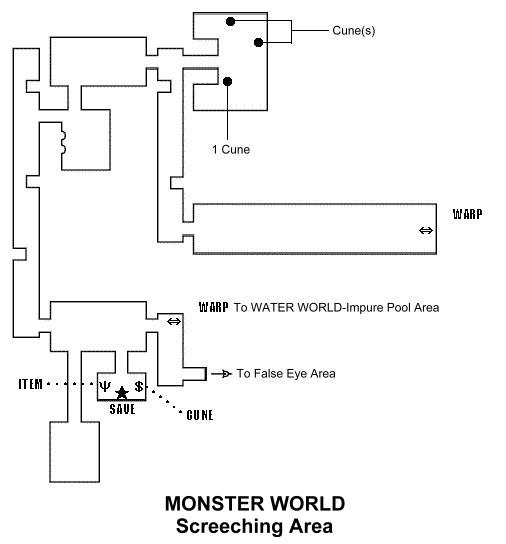
You enter this area facing W. And a wall. Turn to the right.
The WARP stone ahead leads to the secret room in the WATER WORLD Impure Pool Area. This is the shortcut back into the upper levels of the Tower.
This is the level where you will need to use the Beast Key traded from the Cune trader and the level where the creatures are invisible until you place the Young Dragon Gem on a pedestal. This level is the best justification for the lack of music that the game offers. You will be able to hear your opponents and know they are there, but not se them. If you get here without the Young Dragon Gem, you will thank the game designers that music was left out. I will get you to the pedestal as fast as possible.
Head around the corner into a wide but short corridor with 2 doorways on the S wall. Take the first one and you will find the Save stone, Cune trader, and Smithy. Repair and Save.
In the room next to this, you can talk to Auriel again. She will give you a Soul Pod +53(!), a very nice addition to your constantly increasing abilities.
The next phase of this level is to get to the pedestal. Head into the next corridor that has several creatures that can appear to interfere with your progress.
>Long Corridor
>3 Oblids (Drops Mpotion)
>1 King Hoppers (Drops Bracelet of Curing (Brass))
>2 Warders (Drops Cunes)
It is likely you will encounter an Oblid or two before you can get to the pedestal. Run past them if you can. Otherwise, finish them off. Near the end (far N) of the corridor there is a doorway on the E wall. At this point you will hear some groaning. You may even become paralyzed. That is caused by the Wardens that are near the ceiling to each side of this doorway. You cannot see them, but if you look at the Creature Book, you can see what they look like when they are visible. If you hear 'boinging' sounds, that is the King Hopper in the alcove at the end of the corridor. Ignore them for now; enter the doorway into the Dragon Pedestal Room.
>Dragon Pedestal Room
>Find: nothing
Move to the pedestal, use the Young Dragon Gem, and now you will be able to see all your opponents on this level. The next room (Cursed Demons Room) contains creatures that will only appear after you pass through it once and then come back through it. I will explain them later. Pass through this room to the locked door. Use the Beast Key to open it.
>Oxelus Room
>3 Oxelus (Drop Keenest Battle Axe, Deadly Great Sword, Crushing Bastard Sword)
>Find: Cunes x3
Trying to fight these guys while they were invisible got me dead more times than I care to remember. Visible is much preferred. They hurl fireballs and move moderately slow. But they do punch pretty well. Dance around them but try to isolate one of them and take it out fast. It easier (and safer) to go 1 vs. 2 than vs. 3. Wear fire protection gear and use a Fire World Stone for extra protection. As you leave here, the Cursed Demons will begin appearing.
>Cursed Demons Room
>4 Cursed Demons (Drop Mpotion x2, Soul Pod +29, Great Shield of Balance)
>Find: nothing
As soon as you exit the Oxelus room, the Cursed demons will appear and they carry a Cursed field around each one. Slashing attacks worked well and Frozen Hornet too. They are easy to maneuver around. Finish them, go back and heal up durability and health, and save. Now return to the formerly locked door to the Oxelus Room, head S down this corridor, and enter the Great Hall to the E.
^^^^^^^^^^^^^^^^^^^^^^^^^^^^^
BOSS FIGHT - NECRON
^^^^^^^^^^^^^^^^^^^^^^^^^^^^^
>Great Hall of Necron
>3 Death Serpents (Drop Arm Guard Of Composure, Harden Leg Guards)
>Necron (Drop Ring of Dead Spirit)
>Find: nothing
At this end of the hall will appear a creature called the Death Serpents. More fireballs, and again, easy to maneuver around. Standard tactics work well. But at the other end is one of the bosses you need to finish off, Necron. And no, he is not the Necron in KF. He fires cold waves and occasionally tosses and acid-based attack or paralysis. Move in and use smashing or slashing attacks and Holy magic. Combo him and he goes down quickly. But watch your HP. A lot of Cold attacks will make your HP drop fast. Use ranged attacks with Critical plusses if you feel more comfortable. Remember, there is a smithy on this level. Remember this smithy. It is the last one in the Tower. You will be coming back here a few times, I am pretty sure.
Once done, the WARP stone to the DEATH WORLD Dark Castle Layer is now accessible.
