How do you play Hit-a-bump version 6?
1. Introduction and needed items
Where's version 5 you may ask? Simple, version 5 is way too complex with rules so complicated that it takes practically an entire 50-page manual to write out! Just joking, it's more like 15 pages at font size 12 using font face Arial.
Version 6, the most mature, is probably the most fun and has the most action compared to any other version. It is also very simple compared to version 5 [about 4 or so pages instead of 15], and has almost exactly the same principals and rules. The major change is the scoring method. Also, you need the following as well:
- 300+ pennies or chips very close to the size of a penny [3/4 inch or 1.9 mm diameter]
- 1 board [needs to be built in a special way as described in the links at the bottom]
- 8+ dice [no more than 32 allowed; size doesn't make a difference, but no bigger than a die measureing an inch on each side [2.54 cm] and no smaller than a half an inch on a side [1.27 cm]]
- 4 markers to mark boundaries between scoring zones
- 2 good eyes [you need to be able to watch the coin very carefully]
- At least 3.5 by 6 feet of clear space against a corner [such as a wall]
2. Setup
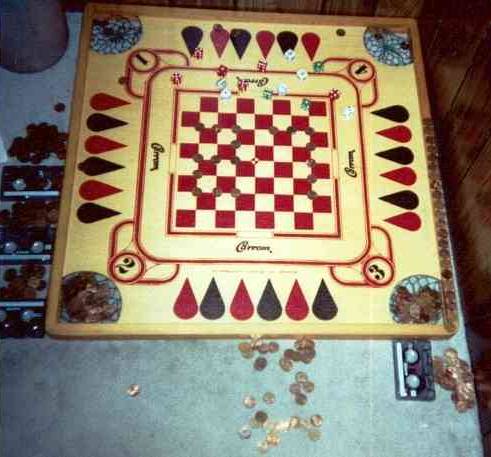
First, you need the specialized board to play this game. The intructions on how to build this specialized board and prepare it are here. To setup the game, [you need to type setup.exe in the run menu, oh, oops, wrong thing :)] you need to put the board next to a corner on a flat, even surface. This game works best on the floor [to me]. You need to set up the levels [formed by numbers in a certain style; refer to the image below "level arena" in the "board layout" subcategory.], the dice, and the boundary markers [for separating the groups so they don't get mixed up; cassette cases with a cassette in them is often a good idea to go with [a good setup of this is shown in the image above]. To set up the dice, they can only be within the dice zone, and not touching the outer edge of it. You may only stack the dice up two levels high. In other words, you have a dice on the bottom, a dice on top of that, and nothing on top [maybe several billion air molecules though, but those don't count :)]. With the dice placed, and your level set up [refer to "saving your game" to see how it's done when resuming]. You can now play. However, you can't play if you don't know the rules, so let's get started on that. MAKE SURE YOU READ ALL THE RULES FIRST BEFORE PLAYING, OTHER WISE YOU WON'T GET THE FULL EXPERIENCE!!!
3. How to play:
The rules are rather lengthy for this game as there are many different forms of scoring and ways to play. I've sort of tried to categorize things on this page as much as I could.
4. Two modes
The image directly above, opens a new window so you can view it directly as it's referred to a lot in the following details. Hit-a-bump version 6 is far easier to play than it's counterpart, version 5. In all the examples, I'll use pennies or coins as the item to roll rather than chips or something. Of course, you don't necessarily need pennies or any coin, you can use anything that meets the criteria in the "items needed" list above. If you've seen the picture above, this is what Hit-a-bump will look like about an hour or two into play. I mainly like going for score, however, there are two major ways to play. You could play for score [getting the most points], or you could play for levels, or even both. I generally go for score though as I like big numbers. You could play in any of these two ways, even both.
5. Scoring
There are several areas for scoring. The fastest way is by dicing the dice. Also, there are ten groups of score values. Group 1 is worth one point, group 2 is worth 5 points, 3 is 10, 4 is 50, 5 is 200, 6 is 1000, 7 is 10,000, 8 is 100,000, 9 is 1 million and group 10 is 10 million.
- Slanted coins are worth quite little. Depending on the degree of the slant, you earn some score. If the slant is estimated to be from 45-75°, the scoring is worth one point. These coins are displayed in the net by the large number two in the picture. Slants estimated to be from 75-85° are worth five points. These are stored in the area marked by the large number three in the picture. Others above 85° would be called "upwards", and they are in a different section, and mentioned later on.
- When a coin leans against one die and doesn't slip and if 45° or more in an angle [almost always it's above 80, so judging on this is very easy], it is called a dice phenatic. These are worth ten points, and are stored on the left side of the picture just above the first cassette tape on the bottom.
- When a coin leans against two dice, it is called a double dice phenatic. These are worth 50 points, and stored just above the middle tape in the picture. These are probably very common at the beginning of the game.
- When a coin leans against three dice, it is called a triple dice phenatic. They are worth 200 points, and are stored on the top most part of the cassettes on the left side of the picture. They are most common at the beginning on the game.
- When a coin leans against four dice, it is called a quadruple dice phenatic. They are worth 1000 points, and typically not that common. These are placed on the right side of the picture just to the right of the tape. They are more common when they are caused from dicing dice [more information later on that].
- When a coin leans against five dice, it is called a quintuple dice phenatic. They are worth a mega 10,000 points, and placed ON the tape just below the 10's area. These can only be awared when distributing a jackpot [later on], or by getting a quintuple dice phenatic.
- When a coin leans against six dice, it is called a sextuple dice phenatic, and are worth a super 100,000 points. You have the highest chance if the dice are grouped and at the very beginning of the game. If ever achieved, they are stacked onto the the middle cassette on the far left of the playing area.
- When a coin leans against seven dice, it is called a septuple dice phenatic, and are worth a million points. The are so rare, that with a month's worth of total play, I've never had one. The ones you see in the picture are due to rearrangements [explained later in this section]. They only occur at the beginning of the game. If ever achieved, they get stacked onto the top cassette on the left side of the play area.
- When a coin leans against eight dice, it is called a octuple dice phenatic, and worth the most ever possible in the game of Hit-a-bump. They are worth 10,000,000. They are stacked on the far right cassette next to the 1000's group. I've never achieved 10,000,000 points yet, and it takes a long time to get. In fact, the closest I've ever been to ten million is about 5,350,422.
- If slants ever get over 85°, they are called "upwards". These are remotely placed compared to the other areas. Rather than grouped, they are stacked in a line that circles the board. Ever notice the long line on the right of the play area? That's exactly where they go. They come in three varieties:
- upwards - One coin gets stacked on here, and occur if angle of tilt is estimated to be at 85° to 87.5°.
- straight up - Two coins get stacked here, and occur if angle of tilt is estimated to be at 87.5° to 89°.
- perfect up - Four coins get stacked here, and occur if angle of tilt is estimated to be greater than 89°.
- Dicing the dice is rather the fastest way, but takes a while to get a die or two beyond the dice line. The dice line is the mark from the bottom of net 1 in a straight line to the bottom of net 4 in the photograph. The points on the water droplets mark the edge of the dice line. If a die or two goes beyond this line, you score random amounts of points varying from a weak 1 to as much as 6000 for one dice. With two dice, it ranges from 2 [mega rare] to as much as 12,000 [more common than 6000 with one die]. With 3, it could be as much as 27,000. If one die does go beyond the dice line, remove that die and shake it outside the playing area. The number involved specified which category it'll go in:
- 1: 1 point area, group 1 by net 2.
- 2: 5 point area, group 2 by net 3.
- 3: 10 point area, group 3 above the bottom cassette [not on it].
- 4: 50 point area, group 4 above the middle cassette [not on it].
- 5: 200 point area, group 5 above the top cassette [not on it].
- 6: 1000 point area, group 6 to the right of the right side's cassette [not on it].
Then, roll the die again, and take the number it indicates and put it in the specific category marked by the first roll. Take these coins from your stock, and assign them in the specified category. For example, if you roll a 4, then a 6, you put six coins into the area above the middle cassette on the left. This would actually be 300 points.
- For two dice, it's a little more gifting. First, you remove BOTH dice that went above the dice line. Then, you shake BOTH. Instead of going for what ever the odd ball one is, go for what ever one is the highest. [i.e. you roll a 3 and a 5, you consider it group 5 [see why it's an advantage and why 12,000 would be more common this way than 6,000?]] Then, with BOTH dice again, shake them and roll them. The number indicated from adding the two together would be your number you put in that category. [i.e. you roll a 4 and a 1. You put five in category 5, and score a thousand points. You could also put one in category 6 if you want to to save your coins you have to roll [more on that later].].
- If you dice more than 3, the process is still just as simple. Rather, you shake all the dice, and go for the group that has the highest number. Then, you shake all the dice again, and add the values. However, rather than to add the exact amount, for three dice, you'd add 50% to that [if you get a 1 or a 5, round to the next number if you end up with a half], or multiply by 1.5. If you get 4 dice, you multiply by 2, 5 to 2.5, and so on. I've never diced three dice in a row at once yet.
- There are also other ways that allow points, and that's at the beginning of a level. First off, if you roll a coin, and that coin strikes through 4 coins that are in a line, it's called a line drive. They are worth 50 additional points, and can only occur in the level arena [the level arena is the area where you see the number 27 in the center of the grid on the checkered squares] from coins that are only involved in the levels. You have the chance to get at least one per level.
- The Strike through is when the coin goes over 5 coins in the same fashion as the line drive. They are worth 200 points, and are only allowed in the level arena and the coins that make up the level.
- If a die hits a coin with a 1, that coin is removed and put into category 1 [1 point].
- If a die hits a coin with a 2, that coin is removed and put into category 2 [5 points].
- If a die hits a coin with a 3, that coin is removed and put into category 3 [10 points].
- If a die hits a coin with a 4, that coin is removed and put into category 4 [50 points].
- If a die hits a coin with a 5, that coin is removed and put into category 5 [200 points].
- If a die hits a coin with a 6, that coin is removed and put into category 6 [1000 points].
- If, by chance, two dice hit the same coin, the larger number of the two dice is the group number and add one to it. For example, if you hit two dice on a single move and both have contact with the same single coin, and the dice had a 2 and a 5 on them, you'd put that coin in group 6 as 5, the greater of the two, and one more is 6.
- If a coin manages to get on any number of dice, you get 50,000 points for that [5 in group 7] and is considered a "superjackpot". Unfortunately, it is very rare as, in about 2000 hours of play, I've had it occur only once. The coin is removed off the die and put into the proper category.
- If a coin is diced, or a hit-a-bump occurs, and you can't get to it without moving the dice, it is considered trapped and you get 50 points from that one and what ever dice phenatic score you get, if any. This is the only time in which you may move the dice during the game other than it going beyond the dice line. You may only move the dice neccessary to grab the trapped coin. Only move them very little, just enough to grab the coin and take it out.
- If a coin hits another coin and that coin use rolled ends up on the top most part on the top, it is a jackpot, and worth 15,000 points. That coin is removed.
- If overlapping occurs, you get various amounts of points, depending on the degree of overlapping. The pictures below show you the degree of overlap and the cooresponding score value [the grey coin represents the one you just rolled, and the black coin represents the coin that was targeted]. For something 60-85% covered, it's worth 1 point. From 85-95% covered, 5 points. From 95-97% covered, 10 points, 97-99% covered, 50, and 99% or more covered is 200. With 97% or more, you also get a 2x bonus multiplier too [more information on multipliers later]. Overlapping refers to the percentage of the coin covered, not how far it's in.

- *NEW* If you clear a level, you get 1000 points, plus 100 more times the level number. That is, clearing level 1 gives 1100 points, level 2 gives 1200, level 53 gives 6300, etc.. It get cumulative, and makes it better for those who aim for levels as well.
- *NEW* If you clear a level and a coin is in the way preventing you from placing a level coin, that coin is removed and you score 500 points [two in group 5 and two in group 4].
6. Scoring in version 5
As you can tell, there are many ways to score points and two new ones added on May 1, 2004. These numbers here are much, much easier to understand than version 5's. For example, a coin tilt at 88° would be worth 23 points, at 89°, 31, for a dice phenatic, it's worth varying amounts depending on the degree of the tilt. For example, for 60° on one die, it would be worth an odd 93 points. For 80°, it'd be worth the odd 2,131 points [I think as I don't remember the formula]. Do you see how much easier the scoring is for this version compared to version 5? Also, you don't have to be so accurate with calls as you do with the fifth version. It's like you had to measure a coin to the nearest degree and estimate it. If something's right on a boundary line and just can't tell, then you usually shake one of your coins in your stock. If you get heads, you get the greater value, but if you get tails, you get the lesser value.
7. Multipliers
Not to mention it, if you have a multiplier on hand, except the permanent multipliers, the higher value is always considered if you're going to use the multiplier. There are three different types of multipliers:
- Temporary multipliers: These are the shortest-lasting multipliers, and often hard to judge when referring to hits. These are dependent on the number of times you hit the same coin or object in one turn. If this happens twice, the two are multiplied. For example, if you hit one coin twice, and the last coin three times, you get a 6 times multiplier that lasts until the end of the turn affecting the immediate score on that play. They also occur if you hit more than one coin. If your rolled coin hits two coins, you get a 2x multiplier, 3 coins for 3x, 4 for 4x and so on. If they are hit from line drives or strike throughs, these coins count together as only one coin. If you hit another coin in the distance, you get a 2x multiplier, whether a line drive or a strikethrough. They are the most common, and generally become the highest. However, they don't last until the next turn though. Let's say you get a strike through and end up hitting another coin in the distance three times. Strike throughs are worth 200 points, and since you hit the same coin three times, you get a 3x multiplier. Also, since you hit the credit of two coins, you get an additional 2x making the multiplier a 6x multiplier! This means 1200 points.
- Bonus multipliers: These can be used either on the turn in which you got the multiplier, or the turn after that. Beyond that, it expires. These are generally caused by multiple or extreme overlapping, and common in the nets [nets 1 and 4 in the image above]. If your coin overlaps two others as in the diagrams below, your bonus multiplier is two. If your coin overlaps three coins, it is five. For four, it is ten. If the coin is overlapping another coin by 95 to 97%, it's a 2x bonus multiplier. From 97 to 99%, it's a 3x bonus multiplier. From 99 to 100%, it's a 5x bonus multiplier. Temporary multipliers can be combined with these for a multiplicative effect. For example, if you had a 3x temporary multiplier and got a 2x bonus from the previous move, you'd have a 6x multiplier. Another, yet remote way to get a bonus multiplier is either by getting your coin to hit a coin, in which that coin hits another one in the distance, Due to the rarity, this allows a free 5x bonus. Yes, these can be combined to make bigger bonuses. If the previous move gave a 3x bonus multiplier and your next move gave a big 5x, you'd get a 15x, and if you had a temporary multiplier of 2x, you'd have 30x! Another way to get them is by dicing two dice at once, or getting a two different coins hit twice. Of course, if you combine something like "two hits, two hits, diced, diced", you'd end up getting a 2×2, or 4x bonus multiplier, plus temporary multipliers as well.
- Special multipliers: These never expire, even if you restore your game after saving it multiple times. They only occur in two ways. The first is by intense overlapping. These pictures below demonstrate the overlapping. If the coin is from 95 to 98% overlapping, you get a +1. Above 98%, you get a +2. These add rather than multiply. For example, if you get one that is 96%, 99%, 97%, then 95%, you'd get a 1+1+2+1+1, or a 6x special.. The other 1 at the beginning is your original multiplier which returns to 1 when used. These continue to add until you decide to use them. Save these until a huge score has been achieved in a move or have a big combo of multipliers from previous runs. If, for example, you had a 30x multiplier from bonuses and temporaries combined and a standing 8x special multiplier, combine these to make a whopping 240x. This type of multiplier may require a calculator if you need it. Once they are used, they return to 1x. You also have a special option of breaking these up. For example, if you have a standing 8x multiplier, you can make it become a 2x, 3x, etc. as well! If you chose to make it a 2x, you take the 8 and subtract 2 then add 1 more to make 7. Why 1 more? If you had a 3x and used 2x instead, you'd have 1x, but 1x is the standard, thus not the full credit it took to earn the 3x, so you have 2x remaining instead. If you get any more intense overlapping, this will go up again. Also, if a coin makes a 360° turn around the board [not spinning, but travelling], it's a +1, a 540° turn would be a +2, 720° is a +3, 900° is +4, and so on. The diameter of the turn must be at least 4 inches [102 mm] across.
As you can tell, multipliers tend to boost the scoring a lot. If you diced a die and got 1000 points from it, had a standing 3x bonus multiplier and an 8x special, you'd have 24,000 points, instead of a puny 1000. Imagine what a 100x multiplier would do with a 15,000-point jackpot, or a 50,000 point superjackpot! The best way to get a temporary multiplier is by the coin leaning against a die and swingin back and forth a lot. This'll allow 1 hit per loop back and forth. If it goes back and forth 4 times, it's considered 5 hits. If a dice phenatic comes in, you're going to get more points. The degree of the tilt must be greater than a 5° arc with the rocking effect. Anything less doesn't count. My record is rather amazing though. I had a coin that hit the side of the die and rocked back and forth so much, that after 14 rocks, it some how rotated along the tip and continued with another 6 hits. Unfortunately, I didn't score anything, so that 20x temporary multiplier [!] was of no use :(.
8. Get into the action!
The way of play is rather simple. All you do is roll a coin out [yes, I have the easy trick to getting them far [I could actually roll a coin a combined total of about a quarter of a mile, maybe even a half a mile!]] into the grid attempting to hit the other "bumps" out there on the grid. The hardest and fastest rolls allowed are of that that take the coin, in a straight path, 1 second or longer. Any shorter calls for a big penalty. There is no goal to the game. You could mainly score for lots of points, or go for the highest level. It's not easy achieving my record of 5,350,422 points [and I haven't improved on it in more than 3 years because I haven't played the game in more than three years.]. It takes lots of time. When I went in for levels, the highest yet is 73.
9. The board layout

This is what the board would look like as if you would remove the perspective [except distance as if you had no perspective, things would be infinitely large], and include the border lines. There are several key points on the board here.
- Foul line/foul zone: [marked in red] Coins that roll around and head back past this point are fouls, and costs 20,000 points after 10 times of any scoring values to free it. If you get five fouls in the game, it's game over. You can resume again from a saved game though [saving the game is mentioned later on] to prevent this. If the coin ends up in one of the nets within the foul line, you take the coin out that went in the net, and put it far aside from the main play such as behind you. After you scored 10 times, you can remove 20,000 points, then you can remove one. If you have four, and have more than 20,000's worth, but end up getting a fifth, you can remove the one if you've scored ten times for the first. Note, you may want to put a string of coins before the coin to indicate the number of times you have scored. If you score in two different methods such as getting a strike through, then a double dice phenatic, you put two counts for scoring by any coins in jail. If you know how to roll the coins properly, you wouldn't get this at all [well, very rarely].
- dice line: [marked in blue] My favorite in which marks the area in which a die or two gets shaked for scoring. If the bottom tip of the die facing the foul line goes past [in other words, the entire die is past that line], the die is diced and get shaken for scoring. The one with the 3 on it is right on the edge of the dice line. It's not diced though, but a half a millimeter more, and it will be. After the die is reshook, it goes in the dice zone.
- dice zone: [marked in yellow] The area in which dice may be placed after diced, or when starting the game again, or starting a new one. They may be stacked two high, but they may not be stacked three or more, unless the die was diced. At the beginning of a game, or resuming from a saved game, you can only stack two-high. Stacked refers to putting the diced die on top of another one already in this area. These lines are marked by the arcs and the stright lines just before the dice line. As you recognize, there is a one-inch clearance between the bottom of the dice line and the top of the dice zone. Dice may not be placed outside the dice zone.
- level arena: [marked in green] The area in which the coins for the level are put down. They always form numbers in a unique way as the drawing below indicates. In the picture, I took this photo just when I started level 27 so you can see this. Ever notice the coins are in the shape of a "27"? That's how they are always arranged. When they are all cleared, you move on to level 28 and score 3700 points. There is no end to the levels. If the levels numbers get too long, they start over at 1 again. This only happens if you go beyond level 99,999, which would take about 6 months of nonstop play to even reach and pass level 99,999, so I don't expect this to happen*.

- open area: The area inside the playing area that doesn't include any of the above [colored in gray and cyan].
When you roll the coin, you can aim for the dice, or the coins in the level arena. The dice are an easy way to score, and the coins are for levels for those who want to go for levels. If you hit a coin, the coin you just rolled out, plus the coin you just hit are removed and put in your stock. You don't score any points for this unless it was in a special way.
If you hit more than one coin, all coins you hit and the one you rolled are removed from the board. If, for any reason, you can't reach a coin such as it being surrounded by dice, you gain the 50 "trapped" points, plus remove those coins. Remember, if the coin is hard enough to get at because the dice are in the way, you can move them, but not by much, just enough to get them. If you can't tell if your rolled coin hit another, you would generally take it. If coins don't touch, don't take them. If you miss everything, leave your coin you just rolled, and roll another one from within your stock.
10. Other rules and penalties
- You cannot roll a coin very fast. If you roll too fast that the coin goes flying outside the grid, or flying too high [too high as in 50% higher than the height of a standard die [5/8 inch or 16 mm]. If you roll a coin fast enough that it crosses the 8-square grid on the board within a single second, the coin you rolled will go to jail and no points are scored, nor hit-a-bumps are removed.
- Transferring 5 1's to a single 5 in the categories is allowed. They must be equal in value though. It's like trading five one dollar bills for a single five dollar bill. This is useful if you're running low on your stock. Replacing 5 1's for 1 5 gains you 4 more rolls to use. In the picture, you could think about doing so, but my stock is rather still okay, although low [the idea of having more than 16000 pennies sort of makes a big difference. That's so much it seems infinite!]. You can transfer 50 1's to 1 50 if you want too. This is why you need a lot of chips/coins to play this game. Also, if you want, if you score 5 coins in group 5, you can put one in group 6 because they are of equal value. If you get, for example, 1200 from 50's, you can put 1 in group 6 and 1 in group 5. Any distribution is allowed as long as it's equal in value.
- Stacking a die on top of another 8 high is allowed after you've diced at least 3 dice. Of course, if you decide to stack a one on to attempt for a better value, that is allowed too, but not at the beginning of a newly started game, or a resumed game. There is no end to this game, so most start up rules apply.
- If you leave a dice beyond the dice line [and know it after examination], and dice another one to get the benefits, you lose whatever points you score from the dice [hope for a one for the first roll], and the number of dice you get beyond the dice line is the number of coins you put in jail. This is a really bad move to do. If you can't tell whether or not it passed the line such as extreme boundaries, it isn't considered part of this. If you take this seriously, you wouldn't end up negative right away with score. Yes, negative scores are allowed.
- If you consider a hit-a-bumped coin that was far off [by at least a sixteenth of an inch or 1.6 mm], and remove those, those coins you removed are sent to jail, or a 50,000 point penalty is added, whichever you choose. If it's a hit-a-bump of 3, you add 25,000 points to the penalty. Yes, you can take 1 jailed coin, and 25,000 points penalty if you want to, but be honest about it.
- If you have extreme overlapping or some sort of multiplier-caused form, and you use that temporary multiplier to being onto the next move [other than a bonus multiplier], you either recieve 40,000 points of penalty, or one jailed coin, and whatever scoring you made from the move you used the multiplier on times ten. For example, if you got a line drive and a "two hits" on the previous move, and gave yourself 50 points, then on the next move, you diced a die and got a 6 then a 3, and use the mutiplier and had no bonus or special multipliers, your penalty would be 40,000 + 3,000*2*10, or 100,000. If you choose to jail it, it would be 60,000. This is probably the worst.
- If you delay a bonus multiplier for a longer period of time than what it's supposed to, 3 coins get jailed, or 90,000 points in penalties, and whatever scoring you had times 25. For example, 4 moves ago, you got two dice beyond the dice line, but got really bad scores, and delayed the multiplier without any temporary multipliers, and choose not to use your 3X special multiplier, and got a double dice phenatic, you'd be penalized 90,000 + 50*2*25, or 92,500 points. If you choose 3 jailbirds, you'd get a penalty of 2500, if you choose two jailbirds, you'd get 32,500, one for 62,500. Be honest about your multipliers and learn about how each type [except special multipliers that don't expire] is receieved. Keep a list next to you to help you remember all the scoring values and things like that. If you're very used to the game, just be warned about these heavy penalties. If you double your score from a wrong special multiplier, it's 50,000 points taken away, or two jail birds. In addition to that, the score you make from it times fifty is used. For example, if you scored 300 from dicing a die and doubled it to 600 and have no bonus or temporary multipliers to add onto that, you get 50,000 + 300*2*50, or 80,000 points in penalty. Yet, you must take at least one jail bird. If you take two jail birds, you take 30,000 in penalties, if you take only one, you get 80,000 in penalties. If you take none, you get 180,000 [it skips 130,000 and adds another 50,000].
- You have the option of converting 20 upwards into skipping five levels. A minimum of 20 is allowed. You can use 40 to skip ten levels if you want, but they must be at the beginning of a level. If you fail to remove these, you get a penalty of 2,000 points times the number of coins that were supposed to be removed. I usually stack up on these because I like seeing how far I can get them around the board. You could also exchange them for a number of other reasons:
- exchange 2 to remove any coin such as those close to the foul line
- exchange 4 to remove the last coin in the level arena [if only one exists]
- exchange 100 to remove a jail bird, by preventing a game over. Useful if you don't feel like gaining a score ten times, or have tons in the jail cell. It's like a continue in some video games.
- exchange 1 for 25 free points
- exchange 1000 for a million free points
- exchange 5 for an instant diced die that's within a quarter of an inch from the dice line
- exchange 200 to dice all dice within a quarter of an inch from the dice line.
- exchange 100,000 to dice all dice on the board [useful if you have the maximum of 32 dice!]
- exchange 2 to transfer all coins in the nets above to the nets below [useful if there's a lot in there. This would mean that coins from net 1 would go to net 2, coins from net 4 would go to net 3.
- exchange 400 to allow a stack of three or more when resuming the game [useful if you hope to get several diced dice at the beginning of the game when they all fall.
- exchange 2 to roll two coins in one roll.
- exchange 10 to roll three coins in one roll.
- exchange 1 to remove the foul line for the next 5 moves [like gambling, but rather useful if you expect to get a foul on the next turn]. After the 5 turns and if a coin is actually in there, that coin just gets returned to your stock without any score or penalties.
- exchange 10 for a reroll on the dice when diced. [really useful if you shake a six and get something worse such as a one on the first]
- exchange 300 for a free +1 to special multiplier
- exchange 550 for a free +2 to special multiplier
- exchange 750 for a free +3 to special multiplier
- exchange 900 for a free +4 to special multiplier
- exchange 1000 for a free +5 to special multiplier
It's like the "upwards" are money. You can actually override many rules with these. I've had about 415 total at this point. Just think of what you can get with that. Tip: If you want to go crazy on getting upwards, aim for the nets. They have the highest probability of getting an upwards, but you often don't score much. Aim mainly for the edges to further increase it. You may get tons of 5's and 1's too though and a possibility of getting a special multiplier add-on from overlapping.
11. Saving your game
Saving your game is very easy to do. All you need to do is to make a table and give the columns of "score" [make this column the widest, mainly because scores can get pretty big], "upwards" [these are always kept separately], "level" [so you know which level you're starting on, and if you fail to record it, you must revert to the previous time you saved it, or, if no saves were made, start on level 1], and "special multiplier" [these last forever, thus important. If you fail to save it, you must start back with one for the value]. These are the 4 things you need to keep. When you feel like quitting for the moment, you'll need to count your score. Here's a step-by-step process on how to do it with great efficency and accuracy:
- count 5 coins in the 1-point area, and put one of those coins in the 5's and put the other four into your stock. Repeat until 0, 1, 2, 3, or 4 coins remain.
- count 2 coins in the 5-point area, and put one of them into the 10's and put the other one into our stock. Repeat until either emptied or one remains.
- count 5 coins in the 10-point area, and put one of those in the 50's and put the other four into your stock. Repeat until 0, 1, 2, 3, or 4 coins remain.
- count 4 coins in the 50-point area, and put one of those in the 200's and put the other three into your stock. Repeat until 0, 1, 2, or 3 remain.
- count 5 coins in the 200-point area, and put one of those in the 1000's and put the other four into your stock. Repeat until 0, 1, 2, 3, or 4 remain.
- count 10 coins in the 1000-point area, and put one of those in the 10,000's and put the other nine into your stock. Repeat until you can't take out ten to replace.
- follow the same strategy as the step above for all other groups.
- now add up all the coins in the areas that have remained. For example, if you have 3 in the 1's, 1 in the 5's, 2 in the 10's, 1 in the 50's, 3 in the 200's, 2 in the 1000's, 7 in the 10,000's, and 2 in the 100,000's, you'd do simple math like: 3+5+20+50+600+2000+70,000+200,000. This would turn out to be 272678 points. By the way, this is the exchanging group values for equal higher values rule. You write this score under the "score" column of your table. Then, under the "upwards" section, count how many upwards you have. Write this in here. For your level, write the number you are currently on [if you quit in the middle, you'll have to start the level over again. Try quitting when you finish a level.]. Finally, if you have a special multiplier other than 1x, write that down because they can last forever, even a million years. Now you have your game saved, and you can return to it at any time. When you resume, and have a score already, make sure you add your new score to the one you already have. This'll come in useful in several ways. When you do resume, you make the level indicated to what you saved, and the special multiplier [if any] gets transferred. Note: if your table gets full, make another one. Since this is mostly numbers, you could make up to 3 columns [unless, of course, you have some large, long numbers involved, but you can still get 2 columns....]
12. Tips
- When using special multipliers, it is recommended that you use 3x's unless you get a gigantic score. Given a little puzzle, make the biggest score possible under the following rules: 3 of the same number counts as 3x, 2 of the same number counts as 2x, and so on. Given 12 digits, 4 sets of 3 gives the biggest score, or 81. For 6 sets of 2, that's only 64. For 3 sets of 4, that's 64. This is why it's recommended that you use special multipliers, by factors of 3. Not only can you score big, it's also easier to replace them for the point in which you score big, like 15,000 in one round or more!
- For lots of those upwards, aim for the nets. The coins will have a high tendency to lean against the wall. This is not only just useful for getting lost of upwards, but, if done well, can be used to gain special multipliers for free. However, you hardly score anything, 5 points at most if you're lucky.
- It is easier to dice the dice if you have few dice. I recommend that you use 10 to 12 dice.
- When rolling a coin, keep it as upright as you can. This makes it go more straight.
- Avoid stacking the dice. Sometimes, the dice can end up going backwards making dicing it much harder.
- When placing a diced die, make sure you leave a small gap to get lots of points from dice phenatics.
- For a high score, focus on going after the dice at first aiming for the level coins. After your level gets into the fifties and beyond, clearing a level can then score you more points than the dice can, and at a faster pace.
- Look for areas where the coins are crowded. Aiming for those can easily help with getting a big temporary multiplier.
- If you dice a die and get a six from the last roll, place that six before a coin if it's within the dice zone. Aim for that dice and dice the coin for an easy 1000 points.
- If a coin is within 1 to 2 inches [25.4 to 50.8 mm] from the furthest edge, roll your coin a bit fast and you're likely to hit a jackpot. Be wise about the speed though, too fast and you'll end up with a big penalty.
- Look for certain opportunities for a good multiplier or big score. Sometimes, you may miss out on about 3000 easy points!
I plan to make a video in AVI format on how to roll a penny or coin very straight, and rolling with almost no wobble [which is why I can roll a coin in excess of a half a mile [for total distance]]. This will allow your accuracy to be top notch!
Not into version 6 because of all these rules or can't [or don't want to] make the board, learn about another version with the following links:
Hit-a-bump home
Hit-a-bump version 1
Hit-a-bump version 2
Hit-a-bump version 3
Hit-a-bump version 4
Hit-a-bump version 6
Hit-a-bump version 6 board construction
Footnotes:
* If you really want to know how long it'll take to reach level 99,999, consider the math. There are almost exactly 31,556,925.9936 seconds in a full year. On a good run, it takes about 80 seconds to clear a level, but by level 500 and up, it can take over a 100 seconds. By level 10,000, you're looking at almost 150 seconds. Considering it as if it was 150 seconds per level, that's 150×99,999, or 14,999,850 seconds of nonstop play to reach this level, or 15 million total to pass it. From eating, drinking, sleeping and other forms of entertainment, as it's almost 100% certain that you'll get bored of the game by even 1 month in. Humans sleep through 1/3 of a day, meaning that 2/3 of the day, or 16 hours is left for awake times. Eating, assuming 2 hours per day reduces this to 14 hours. Knowing that other things are necessary, like food shopping, other shopping, etc. are involved, let's call it 12 hours per day of playing this game. Assuming that you are unemployed, 365.242199 12-hour days is 15,778,462.9968 seconds of play per year. Since it takes you about 15 million seconds to pass level 99,999, that's almost one full year just to get that. If you had a job for 35 hours a week, that makes a 12-hour day a 7-hour day, but since eating and other stuff are done during your job, it's more like 8-hours instead. This makes the time needed to be 1.5 years, still, by even the first month, you're likely to get bored of it, but you may return. Thus, the true time may be close to about a decade, which may be more or less depending on your characteristics and resistance to the effects of repetition, but 5-months' time is the absolute minimum. If you focus on score, this could make the time needed be in the decades range, even a century!