I don't get Minesweeper! How does the game work and what are any strategies to winning?
type: game guide
reliability:  - very high
understandability:
- very high
understandability:  - high
time saving:
- high
time saving:  - not applicable*
usefulness: - very high
difficulty: - easy-medium
required skill:
- not applicable*
usefulness: - very high
difficulty: - easy-medium
required skill:  - newbie
overall: 35 of 40 points,
- newbie
overall: 35 of 40 points,
1. Game basics
Ever want to know the easiest way to win a game of Minesweeper on your computer? Well, I made up my own little version of it in HTML since I know the game extremely well. Let's deal with the how it's played:
You first get a grid, in which you can choose your custom setting. Let's get the grid: A typical example of a finished game would look like this [using my own version of the number colors, the game's main idea and rules of play are still the same]:

In this example of a completed game, the dark red squares indicate a square in which is a bad one, a mine. Then, around any of these dark red squares are numbers. These numbers tell you how many of these bad squares [mines] are surrounding that specific square. If you deal out a "1" after clicking the square, you'd know that one of the eight squares surrounding it has a mine and the other seven do not. If you click on a square in which no mines are nearby, all squares within the range will be filled in with numbers along the boundaries of the mines. This is the most effective to winning. That's the basic structure. Seems easy, doesn't it? Don't make Minesweeper entirely a game of chance, as chances are often less than that of getting a Royal Flush in Poker, far less. There are some images below with different colors. This table has the colors used:
| Color | Meaning | Color | Meaning |
| Red | 1's | Orange | 2's |
| Yellow | 3's | yellow-green | 4's |
| Green | 5's | Green-cyan | 6's |
| Cyan | 7's | Cyan-blue | 8's |
| Dark red | bad squares [mines] | light-grey | no mines around square |
| Blue | squares being focused on for section | White | unclicked square |
2. Special occasions
There are some "terms" of instant findings of a mine as I gave them their own names:
The box of 1's

When you see this situation with only ones all around it [there may be other numbers off to the side in the areas surrounding it], you are 100% certain that that is a bad square. Flag it!
The one in the corner

One of the most common ways to know where one is. When you see a one in the corner with only numbers, grey squares [no mines around] and an unchecked square, you'll know 100% certain that that blank square is definitely a mine.
The lonely eight

Despite an 8's extreme rarity, if you snap an 8, you're guarenteed that all squares around it are mines. Getting an 8 is very rare in any normal game. You have a better chance, far better, when you go custom for 24x30 with 667 mines.
3. The game guide
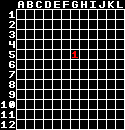
Now that you know the guarentees, let's make up our own game and play it. Let's go with a 12x12 square with 20 mines. Seem hard? Well, let's go at it. This'll show you the best way to win the game.

This is your grid. Where are all 20 mines? We'll have to find out. I supplied the coordinates here so you can easily locate which square I'm referring to, especially at the beginning.
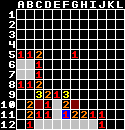
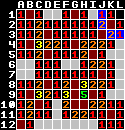
At the beginning of every game, you need to pick out in the open. Let's take square G5. You turn up a 1 here:
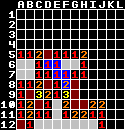
Let's try B6:

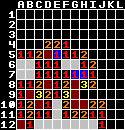
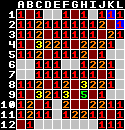
This'll turn up a lot of squares. Obviously you don't get enough to directly know where any mines are. Continue clicking out in the random, but never next to numbers [except, maybe, a 1]. Let's try E10:

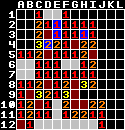
This deals up a lot a squares again. However, you can apply the "one in the corner" method. The square is marked in blue as usual. This means that the empty square is got to be a mine. Let's flag it [to flag a mine, right-click over the suspicious square]. After that, this comes the easiest part:

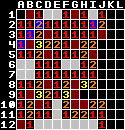
The two ones in blue in the image directly above are the key. Because the ones are already covering a mine, every single square around them [B10 and C9] is safe to get. Let's activate them and see what turns up:
Obviously you can flag the boxes around the 3, yet there's another one in the corner elsewhere. Flag 'em! Now you come across another type of guarentee but harder to get but encountered a lot. There are two twos that you may notice that has only one block left that isn't a mine:
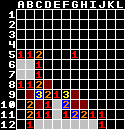
Here, you can tell that the only two mines that the just to the right of the bottom one above is already covered and every square around it is safe. You also have a 1 that leads to a mine you already know is there. There are two more you can uncover safely:

You can do a lot from here. Note how it's creating a chain effect:

Ah, the next click caused a bunch of squares to be cleared because you hit one that had no mines near it. This is the most useful occasion in the game.
Here, the chain effect is still spreading off in two directions. In this case, you turned up seven squares.
Next, you have two occasions of "one in the corner". Flag 'em!

Here, you have two spots in which you can turn over some squares. Remember, when any number by a mine has that number of mines marked, every single square around it is good. For example, when you turn up a "2" and there are two mines already around it, every single square around it that is unchecked is good.

With the next bunch, the two parts from the chain effect are still spreading. Every square turned over here appears to be a one....

Then, the top section caused the uncovering of a blank square so it turns up a ton of others.
Here, you have a one in the corner, and an "only box remaining" type. The two has only one square left to uncover and the two doesn't have every mine it has yet, so that last one is a mine.
In this step, you'd uncover every square around the numbers and one of them uncovers a blank spot thus spreading all over.

Here, the only thing you can do is flag mines. You have a "one in the corner" and a two with only one square left that still doesn't have two around it. Flag both of them. By now, we've got 15 mines out of the 20.
Now the chain on the left side will have to end here, but the chain on the right keeps on going.
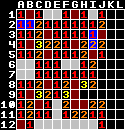
Woah! One little square from this uncovered 19 squares, nearly 14% of the whole table! Yet, it starts another chain effect....

Let's start by flagging mines with the well known "one in the corner" trick. Note how two occasions of "one in the corner" gives only one mine away? That's because they both lead to the same one! There are other numbers and ways that cause that single mine to be recovered. Can you find two others?

Here, you uncover a big one, a five. It seems as if we're leaving the top right corner, but we're not because we can't do anything there.
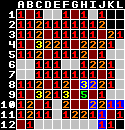
Now that the whole square is covered except the top right, there's got to be a way to know. This 4x4 section can be either guess work or strategy work. It's easy to solve as clues stand right out in front of you.
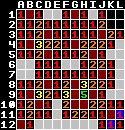

There are two possibilities here that satisfy every number for the mines. Which one do you choose, the left or the right image? Note that you have only one mine remaining. There are twenty mines, and nineteen have been uncovered. That means that only one is left. Obviously the solution must be the one with one mine left.
Let's see here. With one square left, and these turned up ones, there's only one way left.
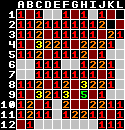
Now, you have every single square filled and you won the game! The finished view would look like this:

Now that you really have the strategy on how to play to win, try it with a 12x12 grid with 20 mines and see [or go with 16 if you feel uneasy with 20]. If you'd like to see the main layout of where the mines were placed before you really even started the game, Click here to see the secret locations of the mines for the above game.
Try doing it on the beginner level and see how quick you can do it. Then, try the intermediate level. You'll never get the exact same layout as above, well, actually you can, but chances are super rare [Care for a 20 to 40 digit number?]. Apply the above tricks and you'll see how easy it really is.
Footnotes:
* The time saving ability of this is not applicable for the reason of this document's nature. This is a game guide, not a standard tip, trick, speed-up and/or shortcut.