Oriental Tunic
Pattern by Nancy and Melissa Taylor
 Please read all of the instructions through ahead of time, making sure you understand them fully. Since satin can be expensive, try to find one that doesn't fray easily, and attempt to sew the tunic with scraps first if you are unsure of anything. Shown, at right, is the tunic as it looks sewn very basically and simply. There are also ideas below for more fancy tunics.
You'll need
* Less than 1/2 yard Oriental satin. Find one that doesn't fray much if you are inexperienced at sewing or dislike working with hard-to-use material. Be sure to pick something that truly looks like an Asian theme, since it helps this outfit look more authentic.
* One package double-fold bias tape in a coordinating color (this will show), any width (the thicker it is, however, the harder it is to work with). (If you are experienced at sewing, you can use fancy embroidered ribbon or even contrasting material instead. You can sew on more than one kind...you can do a lot to embellish this, this is just the basic pattern. One thing you must keep in mind, however, is that due to the way this is put together with bias tape, around the edges of the tunic you should not use any tapes or ribbons that are transparent. Otherwise, the raw edges of the material will be visible.)
* A local printer or computer program that allows for you to modify graphic size.
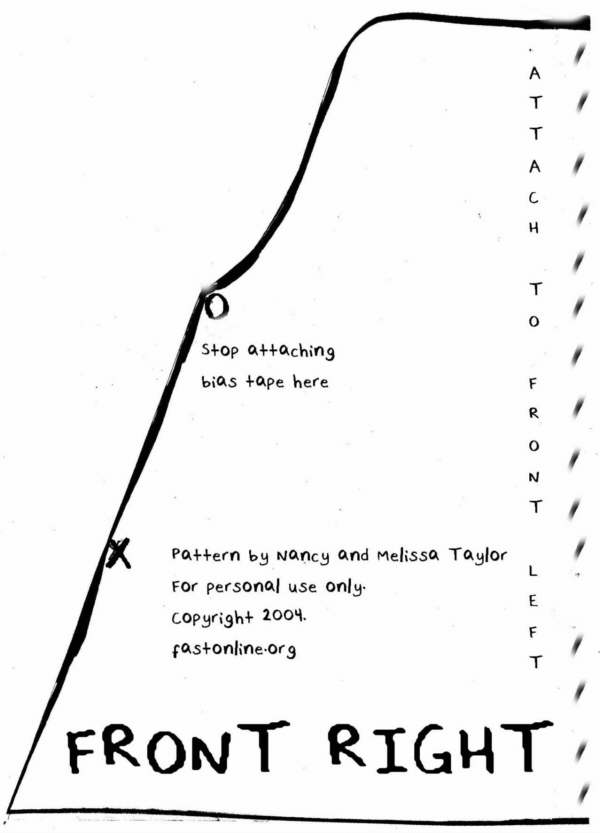
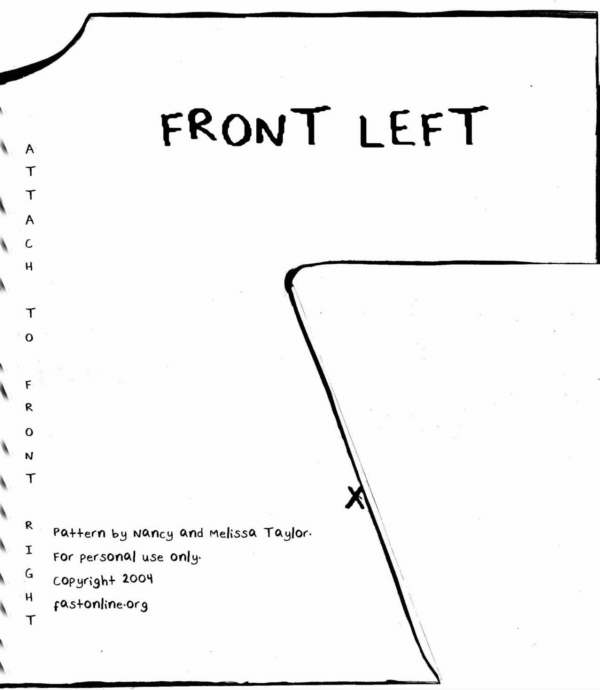
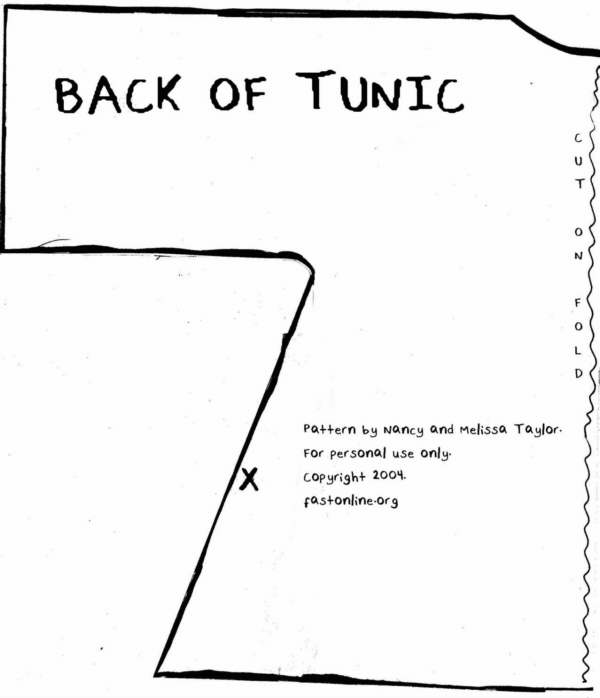
1) Print out this webpage (including the four pattern pieces, in order to readjust them at a print shop). If you want, you can adjust them on your home computer in a graphic editing program that lets you specify size; however, since the pattern pieces are large they will be difficult to print out well. Measurement from sleeve tip to sleeve tip should be approximately 17" or larger in order to fit an American Girl. Each pattern piece should measure approximately 8.5" across at its widest point, before being taped or doubled. If the pattern is slightly larger, this is fine, because the garment is difficult to get onto the doll.
2) The two pattern pieces for the front should be taped together as one unit, along the dashed lines.
3) Cut out the pattern pieces, and then cut them out on your material. Remember to cut out the material slightly larger than the pattern pieces if the garment is for a child's doll, or if you would like it to be easier to put on. If you do not have a pattern for doll pants, cut the pieces longer for a dress. Also, you can enlarge the sleeves vertically on the pattern (making the arm-holes wider).
4) Open up one side of the double-sided bias tape and sew bias tape along the right sleeve piece from X to X. CAREFUL! Sew bias tape on the wrong side of the material. Then fold it over to the right side, and then sew again. You may wish to sew along both edges of the tape/ribbon to create a neat, finished look.
5) Sewing right sides of material together, and attaching front to back, stitch along tops of sleeves on both sides of tunic (right sleeve and left sleeve).
6) Again attach bias tape, this time beginning at right sleeve neck and continuing all around neck at top, ending at O on front piece. As before, remember to always bring tape/ribbon to the front and attach it there. At the beginning of the neck, let bias tape hang over, then tuck it in, to give the neck on the right sleeve side a nice finish.
7) Add bias tape to sleeve ends (cuff edge). Bring it to the outside again, and finish it off.
8) Bias tape the bottom and sides of the tunic, to the Xs.
9) Finish off the tunic, connecting the bottom of the sleeves and the sides, but only sewing up to the Xs (so that the bottom sides are not sewn). You will need to angle your hem to cover up any rough edges of bias tape/ribbon if you didn't attach them at an angle.
10) Finish off the outfit! If you'd like, you can add Velcro at the top of the neck, but this is not necessary. Now, all you need are flats, such as the ones that are in Josefina's Christmas outfit. To make pants, just use any basic doll pattern for pants or pantaloons, but largely widen the leg openings.


Return to doll pages
 Please read all of the instructions through ahead of time, making sure you understand them fully. Since satin can be expensive, try to find one that doesn't fray easily, and attempt to sew the tunic with scraps first if you are unsure of anything. Shown, at right, is the tunic as it looks sewn very basically and simply. There are also ideas below for more fancy tunics.


