
Project Wheeler Dealer - 1995 Ford Mustang GT
By Dino Savva
Inspired by the Discovery Channel program Wheeler Dealers, I spent several months searching for a cheap 1994-5 Ford Mustang GT with a 5.0L V8 engine that was in need of some TLC to fix up and hopefully sell on at a profit. I was already the proud owner of a deep forest green 1995 Mustang GT automatic that I bought more than 5 years ago, fixed up, and added a long list of upgrades, but that was a keeper for me to enjoy as a daily driver. I became very familiar with the vehicle and since I had a stock of spare parts, it was a no-brainer for me to look for a similar vehicle to start a new project.
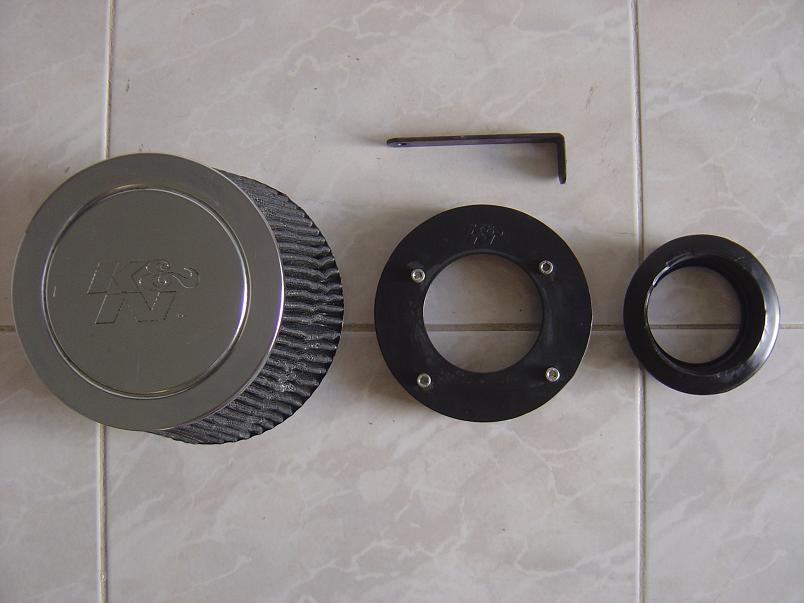
My search ended on 6th May 2012 when, as luck would have it, I heard that a vibrant red 1995 Mustang GT automatic with only 109,524km (68,055 miles) on the odometer was up for sale by a private owner who lived less than a mile away! I immediately contacted the seller, viewed the car, and took it for a test drive. It was rough around the edges, the engine felt gutless, and it had a long list of problems (a few of them dangerous), but luckily there were no major mechanical issues (or so I thought) so it fitted the bill perfectly as a Wheeler Dealer project car. The car was bone stock except for a Xenon body kit, H&R 1.5" lowering springs, immaculate '99 GT alloy wheels, Razo shift knob, and a K&N FIPK. The tires were nearly new and it had a brand new battery.
I haggled with the seller and after agreeing upon a sale price 6500AED ($1770), I became the excited new owner. My mission was to bring it back from the edge of scrapheap oblivion and turn it into a reliable modern classic for a future owner to enjoy driving. Time to remove the Mike Brewer hat, put on the Edd China hat, and get to work on fixing all those problems.
Problem list
Fixed:
Non-functioning brakes
Transmission fluid leaks
Exhaust system leak
Leaking thermostat water neck
Perished upper radiator hose
Perished water pump bypass hoses
Rust-colored coolant
Perished vacuum hoses
Engine runs rough / lacks power
Engine runs rich
Engine oil blow-by
Engine oil leaks
AC not working
Leaking fuel tank
Tears both front leather seats
Rear view mirror missing from windshield
Dirty, oil-stained carpets
Blown passenger side headlight bulb
Blown interior light bulb
Headlight main beams intermittently turn off
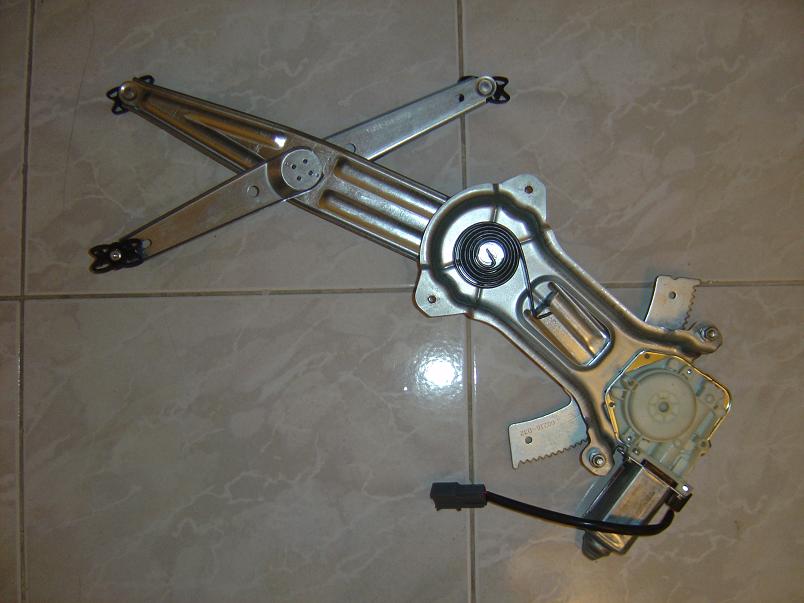
Broken electric window regulator driver's door
Dents & scratches left rear quarter panel
Flaking paint & scratches both bumpers and side skirts
Remaining:
Oil pressure gauge not working - Faulty gauge
Braking System
Brake function was virtually non-existent during the test drive and even if I pushed the brake pedal to the floor, there was a loud hissing sound coming from the brake booster with almost no stopping power. It was downright scary and it was a miracle that the previous owner didn't have an accident driving the car like that! My first priority immediately after I bought the car was to find a good junkyard replacement brake booster to make the car safe to drive. Luckily a local junkyard had one in stock so I drove the car at a snail's pace to my regular workshop to have it installed. The pedal rod on the replacement booster was different so I had the pedal rod swapped over from the old booster to its replacement. Braking function was
restored and with the car now able to stop properly, I could drive it around without my heart in my mouth.
The rear brake pads were about 70% worn and the rear rotors were grooved, so the rotors were refaced and the pads replaced. Result!
Automatic transmission
Drops of cherry red fluid on the ground directly under the car were a sure sign of an automatic transmission fluid leak. Indeed the fluid was leaking out pretty badly and dripping onto the exhaust, causing a horrible burning smell. I was afraid that the fluid might ignite so the leak had to be fixed urgently. Upon close inspection it seemed that the transmission oil pan gasket was damaged so it was replaced, but there was another bigger leak coming from the rear extension housing gasket so that also had to be replaced. To fix the latter, the midpipe of the exhaust needed to be removed so it was a good opportunity to kill two birds with one stone and sort out the exhaust system at the same time.
Exhaust system
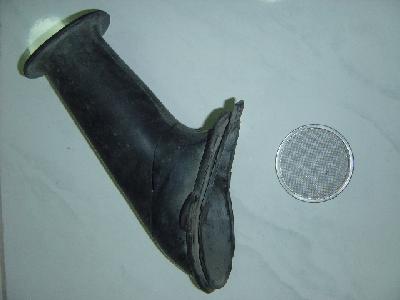
I could hear a noticeable ticking noise coming from the front section of the exhaust which was worse under acceleration so there was an obvious leak. The exhaust manifolds looked fine and there was no leak from the manifold-to-head gaskets so the leak had to be coming from the front section of the H-pipe. The previous owner had the clogged front cats replaced by sections of straight pipe sometime in the past and sure enough, there was a small hole in the front passenger side downpipe next to the upstream O2 sensor (probably why the engine was running rich). Furthermore, the previous owner had installed rear mufflers with only 1-1/2" piping on either side (photo on left). What was he thinking? No wonder the engine felt strangled and lacked power!
The hole in the front pipe was repaired, and two straight-through mufflers
with 2-1/4" piping (photo on right) and a larger casing (supplied by
the previous owner free with car) were swapped in place of the old restrictive
mufflers. As a result the exhaust sounded much better, the shaking from the engine at idle almost disappeared, the engine free-revved more easily, and the car was down on power much less than before, but I still wasn't completely happy.

Cooling system
The water inside the radiator was a distinct rusty color and the upper
radiator hose was so soft that it would collapse when the engine was cool, so I
detached the lower radiator hose from the radiator to drain the cooling system
altogether. I then removed the upper radiator hose (which was discarded), removed the hose from
the water outlet to water pump bypass, and removed the water outlet from the lower intake manifold. The bypass pipe of the water outlet had rusted right through and only thick crud deposits inside prevented it from leaking, so the whole unit needed to be replaced. The thermostat was old so I discarded it.
I used a garden hose to thoroughly flush all the rusty water out of the engine and I flushed the radiator until the water that came out was clear. I then reattached the lower radiator hose to the radiator, bolted the new water outlet onto the intake manifold (without a thermostat), added a new hose from the water outlet to the water pump, and installed a new upper radiator hose. The overflow reservoir had some brown sludge at the bottom so I removed it, and pressure washed the inside with the garden hose until it was clean, and reinstalled it. Finally I added a 50/50 mixture of antifreeze/water with corrosion inhibitor to the cooling system and overflow
reservoir.
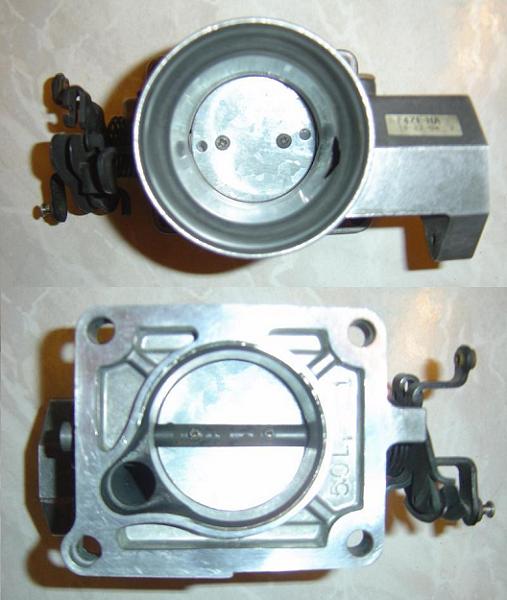
Smog pump / EGR delete & short belt bypass
This is a popular mod amongst Mustang owners who want to remove unwanted clutter in the engine compartment as well as adding a couple of horsepower by having one belt-driven accessory less. I began by loosening the three pulley bolts on the smog pump with the stock drivebelt still in place to prevent the pulley from spinning. I had a spare 90.5" drive belt in stock so the next task was to remove the original belt and replace it with the shorter one. The diagrams below show the belt routing:


After removing the smog pump pulley I had access to remove the two bolts holding the smog pump to the mounting bracket. Once I'd disconnected the rubber hose from the back of the smog pump, all I had to do was "tap" it with a rubber mallet and it fell out onto the ground. I then removed the hose assembly from the two valves at the rear together with the brittle plastic vacuum lines from the upper intake manifold, sealed off the valves with rubber caps, and capped off the vacuum nipple on the upper intake manifold.
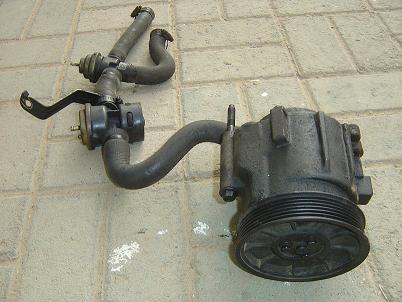


The smog pump/EGR solenoids together with the remaining plastic vacuum lines were under the passenger side fender so I jacked the car up from that side, pulled back the plastic fender liner, and burrowed my way underneath to remove the three nuts that held the assembly to the inner fender. After unplugging the three connectors from the wiring harness, the solenoid/vacuum line assembly came out complete.


Engine
The engine had a blow-by problem and the resulting excessive crankcase pressure was causing oil leaks from both valve covers and both front/rear crankshaft oil seals. Oil was also entering the air intake system from the passenger side valve cover breather and oil smoke was blowing from the dipstick tube. Oh dear! There was no blue smoke from the exhaust tailpipes to indicate piston ring/bore wear so it seemed likely that the cause was either a stuck positive crankcase ventilation (PCV) valve or a clogged PCV valve mesh screen. The problem turned out to be the latter so I removed the mesh screen from the lower intake manifold and discarded it. I cleaned the PCV valve, modified the crankcase ventilation system with new fittings/hoses, and added a DIY oil catch can. I also replaced the rubber hose going from the charcoal canister purge valve to the upper intake manifold, a vacuum line from the AC evaporator to the vacuum tree, and another vacuum line to the fuel pressure regulator.
The valve covers were removed, cleaned, and fresh silicone sealant was added to the gasket mating surfaces (gaskets were undamaged and therefore reused) before bolting them back on again. The spark plugs were heavily fouled and five were oily (probably the reason why the engine was down on power) so I replaced all of them. I also replaced the distributor cap with a spare red MSD cap that I had in my spare parts bin. The ignition timing was about 10 degrees overretarded so I loosened the locking bolt and rotated the distributor clockwise to the correct position.I removed the heater hard lines/hose assembly (see photo above) because it never gets cold enough in the UAE to use the heater, and Murphy's Law states that the steel hard lines will eventually rust through and leak coolant in the most inaccessible place. It was also a good excuse to further reduce engine bay clutter. With the assembly removed I cut off the front part (see white lines) for recycling in order to restore the coolant bypass to the water pump and retain the ECT sensor, and reused a U-bend from the 5/8" hose to bridge the two pipes.
All this hard work proved to be fruitful. The engine idled more smoothly, revved up quickly, and performed much better during a shakedown test drive. "Uncorking" the crankcase ventilation system reduced the crankcase pressurization problem and the leaks from the front/rear crankshaft oil seals slowed down considerably.
Fuel system
There was a strong smell of fuel coming from the rear passenger side and I traced the problem down to a perished fuel filler neck grommet. Being in close proximity to one of the exhaust tailpipes, it was a potential fire hazard so the rubber grommet had to be urgently replaced. The new grommet fixed the fuel leak and the gas mileage was back to normal!
AC system
The AC system was only blowing warm air and there was no pressure in the system. The Schrader valve had been brazed over so I replaced it together with a new o-ring but after pressure testing the system, I discovered that the compressor and the front pipe had big leaks. Replacing the compressor seals/gaskets and the front pipe (recycled spare) solved the problem and after the system was recharged with refrigerant, the AC was blowing ice cold air inside the cabin. Living in a hot climate, that's a godsend!
Interior
The interior of the car was generally in good condition but three flaws stood out like a sore thumb. The floor mats looked very grubby but with a combination of STP Tuff Stuff cleaning foam, a damp cloth, and some elbow grease, I managed to remove the oil stains and transform their appearance.
Before:
After:


The rear view mirror was missing but fortunately the previous owner kept it in the trunk, so I mixed up some fast-setting epoxy and glued it back onto the windshield.
The black leather rear seats looked immaculate but the front ones had some small tears that were in need of repair, so I had the damaged parts retrimmed and the front seats came back looking great.
Before:


After:


I used the opportunity while the seats were out to clean/vacuum the carpets and condition the dashboard, steering wheel, center console, and the rest of the interior trim with wax spray. With the seats and the floor mats reinstalled, the interior restoration was complete and it looked fantastic.

Electrical system
Added new grounding cable from upper intake manifold to firewallBodywork
Reconditioned headlight and taillight lenses with rubbing compound and wax


Conclusion Part 1
After fixing all the key problems, I drove the Mustang on 9th October 2012 to the vehicle testing station where it sailed through the inspection. Woohoo! Time to sell the car on to the next owner.Change of Plan - Shoestring Performance
Unfortunately things didn't go according to the original plan. After 5 months of silly offers by phonecallers who didn't even have the decency to view the car, I'd had enough and took the decision to hold onto this beauty instead. Now it was time to execute plan B, which was to extract some additional horsepower/torque from the engine without using any aftermarket bolt-on upgrades. The idea was to minimize the cost by carefully reworking existing stock parts. I already had a head start by removing the smog pump and decatting the exhaust (keeping the original stock pipes), but I still had more old school hotrodding tricks up my sleeve (modified stock airbox, DIY ported throttle body/lower intake manifold/cylinder heads).Modified Stock Airbox
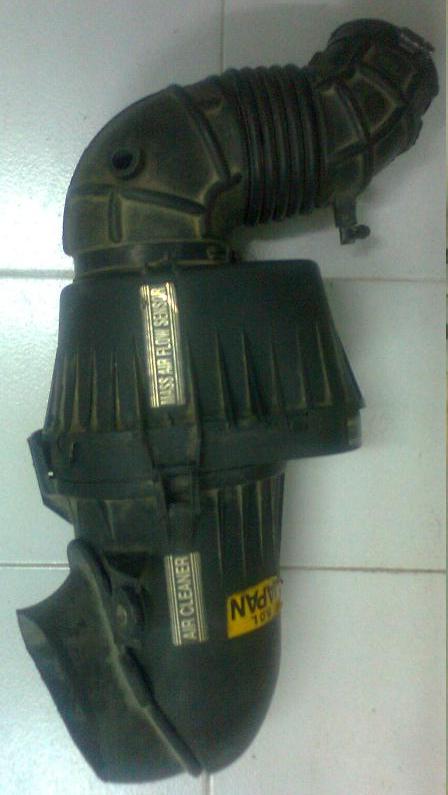
The car already had a K&N FIPK installed but the filter was exposed to hot underhood air where temperatures can reach up to 70*F higher than ambient. Since each 11*F increase in intake air temperature results in a 1% horsepower loss (possibly more with the ECU retarding ignition timing to prevent detonation), the K&N FIPK that was supposed to yield more horsepower was actually costing horsepower instead. The simple solution was to recycle the spare stock air filter assembly that I'd removed from my other Mustang. I'd already removed the restrictive airbox snorkel and MAF sensor housing mesh screen from the assembly so the modified stock intake was free-flowing and, more importantly, able to inhale ambient air from the passenger side fenderwell.Bored Stock Throttle Body
The original throttle body has a bore of only 60mm that is restrictive at higher rpm and blunts throttle response. Enlarging the bore and fitting an oversize throttle plate is an easy way to add airflow and costs almost nothing. Since I had a spare stock throttle body that I'd removed from my other Mustang, I decided to experiment. Unfortunately I could only safely go to 62mm so the airflow increase was only 7% but every little bit helps!Ported Stock Lower Intake Manifold
I reused the spare ported stock lower intake manifold that I'd removed from my other Mustang, cleaned it up, and treated it to a coat of heat resistant aluminium paint.
Engine Mini-Overhaul
The engine ran well but the idle was still a bit lumpy and the oil blowby problem, though reduced, persisted despite having a modified PCV system with an oil catch can. I investigated the problem further by using my OBD 1 engine computer fault code scanner to perform KOEO, KOER, and cylinder balance tests. The KOEO and KOER tests only revealed codes relating to the removal of the smog pump/EGR systems so that was good news. However, the cylinder balance test revealed a loss of compression from the no.8 cylinder. Oh dear! It appeared that combustion gases were being forced one way into the crankcase, yet no oil was being blown the other way into the exhaust because there was no blue smoke from the tailpipes and the no.8 spark plug was dry. Could the culprit have been something as simple as a damaged compression ring on the no.8 piston? I removed the oil catch can and reversed the PCV system back to the stock configuration with a clean mesh screen knowing that I'd need to leave the car at my trusty local garage to have the engine removed from the car and disassembled.
Conclusion Part 2
The car sailed through a second vehicle inspection in April 2013 whereupon I had it registered and insured. I enjoyed cruising around in it on weekends during the summer months and put it back on the market at the beginning of September when people had returned from their vacations and I had the best chance to find a buyer. The car cost me 6500 AED ($1770) and replacement parts cost 3431 AED ($934) for a total of 9931 AED ($2705). Would I make a profit from the sale?