Assembly
[Introduction] [Parts Selection] [Parts List] [Specifications] [Preparation] [Assembly] [Installation] [Results] [Updates] [FAQ's]Cylinder Head
The first procedure was to press new valve stem oil seals onto the valve guides. The brown ones are for the intake valves and the black ones are for the exhausts.
The next step was to install the Mopar Performance valve springs, retainers, and locks. This was an easy job since I had a jaw-like valve spring compressor and everything fitted together perfectly. The Mopar Performance 5249464 springs are single steel heavy duty units with a damper and are rated up to 0.525" of valve lift (OEM 4.0 springs are only rated up to 0.430" of lift). They install at the same 1.64" height as the OEM springs so machining of the spring seats isn't necessary to achieve the correct installed height. They're 1.42" in outer diameter compared to the 1.31" diameter of the OEM springs but the spring seats are wide enough to accomodate them without any problem. Larger diameter than stock Mopar Performance 4452032 retainers together with Mopar Performance 4529218 valve locks are required to keep these springs in place.
Finally I bolted on the rocker arms, bridges, and pivots leaving them loose until the head is bolted onto the block and the pushrods are installed. I greased the pivots so that they'd have some lubrication until the engine builds up oil pressure when it's fired up.
Short Block
Assembly of the short block was fairly straightforward but I did encounter some minor glitches along the way:
1) The locating tangs on the Clevite 77 AMC 258 main bearing inserts that came with the crank kit (MS-704P-30) are offset to the side, so they fit in the AMC 258 block and the '87-'90 Renix 4.0 blocks but for my '00 block, I needed main bearing inserts with locating tangs in the center. The solution was to install a set of Federal Mogul main bearing inserts with part no. FM7211M.030. Clevite 77's carry part no. MS-1947P-30. There were no such problems with the rod bearing inserts though because these are the same for AMC 258 and 4.0 engines of all years.
2) The rear main seal that was included in the Victor Reinz lower gasket set did not fit in my '00 block, so I had to buy another one with part no. 05018594AA.
3) My '00 camshaft sprocket wouldn't fit onto the Crane camshaft. Beware! From '99 onwards, DC changed the cam sprocket and retaining bolt (the new style bolt is smaller and doesn't have a spring/thrust pin). I found another sprocket from a junkyard '98 4.0 that fitted perfectly and I'd already sourced the '98 and earlier style cam bolt kit.
4) The nose of the AMC 258 crank is 1.0cm longer than that of the 4.0 crank so when the crank pulley is installed, there's 1.0cm of crank nose left protruding at the front and the pulley cannot be bolted tightly in place. One solution to this problem is to cut 1.0cm from the nose. The other is to fabricate a 1.0cm thick spacer and insert it in front of the crank pulley. I did the latter. I sourced an old crank pulley and asked my local engine shop to cut a 1.0cm slice from the rear pulley flange on a lathe. That worked perfectly since it also had a groove for it to slide over the key on the crank nose.
The first item that I installed in the bare block was the camshaft. I lubed the cam journals, lobes, and cam bearings with the assembly lube that Crane cams supplied and slid it carefully into the block. There were no clearance problems and the cam turned freely when rotated by hand.
I then inserted the two pieces of the rear main seal into the block and into the no.7 main bearing cap. The upper main bearing inserts went in next. I lubed them with engine oil and carefully set the crankshaft in place. After lubing the main journals, I set the lower main bearing inserts into the main caps, lubed them, and bolted the main caps onto the block. The main cap studs were torqued in stages to 80lbft.
With crank & cam in place, the timing gear could be installed. The timing marks on the crank & cam sprockets must be facing each other to ensure correct cam timing. The cam sprocket retaining bolt and washer were installed and the bolt was torqued to 80lbft. After placing the spring/thrust pin into the cam bolt recess and sliding the oil slinger over the crank sprocket (cupped side facing forwards), the timing cover with chain tensioner and new oil seal was bolted onto the block.
The crank pulley with spacer went on next and this enabled me to install the distributor, index it, and bolt it down.
The piston/ring/rod assemblies were carefully installed in their respective bores and the rod bearing clearance was checked before the new ARP rod bolts were finally torqued to 35lbft.
When the main bearing stud girdle was placed onto the studs, the pads on either side of the crank's no.2 and no.5 rod journals interfered with it. To solve that problem, the girdle was raised by placing 5/16" hardened steel washers between the girdle and the main bearing studs. The girdle was then secured by torqueing the retaining nuts to 35lbft.
The oil pump was then slotted into place, bolted down, and the short block assembly was completed by bolting on the oil pan with a new gasket.
Long Block
The short block was turned with the block deck facing upwards so that the valve lifters could be placed in their bores. The underside of the lifters should be coated with assembly lube before insertion to prevent rapid wear upon start up.
The cylinder head assembly with head gasket were carefully aligned with the block deck and bolted into place. The cylinder head bolts must be torqued in the correct sequence in stages to a final torque of 110lbft (100lbft with Loctite for the no.11 bolt on the driver's side front corner).
The pushrods were placed into their bores ensuring that they were properly seated in the lifters, and then aligned with the pushrod cups of the rocker arms before tightening down the rocker arm bolts. With the valve cover and gasket bolted onto the head, the long block assembly was complete and ready to go into my Jeep.
Weights
Bare block: 136lb
Bare cylinder head: 60lb
Crankshaft: 66lb
Pistons (each): 735g (563g without pin)
Connecting rods (each): 695-696g (with rod bolts)
Assembled short block: 275lb
Assembled long block: 360lb
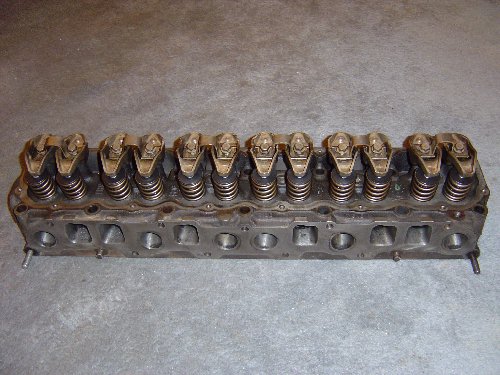
Cylinder head fully assembled and ready for service. Heavy duty Mopar Performance valve springs will ensure that there's no valve float at high rpm.

The AMC 258 crank (left) has a 1.0cm longer nose than the 4.0 crank (right). A 1.0cm thick spacer (inset) placed in front of the crank pulley ensures that it won't "walk" forwards and throw off the serpentine belt.
The rod caps wouldn't clear the main bearing stud girdle, so two 5/16" hardened steel washers had to be inserted on each stud to raise the girdle and provide the necessary clearance.