The Zipped Chartres labyrinth

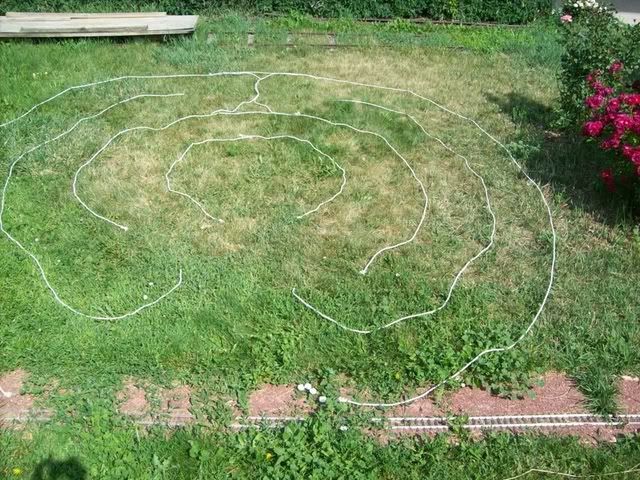
I call the following two designs the Zipped Chartres labyrinths because they allow you to walk a very close approximation of the complete Chartres labyrinth in a very minimal amount of space, rather like zipping a computer file, which encodes a lot of information in a small space. They are like the Bridge Labyrinth in that I have folded the quarter circles into half circles, and the half circles into whole circles. As with the Bridge Labyrinth, the first zipped labyrinth, the one you see above, has a few turns that don't match the direction of the Chartres pattern, though all the arcs curve the right way. The second pattern, which you will see below, corrects that, but is a little more complicated to walk. Both of them have places where you cross from one circuit to another in the middle of a circuit. This is what allows you to replicate a walk of eleven circuits using only two.
As I explain on my page about labyrinths you can walk anywhere, the Chartres pattern has a rhythm that repeats three times. If you think of a quarter circle as "short" and a half circle as "long", then as before the rhythm of the whole pattern is ..- - ..- .- .- ..- .- .- ..- .- .- ..- - .. Note that the pattern ..- .- .- is repeated three times between the introduction and conclusion. Because the zipped labyrinth is folded, "short" becomes a half circle and "long" becomes a full circle.
Enter the labyrinth and turn left onto the outside circuit, letting the red line guide you. Use the Morse code rhythm ..- - ..- .- .- ..- .- .- ..- .- .- ..- - .. to guide you on the walk. A dot represents a half circle, and a dash is a whole circle. The rhythm on the way out is exactly the same. As in the Bridge Labyrinth, you can turn back at the top and bottom of the labyrinth, or continue on to the other side. You could use beads to encode the pattern, with small beads for half circles and large beads for whole circles. The string would look like this:
oo00 oo0o0o0 oo0o0o0 oo0o0o0 oo00oo

(You can also use these beads for the Bridge labyrinth if you think of doing half a circle, crossing the bridge, and doing aother half circle as a single whole circle.)
As you walk the half circles and whole circles, the red and blue lines will guide you from one circuit to another. At the top of the labyrinth, you will not change circuits, but either turn back or let the green line guide you forward on the same circuit.
At the end of the pattern, go into the center. To come out, turn left (as you face out) onto the inside circuit and repeat the same pattern.
I find this design very pleasing. The lane changes make it just interesting enough that it feels more labyrinthine than some of the other patterns on this page. Using the beads and following the lines that guide me in the lane changes, I don't have to think. You could make the walk even more meditative by just repeating the pattern oo0o0o0 a few times and then turning into the center.
Here is what it looks like on a twin-sized bedsheet:

A Better Zipped Chartres labyrinth

This pattern corrects the "wrong way" turns in the previous pattern. It is the most accurate 2-circuit approximation of the Chartres pattern. Using this labyrinth, you can exactly duplicate the Chartres pattern, except that it is "folded" as described above (that is, the quarter circles become half circles, and the half circles become whole circles.) This pattern is very easy to lay out with string, since the green dashed lines are only included to aid the discussion, and can be left out.
If you think of the paths as a highway, the green dashed lines are "passing zones", where you can change lanes. At the top and bottom of the labyrinth, you can do a U-turn into the other lane, or go on to complete a circle.
As in the above pattern, use the beads oo00 oo0o0o0 oo0o0o0 oo0o0o0 oo00oo or the rhythm
..- - ..- .- .- ..- .- .- ..- .- .- ..- - ..
to guide you on the walk. Again, the small bead or dot represents a walk of half a circle, and the large bead or dash represents a walk of a full circle, before doing a U-turn and going back the other way. Here are the rules of the road:
- When you walk a half circle, always change lanes at the passing zones on the left and right sides. There are no U-turns allowed at the left and right sides. When you do a zig-zag of two half circles, you will find yourself walking a figure-8.
- When you walk a full circle, do not change lanes at the passing zones on the left and right sides.
- When you walk a full circle from the top, across the bottom and back to the top, always change lanes at the bottom (the bridge across the entrance.)
- When you walk a full circle from the bottom, across the top, and back to the bottom, do not change lanes anywhere if you are going clockwise (left to right), but do change lanes at the top of the circle if you are going counterclockwise (right to left).
- Begin the walk by going in the entrance, and turning left at the inside circuit.
If you follow all these rules, you will be making all the correct turns for the Chartres labyrinth, as well as curving the correct way on all the arcs.
It's confusing coming out again, because of the lane changes at the top of the circle. Coming out, you cross when you are going left-to-right and do not cross when you are going right-to-left, exactly opposite of going in. I fixed this in my mind by remembering that when you are going in, you begin at the left side of the labyrinth and end at the right, so left-to-right is the "positive" direction of movement, and you can walk a nice satisfying circle with no lane change going that direction. When you go against the flow, you have to change lanes at the top of the circle. Coming out, right-to-left is the "positive" direction. You may find it less confusing to just do the walk to the center and then come straight out the center instead of walking through the pattern again.
There's also no harm in simplifying the "rules of the road" in any way you choose. It won't be exactly the Chartres pattern, but it will still be a satisfying labyrinth walk. For example, you could choose to never change lanes at the top. If you do that, you will be duplicating the Bridge Labyrinth walk.
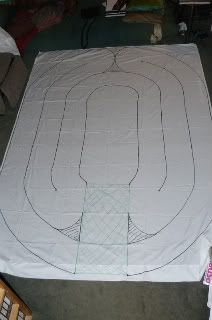
Here is what the pattern looks like if you want to lay it out with string:

You can also connect the ropes with a "bridge" rope that you step over when you cross the bridge; it's dotted in this diagram. I like doing that because it makes the labyrinth feel more enclosed, like a real labyrinth. There's a defined entrance, and a defined place where you go into the center.

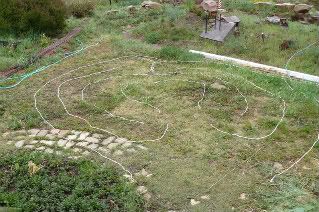
And here's a photo of one in my yard, made with ropes. I used a 42-foot rope for the outer circle, a 21-foot rope for the inner circle, and four 6-foot ropes for the portions of wall between them. This gave me a very walkable labyrinth with about a 15-foot diameter that I could lay out in about a minute and then pick up when I was done. A labyrinth of this size gives about the same length walk as a full-sized 42-foot diameter Chartres labyrinth.
The Model Railroad Maze

This pattern is even more "zipped" than the ones above. It is also the most versatile, because you can walk it easily without actually laying it out. I call it the "Model Railroad Maze": I borrowed the layout from generations of model railroaders who didn't have much room for a big layout and used this pattern. My husband tells me the Lionel track, with three rails, was developed because of this pattern. It allows the trains to turn around and go the other way, which would short out the circuit on a two-rail track, so the middle rail would carry the electricity.
Note: When walking this maze, you never turn back around the sharp corner, but instead walk in graceful figure eights, S curves, and elliptical curves. Think of the path as a highway, and merge from one lane to another. This image of the path may be clearer than the one of the walls:

The four colored dots allow you to recreate this maze without actually drawing the pathways. You could use any objects to mark their locations: stones or candles (be careful!) or cups or cards, etc. As you walk, you will either loop around the two blue markers, crossing over in the middle, or walk around the outside of the markers. If space is limited, you really only need the two blue markers at the top and bottom. Outdoors, two trees or boulders might make nice markers.
You can walk this at random, choosing to go around the outside or through the center whenever you want, but you can also recreate the Chartres labyrinth with this design. As I explain earlier and on my page about labyrinths you can walk anywhere, the Chartres pattern has a rhythm that repeats three times. If you think of a quarter circle as "short" and a half circle as "long", then as before the rhythm of the whole pattern is ..- - ..- .- .- ..- .- .- ..- .- .- ..- - .. You can keep track by using the same string of beads described above. Let a small bead represent the quarter circle, and a large bead represent the half circle. The string will look like this:
oo00 oo0o0o0 oo0o0o0 oo0o0o0 oo00oo
You can replicate this rhythm by thinking of the short "quarter circle" as being a walk from the center around one end of the figure 8, and the long "half circle" as being a walk from the center out and around half the outside and back to the center.
Quarter circle pattern (Sometimes you will walk around the top half of the figure 8 instead of the bottom):

Half circle pattern (Sometimes you will walk a mirror image of this path):

Note that when you finish one of these two patterns, you will walk straight through the center and out the other side to begin the next part of your walk.
Begin by stepping from outside to the right of the first blue dot and into the center. If you then continue out from the center onto the figure 8 so that you curve around to the left of the top blue dot and then back into the center, you will be turning the correct direction for all the Chartres segments. Pause in the center, which represents the actual center of the Chartres labyrinth. The path out is exactly the same pattern. You can retrace your steps to exit the labyrinth.
Again, you can do this walk using just four objects, or even two, instead of having to have a physical maze. You can space them according to how much room you have to walk. A very small space works well with this pattern, because you never have to stop and change direction suddenly, which can make you trip over your feet if the walk is very short. The places that would be direction changes in a real labyrinth are replaced with a straight walk through the center. The figure 8 and arcs make for a smooth, meditative walk, and the beads allow you to relax into the pattern.
The 3-circuit Bridge Labyrinth

The 3-circuit bridge labyrinth is only slightly less accurate than the 4-circuit bridge laybrinth, as far as re-creating the Chartres pattern, but is smaller, and just as easy to use. You will use your hand to keep track of what to do. At the beginning, close your hand into a fist. You can either begin by turning right or turning left on the outside circuit. In the following instructions, I suggest beginning by turning left at the entrance. Follow the arrows. If you imagine the green dotted lines in place, just walk through the entire labyrinth once.

When you come to the opening again, you have two choices: either to cross over and continue on the outside circuit, or to turn back on the inside circuit. Notice that your hand is closed. This means to turn back on the inside circuit.

Now open your hand, and continue walking through the labyrinth.

When you reach the opening again, notice that your hand is open. This means to walk straight across and continue on the outside circuit.

Close your hand, and contine walking through the labyrinth.

When you reach the opening again, notice that your hand is closed. This means to turn back on the inside circuit. Do so, and open your hand.

You can continue on, alternating crossing over the "bridge" and turning back to the inside circuit, as long as you want. If you want to replicate the Chartres pattern, keep track of how many times you have crossed the bridge and continued on the outside circuit. After you have done so three times, the fourth time you approach the bridge with your hand open, go into the center. It may be more meditative just to keep walking as long as you find it satisfying.
To walk out from the center, you can either just exit immediately, or turn left on the outside circuit and follow the above instructions.
As with the 4-circuit bridge labyrinth, this one is a fairly good approximation of the Chartres pattern, except that you do turn the wrong way on a few of the turns. If you start by going left at the entrance, the intro and conclusion part of the walk will match the Chargres pattern, but most the middle portion will be the wrong way. If you start by turning right at the entrance, the intro and conclusion paths will be the wrong way, but the rest of it will be curving the correct way, though you will still be turning the wrong way at some of the turns. As in the 4-circuit bridge labyrinth, this one misses one circuit near the beginning and one near the end. However, if you don't worry about replicating the Chartres pattern exactly, this one does give you an experience that feels very much like a much larger labyrinth.
This pattern is fairly easy to lay out with rope or string. A 12-foot diameter makes a very pleasant size to walk.
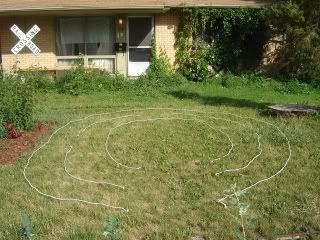
Here's what it looks like on a twin-sized bedsheet:
And here it is laid out with rope in the yard:
and in the front yard:
The Weaver's Labyrinth

This is identical to the second zipped labyrinth described above, except that it is unfolded. Therefore it exacly replicates the Chartres walk, except for the lengths of the circuits. It is very easy to lay out with a single piece of rope and five markers. The markers can be stones, candles, flowers, shells, or any other small objects. They could also be poles or even trees. You could just imagine the rope and use the markers only, or vice versa.
In my Youtube video on the Weaver's Labyrinth https://youtu.be/kC2k7minE0A, I simplified the pattern a bit so that a few of the turns don't match the Chartres directions, but it is easier to walk.
Walk into the labryinth past the first marker and turn left. When you come to the second marker, go to the left of it and turn right, going back toward the entrance. Continue walking around the single circuit, doing quarter circles and half circles, turning toward the outside or the inside just as you would on the full-sized labyrinth. The markers are for making the turns.
Use the pattern oo00 oo0o0o0 oo0o0o0 oo0o0o0 oo00oo. You will find yourself weaving around the markers as you walk. The "rules of the road" are similar to those for the zipped labyrinth.
- You will always cross "lanes" between the markers while making a quarter circle. (There are no physical delineations of the two lanes, beyond the five markers.) When doing two quarter circles in a row, this makes a figure 8, very much like what happens in the Model Railroad Maze.
- When doing a half circle, you will usually cross lanes after passing the first marker, and then continue in that lane until you complete the half circle. (You could change lanes anywhere in the half circle, but I find it easier to remember if I do it at the beginning.) There is one exception:
- When you are doing one of the two side half turns (not the one across the top) in the forward direction, you do not change lanes. This will be the clockwise direction as you are going into the labyrith, and the counter-clockwise direction as you are coming out.
If you follow these rules and use the pattern oo00 oo0o0o0 oo0o0o0 o0o0o0 oo00oo, you will exactly replicate the Chartres pattern. Here are diagrams that correspond to the first part of the pattern: oo00 oo0o


This is very similar to walking the Model Railroad Maze, excpet that it preserves all the compass directions of the Chartres Labyrinth. When you walk around the markers, you actually overshoot the four compass directions. In my opinion, this is a good thing, because it lengthens the walk in a small space.
I believe that all of these are original designs, except for the Model Railroad Maze, which is of course based on model railroad layouts. But people have been designing labyrinths for thousands of years, so it's very possible that someone has thought of this before me. If I am the first person to come up with these designs, you are welcome to use them in any way you want, including commercially, as long as you don't try to hog the idea and prevent other people from using them. (Before using them commercially, be sure to do everything you can to make sure no one has published any of them before me. If you find out that someone has please Contact Me and let me know.)
*Footnote
Conversion from small folded labyrinths to large full Chartres labyrinth:
Let p = path width, d = the inside diameter of the folded labyrinth, and D = the outside diameter of the folded labyrinth. Then the diameter of the large labyrinth is d+D+11p.
Here is why: d+D is twice the average diameter of a walk around the folded labyrinth. The total length of the walk is proportional to the average diameter. However, in the large labyrinth, you are walking arcs that have half the angle measure of the smaller labyrinth, so you circumnavigate the small one twice as often as the large one. Therefore double the average diameter of the folded labyrinth to find the average diameter of the large one.
The average diameter of a walk on the large labyrinth is the diameter of the center of circuit 6. The distance from there to the outside of the labyrinth is 11/2 path widths. That distance is added to the radius, so twice that distance, or 11 path widths, is added to the diameter.
I am assuming here that the walker is in the center of the path.
How big should a folded labyrinth be to give the same length walk? It depends on how wide we make the paths. If we keep the path width the same as it is in the large labyrinth, we can answer this question. Changing the path width will change the answer.
The original Chartres labyrinth has an outer diameter of about 42 feet, and an inner diameter of about 10 feet. The difference in diameters is 32 feet, so the difference in radii is 16 feet. The path width is about 16/11 feet), and therefore 11p is 16 feet.
Suppose we want our folded labyrinth to have path widths of 16/11 feet (about 17 and a half inches), and to be equivalent to a Chartres labyrinth with an outer diameter of 42 feet. Here are some calculations.
The Bridge Labyrinth
The Bridge labyrinth has four circuits, so the difference between the inner and outer diameter would be 8 path widths or 8x16/11 feet, or 128/11 feet. Let the inner diameter be d. Then the outer diameter is d + 128/11. Set d + D + 11p = 42 feet:
d + d + 128/11 + 11(16/11) = 42
2d + 128/11 + 16 = 42
The inner diameter is approximately 7 feet, and the outer diameter is about d + 128/11 or 18.8 feet.
The Zipped Labyrinth
The Zipped labyrinth has two circuits, so the difference between the inner and outer diameter would be 4 path widths or 4x16/11 feet, or 64/11 feet. Let the inner diameter be d. Then the outer diameter is d + 64/11. Set d + D + 11p = 42 feet:
d + d + 64/11 + 11(16/11) = 42
2d + 64/11 + 16 = 42
The inner diameter is approximately 10 feet, and the outer diameter is about d + 64/11 or 16 feet.
The Model Railroad Maze
The Model Railroad Maze has one circuit, so the difference between the inner and outer diameter would be 2 path widths or 2x16/11 feet, or 32/11 feet. Let the inner diameter be d. Then the outer diameter is d + 32/11. Set d + D + 11p = 42 feet:
d + d + 32/11 + 11(16/11) = 42
2d + 32/11 + 16 = 42
The inner diameter is approximately 11.5 feet, and the outer diameter is about d + 32/11 or 14 feet.

copyright 2006 by Karen Deal Robinson
Click on the labyrinth to return to the main labyrinth page.


 .
.