|
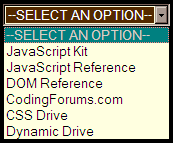
This combo
box menu never leaves the user's screen as it appears always in view (in IE7+,
Opera 8+ and Firefox that is). Legacy browsers such as IE5 and IE6 will simply
not see the menu at all. You can specify the location of the menu relative to
the four edges of the window: top left, top right, bottom left or bottom
right.
Script updated: Jan 24th, 2007 to use CSS's "fixed" positioning method instead.
We have tested the code in IE 7.0, IE 6, IE 5.5, Firefox 2.0.0.4, Opera 9.21, Netscape 8.1.3, Netscape4.08 and AOL Explorer 1.5. This script worked well in all platforms with no variations observed.
Depending on your knowledge of HTML and javascripts, this is an easy two (2) part copy and paste code that goes in both the <HEAD> section (two parts) and <BODY> section (anywhere before the closing </BODY> tag*) of your document.
* Reason it does not matter where you paste the <BODY> section of code is quite simple. You set the positioning of the effect either top, bottom, left, right, vertical, and/or horizontal offset. This is why it does not matter where in your document you paste this section.
There are three (3) sections of reconfiguration within this effect. Both <HEAD> sections (CSS and Javascript) and <BODY> section. See below where and howto.
|
CCS <HEAD> Section
* html #visiblecombo{ /* Hide combo box from legacy browsers such as IE5-6? */
display: none;
}
#visiblecombo select{
background-color: lightyellow;
}
#visiblecombo .gobutton{
font-weight: bold;
padding: 0 3px;
text-decoration: none;
}
#visiblecombo .gobutton:hover{
background-color: #FFE242;
}
}
</style>
Javascript <HEAD> Section
var alwayscombo={
location: ["top", "right"], //Position of com box from window edge ["top|bottom", "left|right"]
addoffset: [10, 15], //Additional offset from specified location above [vertical_offset, horizontal offset]
comboid: "visiblecombo", //ID of div containing floating combo
////////Stop editing past here///////////////////
|

This section controls the color of the inside of the dropdown box. Default is defined as lightyellow;

This section defines the color of the CSS style of the "Go" button on mouseover. Default is defined as #FFE242;
This section of code which is located in the Javascript portion of the <HEAD> section defines the position of the effect as either top, bottom, left, right, vertical and/or horizontal positioning of the effect itself. The top, bottom,left or right is self-evident but the vertical and/or horizontal reconfigurations may take a little longer to get where you want it to appear. The default has it as an absolute position of 15 px from the top of the page and 10 px from the right side of the page. Just play around with this until it works for you. We have ours set at .......... addoffset: [30, 15],
|
The last set of reconfigurations are made within the <BODY> section of code. They include the background color of the closed dropdownbox, font color inside this section, the URL's, link names and "Go" button. See below where and howto.
<!------ Default <BODY> Section ------>
<form>
<div id="visiblecombo">
<select size="1" onChange="alwayscombo.navigate()">
<option value="default" selected="true" style="background-color: #532900; color: white;">--SELECT AN OPTION--</option>
<option value="http://www.javascriptkit.com">JavaScript Kit</option>
<option value="http://www.javascriptkit.com/jsref/">JavaScript Reference</option>
<option value="http://www.javascriptkit.com/domref/">DOM Reference</option>
<option value="http://www.codingforums.com">CodingForums.com</option>
</select>
<a href="#" onClick="alwayscombo.navigate(); return false" class="gobutton">Go</a>
</div>
</form>
<!------ Define Above <BODY> Section Reconfigurations ------>
- style="background-color: #532900; color: white;"......Defines the background and font color inside the closed form.
-

- <option value="URL Goes Here">Link Name Here</option> Each of these encloses a link.
- </select> This is your closing tag for all the option values. Any option values (links) you want to add must be prior to this closing tag.
- Go This is the word you see just to the right of the form element. This is the one we discussed earlier about having the CSS effect on mouseover.
-

 If you are designing this effect in an editor such as [ Angelfire ], when you select "Preview" the effect will not be visible. You will need to view the effect in the actual URL and not from the cgi-auth/webshell. If you are designing this effect in an editor such as [ Angelfire ], when you select "Preview" the effect will not be visible. You will need to view the effect in the actual URL and not from the cgi-auth/webshell.
 The way this script is designed, all the links will open in the same window. You can not have the links open in a new window.
We hope our tutorial was easy to follow and we covered everything in detail. If you would like to add this effect into your pages, grab the respective below link and you are there. If you have any problems with this or anything else, feel free to consult our [ FAQ ] and if you can't find the answer there, [ contact us ].
[ Get Code Here ]
[ Rate This Page ]


|
Search Our Site By Individual letter
[ A ]
[ B ]
[ C ]
[ D ]
[ E ]
[ F ]
[ G ]
[ H ]
[ I ]
[ J-K ]
[ L ]
[ M ]
[ N-O ]
[ P-Q ]
[ R ]
[ S ]
[ T ]
[ U-V ]
[ W ]
[ X-Y-Z ]
|
|
 Always-Visible Combo Box


