Today is . Page created 03/29/07
 Form Field Progress Bar Form Field Progress Bar 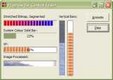
|
Reset Button Not Part Of The Script - We Added It As A Convenience For You |
Today is . Page created 03/29/07
|
Form Field Progress Bar
|
Reset Button Not Part Of The Script - We Added It As A Convenience For You |
T his script allows you to restrict the number of characters inside a form element (ie: textarea) while displaying a progress bar on the remaining characters beneath it.
We have tested the code in IE7.0, Firefox2.0.0.3, Opera9.10, Netscape8.1.2 and AOL Explorer1.5. This script worked well in all platforms with no variations observed.
![]() For your Information:
Before we begin, we feel obligated to advise you that the above form is for all intensive purposes a "Stand Alone" script. In other words, it really does not do much of anything other than what you see. In order to make it function as designed, you need to incorporate it into a valid working form. If you do not have a good Solid Knowledge of HTML coding, javascripts, forms and reconfigurations, please
"Do Not Attempt" this until you are Proficient in the aforementioned areas.
For your Information:
Before we begin, we feel obligated to advise you that the above form is for all intensive purposes a "Stand Alone" script. In other words, it really does not do much of anything other than what you see. In order to make it function as designed, you need to incorporate it into a valid working form. If you do not have a good Solid Knowledge of HTML coding, javascripts, forms and reconfigurations, please
"Do Not Attempt" this until you are Proficient in the aforementioned areas.
Depending on your knowledge of HTML and javascripts, this is an easy two (2) part copy and paste code that goes in both the <HEAD> section ( two parts - style sheet is for cosmetic reconfigurations and other part has no reconfigurations) and <BODY> section (incorporated into a working form) of your document. This section is where you will reconfigure the number value for how many characters you want to allow.
The reconfigurations within the <HEAD> section is for the color of the text and progress bar under the textarea form. See below where and howto:
|
Default <style type="text/css"> |
Our Reconfigurations <style type="text/css"> |
Define Reconfigurations
|
The <BODY> section of code is what you will be incorporating into a valid form. To change the number of characters allowed in this form (four places) and/or to change the size of the textarea, see below where and howto.
<form>
<textarea rows="5" cols="40" name="maxcharfield" id="maxcharfield"
onKeyDown="textCounter(this,'progressbar1',30)"
onKeyUp="textCounter(this,'progressbar1',30)"
onFocus="textCounter(this,'progressbar1',30)" ></textarea><br />
<div id="progressbar1" class="progress"></div>
<input type="reset" value="Reset">
<script>textCounter(document.getElementById("maxcharfield"),"progressbar1",30)</script>
</form>
Define Cols and Rows
![]() Little Extra Not Included In The Script: Since most forms are bloated with code, it may be a good idea to make the <HEAD> javascript section (not style sheet -there is another code for that) into an external.js file.
Little Extra Not Included In The Script: Since most forms are bloated with code, it may be a good idea to make the <HEAD> javascript section (not style sheet -there is another code for that) into an external.js file.
The <HEAD> section of code starts and ends with opening and closing JavaScript tags, See below:
![]() Another Little Extra Not Included In The Script: The last this we shall cover is to make the <HEAD> section of the CSS style sheet into an external.css file and called from an external location. The CSS style sheet in the <HEAD> section starts and ends with opening and closing CSS tags, See below:
Another Little Extra Not Included In The Script: The last this we shall cover is to make the <HEAD> section of the CSS style sheet into an external.css file and called from an external location. The CSS style sheet in the <HEAD> section starts and ends with opening and closing CSS tags, See below:
If you would like to see an example of this effect with the use of an external..js and external.css file in the <HEAD> section, grab the below link and you are there.
[ Form Field Progress Bar With External.JS And External.CSS Files ]
We hope our tutorial was easy to follow and we covered everything in detail. If you would like to add this effect into your pages, grab the respective below link and you are there. If you have any problems with this or anything else, feel free to consult our [ FAQ ] and if you can't find the answer there, [ contact us ].
[ Get Code Here ]
[ Rate This Page ]