"A Gamer's Guide To Small Unit Tactics".
The following manuscript is compiled and edited from a series of postings in a PBeM role-playing game.
Sergeant Johnathon Wolfe was my character in an "Aliens" based PBeM. He was a Colonial Marine of the old school-been everywhere, done everything. During the game I posted a series of classes for my squad leaders. Interest has been so high that I have compiled them into this manuscript. They have been edited to apply to a broader set of circumstances. The intent is to be short, clear, and an enjoyable source of information for people without much military experience, and want to play characters that have that experience. I hope I hit my mark.
I have just touched on the surface of small unit tactics here; it is by no means a comprehensive tactical textbook. It is simply to help players to feel a bit more comfortable in their chosen roles and to increase their enjoyment of gaming.
This is a public domain document that includes no copyrighted material. Please feel free to pass this address to whoever you feel may enjoy it. Gamemasters of military games can email me and I will send them a copy of the document so they can post it on thier website.
WOLFE'S TACTICS
CHAPTER ( I ) DEFENSIVE POSITIONS
When setting up a defensive position there is a handy acronym commonly taught to remember the key elements. This is OCOKA.
O = OBSERVATION and FIELDS OF FIRE Make sure that you set up with good visibility and any attackers do not have any cover to hide behind.
C =COVER and CONCEALMENT Cover stops incoming nasties, Concealment hides you - try to have both. Sometimes you can't but take what you can get.
O = OVERHEAD COVER Lots of things fall from the sky. Bird crap. Sniper rounds. Grenades.
K = KEY TERRAIN You have to position yourself with your mission objectives in mind. You don't always have to be sitting on top of the objective, just as long as you can defend it effectively.
A = AVENUES of APPROACH Keep in mind ALL the routes that the enemy can attack you from. Cover them. Leave a few nasty surprises.
Once a position is set up get your people hunkered down in them and walk out front. Take a long hard look at what the enemy will see. You'll be surprised. Private Smelly's butt sticking up, that wisp of cigarette smoke, whatever. Set up secondary and tertiary positions to fall back on and drop into if you're overrun. ALWAYS leave yourself a back door and establish a rally location BEFORE you have to pull back. Plan for the possibility.
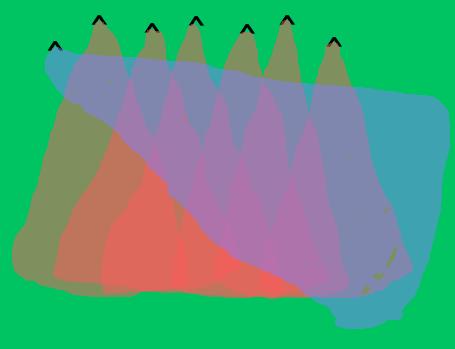
WOLFE'S TIP: Put your heavy squad weapons on the far edges of the formation, both while moving and when in defensive positions. VERY beneficial- the heavy/automatic weapon(s) can fire across the entire front of the formation without having to swing all the way back and forth. See the above illustration
CHAPTER ( II ) MOVING TECHNIQUES
There are four basic moving techniques, all of them based on the inverted "V". In the inverted "V" pattern each squad will form a wedge facing the enemy. Squads follow each other with the Section Sergeant and Lieutenant in between the squads to keep command and control. Spacing within the squad will vary depending on the mission and terrain but squad members will ALWAYS stay at least five meters apart from each other - so a single grenade cannot take out more than one person. The four moving techniques are: Travelling, Travelling Overwatch, Bounding Overwatch, and Fire and Maneuver.
TRAVELLING Used when contact with the enemy is unlikely and is the quickest way to cover ground. This double wedge formation has each squad member in the wedge primarily covering one particular area and creates interlocking fields of fire. (IE- the areas they cover overlap.)
TRAVELLING OVERWATCH Used when contact with the enemy is a possibility. This is a lot like Travelling except the second squad hangs back and follows from a distance. If the first squad makes contact with an enemy the second squad is responsible for laying down covering fire to allow them to maneuver and keep them from being pinned. This prevents the entire unit from being caught in an ambush. We'll get to ambushes in a minute.
BOUNDING OVERWATCH Used when contact with the enemy is not only possible but expected. It works a little like Travelling- except much slower. Both squads hunker down into good firing positions. Then the first squad moves forward into another good firing position, going no further than the second squad can effectively cover them. Then they stay put and the second squad moves past and through them to the next set of firing positions within first squad's firing range. Repeat ad infinitum.
FIRE AND MANEUVER Used when contact with the enemy has already been made. This is like Bounding overwatch except nobody moves until the covering squad starts pouring fire into the enemy's positions, and nobody stops firing until they're in their next position. This is your classic "Cover me!" from cop shows except an entire squad is moving at once, in unison - unless they want to take turns as targets.
WOLFE'S TIP: The OCOKA techniques work pretty good when moving too.
CHAPTER ( III )
This one covers ambushes; how to avoid them, setting up a simple "L" ambush, and escaping from them.
AVOIDING AMBUSHES This was covered a bit in moving techniques. By spreading your unit out and moving in two groups one half of your troops can cover the other half. A unit set up in ambush may even decide that you are not worth the risk and let you go without attacking if you are well prepared. (I know, we did a few times in Nicaragua!) Also- whenever you reach a choke point where movement is restricted/channelled or a large open area, STOP! Hunker down and send a scout forward to check it out. Once he gives you the all clear, THEN send your unit across in small groups - this minimizes the amount of personnel you put in the kill zone at any one time.
"L" AMBUSH This is called an "L" ambush because of the formation the unit sets up. This works best at a bend in the road. Set up your riflemen along the roadway leading up to the bend and place your heavy weapon just around the corner facing back down along the road. From here he can rake grazing fire down its length. It looks something like:
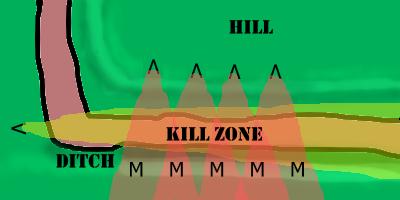
The "open" part of the fan, (the shaded portion), is the area that each person is responsible for. The area where everyone's field of fire crosses is called the "Kill Zone". You'll be jumpy as they approach but don't open fire until the main body of the enemy is in that zone. It works particularly well if you are on a hill alongside the road and firing downhill. If there is a ditch on the far side... it just became perfect. Put some mines in the ditch for when they jump in to take cover. Just close your eyes for a moment and imagine THAT meatshredder! The diagram also helps to illustrate what I meant earlier by interlocking fields of fire and anchoring your flank with the heavy weapon.
ESCAPING FROM AMBUSH The answer to this one is really very simple - but it seems incredibly stupid until it's explained. Rush their position. YES! Run right into their guns. You see, the way an ambush is designed is to keep you in their sights as you run away. Makes your back itch doesn't it? Diving for cover isn't such a hot idea either if the ambushers are any good. IE- remember the mines from our ambush? If you run right at them and pass through their formation then you are in their "kill zone" for the shortest length of time. Once past, rally your troops and hit them from behind - turn the tables.
WOLFE'S TIP: Treat an ambush like any other defensive position when you set it up. Remember OCOKA.
CHAPTER ( IV ) S.O.P.
I'm shifting gears a little, to cover some Standard Operating Procedures (SOP) for tactical operations in the field. Before I begin let me define some terms. Tactical Operations refers to any time that you are in or possibly in a hostile environment. Administrative Operations are those times when it's safe to relax. The rules for each are VERY different, TACOPS has a whole different flavor than when you're back at base.
When you are in a tactical environment:
1.Stay in position. You NEVER leave your squad unless told otherwise. If you gotta take a leak, don't go off all by yourself. Take a buddy- he'll turn his back if you're modest.
2.If you are Mechanized (In a vehicle or APC) do not get out until told to do so. When you do, the section will immediately secure the area and rally awaiting further instructions.
3.Do not gather in groups of more than two within five meters of each other. Remember grenades?- or incoming artillery.
4.Do not salute officers or stand at attention in their presence. If the sniper wants him make HIM figure out which one of you it is.
5.Keep you weapon with you at all times, or at least within arm's reach. You live to regret that one only if you're lucky.
6.Make no more noise than you must. No signal flares okay?
7.NEVER leave behind any evidence of your passing. Let them gather their own intelligence- no hints.
8.Don't question orders. Just do it, questions can come over a cold one later. In Administrative Operations, questions are acceptable and suggestions welcomed - but in Tactical Operations there is not the luxury of time. Sometimes orders given may seem crazy, but failure to follow them will result in death. Remember how to escape an ambush? You want to hang out in the middle of the road and chat?...
CHAPTER ( V ) ASSAULTING DEFENSIVE POSITIONS
With the exception of Urban Combat there is no tactical operation more deadly than assaulting a prepared position. As I run through this remember the chapter on how to prepare a defensive position. Knowledge of both, assault and defence, enhances understanding of each of them alone. This is a long one, but that's the only way to cover it.
The first step in assaulting a prepared defensive position is the reconnaissance. The person's or person doing the planning MUST look at the position with their own two eyes - at a safe distance of course. Take a minute. They're not going anywhere.
When planning an assault consider what you would do yourself if you set up the defensive position. Once again a solid knowledge of defense is essential. Remember OCOKA! These are the things that you must overcome. Complex plans almost never work, and the more coordination required the more likely the failure. Remember the KISS principle - Keep It Simple, Stupid!
During the execution stage things tend to fall apart very quickly. I would recommend a plan that puts your soldiers in place and then runs by itself. Getting the troops in the best placement possible before fighting is absolutely essential. There is an old axiom: No plan ever survives first contact with the enemy. Have a plan that puts your troops in place and leave the fighting to them.
WOLFE'S TIP: Remember that grenade launchers have an arcing trajectory that can be used to drop them into foxholes - or into your hiding positions as well.
To make all of this a little clearer, I'll run through a sample assault plan. Let's say the plan is to assault a dug-in platoon set up on the top of a hill at night and the assault has three platoons at its disposal.
Third platoon will be the overwatch platoon. Their job is to move onto an adjacent hill overlooking the objective and at 0100 hours start firing onto the hill. First and second platoons will be the assault group. It's their job to sneak up to the base of the hill and begin their advance once third platoon starts firing. They will crawl up a conveniently located ditch (how'd that get there?) that ends halfway up the hill. It may be mined so they'll take it slow and careful and remove mines as they go.
When the assault group reaches the end of the ditch first platoon will start crawling up the hill. Second platoon will stay put and begin giving covering fire for the first platoon. First platoon will attack the left flank. Just before they do though they will fire a green signal flare. This signals both second and third platoons to shift their fire to the right flank.
When first platoon has established a toehold they will fire a white flare signalling second platoon to make their way up and join them while they provide the covering fire. Once second is up top with the first platoon they will fire a red signal flare to let third platoon know to cease all fire while they finish clearing the opposition off the hill.
As you can see the above plan primarily puts the soldiers in place to do their job, requires little communication that can be misunderstood, and is easy enough for the simplest soldier to understand. It also is not dependent on any single person for success and makes good use of fire and maneuver.
WOLFE'S TIP: The defender ALWAYS has the advantage. To attack a prepared position against troops of equal quality and equipment the attackers should outnumber the defenders by at least three to one. If you don't - AVOID ATTACKING. Call for reinforcements, go around, call an airstrike - anything. BUT- if you have to anyway, remember everything we have discussed and I wish you luck- you'll need it in spades.
CHAPTER ( VI ) INTELLIGENCE REPORTING
It is one of the most common laments of the Infantry that more soldiers are killed by poor intelligence than from enemy bullets. While it may be true there is a flip side - Intel only knows what the Infantry tells them. Good reporting is essential to keeping yourself and your fellow soldiers alive. Here comes another acronym: SALUTE.
S = SIZE How may of them do you see? If you can't count 'em all make an educated guess.
A = ACTIVITY What were they doing when you saw them?
L = LOCATION Where were they?
U = UNIT If you cannot recognize the unit describe what you can. Patches? Markings? Colors?
T = TIME Time and date. VERY important if you cannot see them at the moment and it's now become military history.
E = EQUIPMENT What do they got for vehicles, artillery, or in their hot little hands?
Here's a sample report:
+"Sergeant Wolfe to Lieutenant Ellison - I have a contact report for the Captain. I have spotted an enemy unit of approximately company strength breaking camp on hill 4327 and one of their platoons was starting to move off to the northwest, apparently recon.+ +"I don't recognize the unit, but they had some kind of shoulder patch, red triangle in a blue circle, looks like a corporate logo. Looked like straight-leg standard issue troops, with the following additions: A lightly armoured tracked recon vehicle with a chaingun and small cannon, and a wheeled scoutcar with a communications satellite array mounted on top.+ +"Contact was at 0700 hours on 03 July. Please acknowledge."+
WOLFE'S TIP: On any very serious communications transmission ask for an acknowledgement. Ain't nothing worse than wasting your breath.
CHAPTER ( VII ) URBAN COMBAT
Urban combat is, without question, the most dangerous form of warfare in existence. There is no way I can do it justice within this limited format. However, I can give you a few tips to help increase your chances of surviving. 1.Learn to shoot with your off side. This reduces your exposure around awkward corners.
2.If you are absolutely sure there is no danger of harming friendlies use a grenade or a flamethrower on a hostile room before you enter it.
3.When you enter a room or hallway leave someone in the doorway or around the corner to provide cover. The Hi-Low approach from the cop shows works - IF you have a third man to cover them. It is NOT a two man operation. All it takes is one hostile in an adjoining room with a shotgun to take them both out with one shell.
4.Remember, you can fire through most walls and floors. And so can they...
5.Have your people spaced well out when you use stairwells. Some types of grenades roll downhill real well.
6.Avoid elevators. If you have to, then send people up two at a time. Talk about putting all your eggs in one basket!
7.Window tracks make excellent guillotine rails. Check before you stick your head out for a look.
8.Any wall can become a doorway if someone wants it to be one bad enough.
WOLFE'S TIP: Never go prone or lean against a wall while playing hide and seek in closed in areas with no cover. Low velocity projectiles hitting a hard surface like a wall or the ground will tend to follow along the surface. This is a technique taught in every combat shotgun class, shooting in front of your target instead of straight at them. You hit them almost every time.
Once again, I hope you have enjoyed this and feel free to pass it around to whoever else may enjoy!
Robert Kern, formerly:
(SSgt Robert Kern, C/3/75th Infantry, US Army Rangers, Building Clearing Team)