Chapter 8 An IM Distortion Reference.
8.1 The Design Approach.
8.1.1 Circuit Description and Theory Of Operation. 8.2 Construction.
8.2.1 Drilling holes in the box. 8.3 Initial Test>
8.2.2 Parts Mounting.
8.2.3 Switch Prewiring.
8.2.4 Switch Label.
8.2.5 Final Assembly.
8.4 Measured Values of IMD and THD.
Chapter 8 An IM Distortion Reference.
I suppose it would be possible to build an intermodulation distortion standard but it would need all kinds of precision parts and temperature compensation. It would also need its own signal source to avoid errors introduced by the signal source that is part of the instrument being calibrated. Such a device would have to be calibrated in a top level metrology lab. It would not be possible to build such a device at home following plans found on the internet.I may be wrong, and if I am I'm sure there are many who will correct me, but I think that a reference is one or more levels below a standard. Not very accurate but intended for a quick check to determine if a test instrument is working at all. Sort of like checking a voltmeter with a 1.5 volt cell and a 9 volt battery.
The project described here is such an operational check device.
Back to Fun With Tubes.
Back to Fun With Transistors.
Back to Table of Contents.
Back to Top.8.1 The Design Approach.
To produce IM distortion from the two signals of the signal source all that is needed is some nonlinearity. What better device for that than a diode. A diode, or two of them, has quite a lot of nonlinearity, in fact enough to cause 30% modulation without even trying. Some well place resistance will reduce the effect of the diodes to obtain reasonable values of IMD for verifying the operation of the analyzer.8.1.1 Circuit Description and Theory Of Operation.

The signal is fed in through the 10 k ohm resistor which isolates the circuit from the signal generator and prevents overloading it. Two diodes are connected in antiparallel so the distortion that is introduced will be symmetrical. The %IM switch selects a resistor to be placed in series with the diodes. The larger the series resistance the less distortion is introduced. For a very large resistance the nonlinearity of the diodes is a small part of the total impedance. As the resistance is made smaller the diode nonlinearity becomes more effective and more distortion is introduced.
I have chosen 4 values of IMD. They are 10%, 3%, 1%, and 0.3%. This covers a wide enough range that if you get an amplifier that is giving you an unbelievable amount of IMD, either high or low, you can quickly verify if the instrument is working properly.
I selected the 5% resistor values to give IMD values that are just a little less than the full scale readings so you will always be reading near the top of the meter range. The next 5% value puts the reading over the stated value and onto the next range where the meter pointer is low on the scale giving less accurate readings. You are probably wondering why I didn't use 1% resistors to deliver readings that are much closer to the stated values. I don't think this circuit is very repeatable. If 1% resistors were used that might give someone the impression that this can be used as a calibration standard. I don't believe it is reproducible enough for that. It is just a rough check to see if your IM analyzer is working at all.
Due to what is technically known as a foul up I had to build the circuit a second time. The measured values of IMD came out amazingly close. However, I am using diodes that were supplied in a role and held on paper strips. This would seem to indicate that they were all made at the same time from the same batch of silicon. Diodes from a different batch are likely to give different results. I hope those who duplicate this project will report to me about this.I suggest breadboarding the circuit before you build it. The diodes you have may be different enough from mine to require some changes in resistor values to obtain the readings described in the paragraph above.
Back to Fun With Tubes.
Back to Fun With Transistors.
Back to Table of Contents.
Back to Top.8.2 Construction.
Except for time to allow the glue to dry this is a single afternoon or evening project. You probably already have the resistors and diodes on hand. All you need to order is the box and switch. I hope you ordered them at the same time you ordered the parts for the analyzer.8.2.1 Drilling holes in the box.
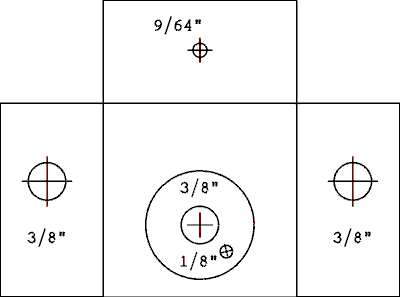
Here is the drilling template. Scale it and stick it to the box as you have done before.

Cut out the drawing along the outside lines. Stick the large square to the bottom of the box and fold the three flaps down to cover the sides of the box. Drill all holes as indicated.
Remove the paper and any tape that remains stuck to the box.
Back to Fun With Tubes.
Back to Fun With Transistors.
Back to Table of Contents.
Back to Top.8.2.2 Parts Mounting.
Remove the nut supplied on the BNC connector. Leave the lockwasher in place. Insert the connector through one of the 3/8 inch holes in the side of the box. The lockwasher should be on the outside of the box. Thread the nut onto the connector on the inside of the box. The best tool for tightening the nut in this confined space is the box end of an end wrench. You may have to place a male BNC connector on the female one to hold it from turning while you tighten the nut.Similarly mount another BNC connector in the 3/8 inch hole on the opposite side of the box.
Mount a number 6 solder lug at the 9/64 inch hole on the inside of the box. Use a 6-32 x 1/4 screw and a 6-32 nut. The nut should also be on the inside of the box.
First be sure the switch is in the most counter clockwise position. Remove the nut and lockwasher from the switch bushing. Be careful not to lose the item which looks something like a washer that is closest to the switch body. This is the stop ring. Removing it may require some gentle prying with a small screwdriver. After you have removed it you will see a ring of holes around the bushing and a number associated with each hole. Reinstall the ring and insert the tab into hole 4. This sets the switch to be a 4 position switch.
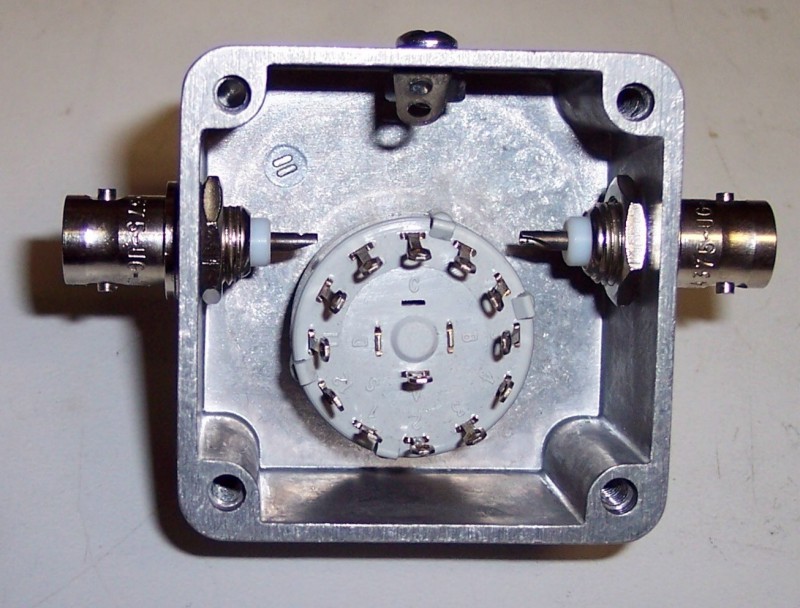
Fit the switch in place. If the alignment pin does not go into the hole file the hole so it will. Make sure the solder tips on the BNC connectors don't interfere with the switch. Thread the nut onto the switch bushing and tighten it only finger tight. The assembly should look like this.

If there aren't any interferences you are good to continue on.
Fit the knob over the switch shaft. If the knob drops down all the way you can skip the next step. If it doesn't, estimate how much must be cut off of the shaft to allow the knob to be fully seated.
Tighten the nut on the switch a little more and clamp the box in a vise. Use a hacksaw to cut off the amount of shaft you estimated in the above step.
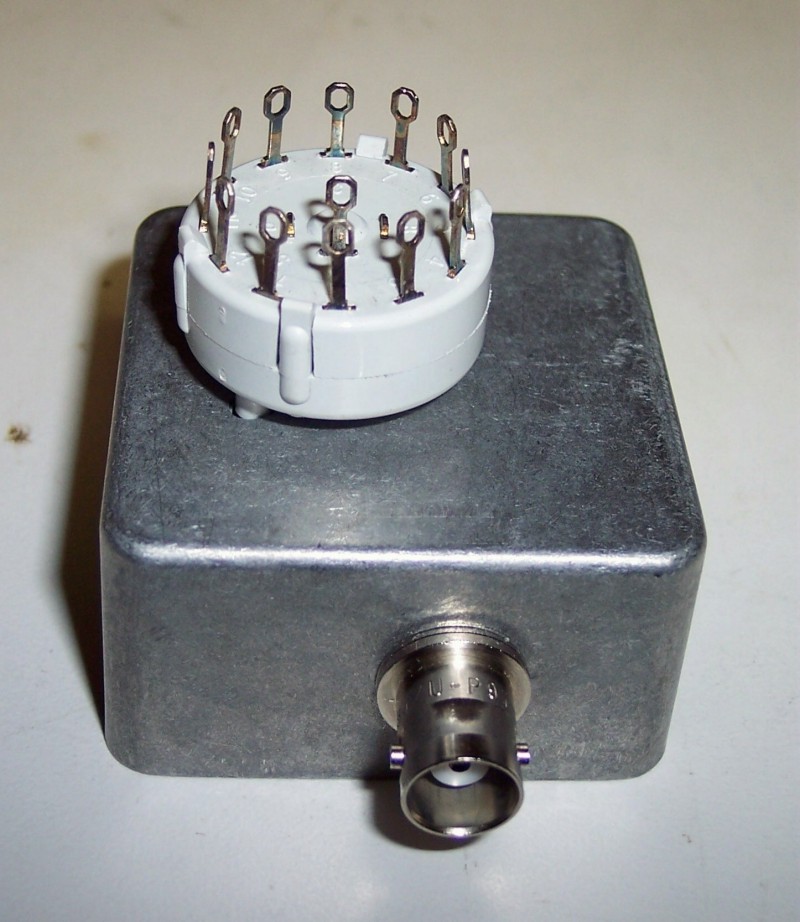
Remove the switch and insert the shaft through the hole from the outside. Thread the nut onto the switch bushing, fit the alignment pin into the hole and tighten the nut finger tight. The purpose of this rather strange instruction is to provide a means of holding the switch still, while you install resistors and wires onto it and solder them. It should look like this.

Back to Fun With Tubes.
Back to Fun With Transistors.
Back to Table of Contents.
Back to Top.8.2.3 Switch Prewiring.
Although these switches are listed in the catalog as high reliability they can be damaged by too much bending of the lugs. (That foul up I mentioned earlier). That is the primary reason I decided to instruct you to wire the switch outside of the confines of the box.Cut 2-1/4 inches of black hookup wire and strip 1 inch of insulation from one end and 1/4 inch from the other. Pass the long bear end through lug 10 (NS) to lug 6 (NS) of the switch. Hook the wire on to lug 6. Be careful not to put too much force on the lug.

Pass the cathode lead (banded end) of a 1N4148 diode through the hole in lug A and all the way until the body of the diode touches lug A. Make sure the lead misses the holes in lugs 1,2, and 3. With the body of the diode against lug A cut off the other lead even with lug 8. Bend the lead downward so the diode is up and pass the end through the hole in lug 8. Center the diode between lugs A and 8 and bend the lead outside of lug 8 upwards, over the top of the lug and down the inside. Make sure the diode body is still centered between the lugs and crimp the wire hook around the lug. Lift up the diode to make sure the leads or body are not in contact with the bear wire between lugs 6 and 10. Do not solder the connection.
At lug A bend the lead upwards and cut it off leaving enough to bend over the top of lug A as you did with lug 8. Be careful in bending the lead that you do not put the diode leads and lugs 8 and A in tension. Do not solder the connection at lug A.
In a similar manner pass the anode lead (not banded end) of a 1N4148 diode through the hole in lug A and all the way until the body of the diode touches lug A. Make sure the lead misses the holes in lugs 1,2, and 3. With the body of the diode against lug A cut off the other lead even with lug 8. Bend the lead downward so the diode is up and pass the end through the hole in lug 8. Center the diode between lugs A and 8 and bend the lead outside of lug 8 upwards, over the top of the lug and down the inside. Make sure the diode body is still centered between the lugs and crimp the wire hook around the lug. Lift up the diode to make sure the leads or body are not in contact with the bear wire between lugs 6 and 10. It does not matter if the two diode bodies are in contact with each other. In fact this seems unavoidable. Do not solder the connection at lug 8.
At lug A bend the lead upwards and cut it off leaving enough to bend over the top of lug A as you did with lug 8. Be careful in bending the lead that you do not put the diode leads and lugs 8 and A in tension.
If you have a pair of hemostats clamp them over the diode leads between lug A and the diode bodies. If you don't have a pair place a rubber band around the handles of your needle nose pliers to hold the jaws shut and clamp them over the diode leads. I don't know how much good this will do but I will sleep better knowing I have told you to do it.
Solder the connection at lug A (S2).
When installing the following 4 resistors it is suggested that you not try to bend the resistor leads around the switch lugs but push the lead through the hole and fil it with solder. While this is not traditional for soldering to lugs it is no different from the way printed circuit boards are routinely soldered. The wires are not wrapped around and around the board but just pushed through the hole and soldered.
Connect a 240 k ohm resistor (red yellow yellow) between lugs 2 (S1) and 10 (NS). Form the leads so the resistor body or leads do not touch lug 1 or lug A.
Connect a 680 k ohm resistor (blue gray yellow) from lug 1 (S1) to lug 10 (S4). Note when a wire passes through a lug and goes on to another lug it counts as two in soldering accounting. Position this resistor outside of, but not touching, lugs 11 and 12.
Connect a 91 k ohm resistor (white brown orange) from lug 3 (S1) to lug 6 (NS). Make sure the resistor leads or body do not touch lug A.
Connect a 30 k ohm resistor (orange black orange) between lugs 4 (S1) and 6 (S3). Position this resistor outside the switch lugs but not touching them.
Cut one lead of a 10 k ohm resistor (brown black orange) to 1/2 inch and the other lead to 3/8 inch. Bend a small hook in the end of the shortest lead and hook it through the hole in lug 8 so the resistor extends off to the right as seen in the photograph above. Crimp the hook shut on the lug. (NS)
In the following step as you work with the switch be careful that the 10 k ohm resistor just installed does not fall out and become lost.
Cut a 1-3/8 inch length of blue hookup wire and strip 1/4 inch of insulation from each end. Bend a small hook in one end and hook it through the hole in lug 6 so the wire extends off to the left as shown in the picture. Crimp the hook shut on the lug. Position the resistor and wire so they extend straight out to the right and left and solder the connection at lug 6 (S4).
Bend lugs 5 and 7 slightly inward so the wire and resistor won't come into contact with them.
Inspect the switch to be sure that the solder on each connection flowed around all wires in the lug. If there are no problems, continue with the panel label instructions.
Back to Fun With Tubes.
Back to Fun With Transistors.
Back to Table of Contents.
Back to Top.8.2.4 Switch Label.

Scale, print, and cut out the switch label above. The width and height are 1-15/16 inch.
Remove the switch from the box.
Position the box on a paper towel on your workbench with the two BNC connectors to left and right and the large hole closest to the bottom and the small hole below and to the right of it.
Apply a VERRY thin layer of glue uniformly over the face of the box. Spread it around with your finger. Place the label over the panel and carefully center it. The glue is forgiving enough to allow you to move the label around for a minute or so after the glue has been applied.
Hold the box up to the light to make sure the hole in the box and hole marking on the label are in the same place. Place the box face down on a piece of wax paper and place something heavy on top of it such as a transformer. Even with this much force there shouldn't be any glue squeeze out. If there is you used too much glue. Remove the label from the box and clean up excess glue by wiping it up with your finger. Wipe the finger on a paper towel and continue until the glue layer is very thin. If the glue is beginning to dry wipe it off completely with a moist paper towel and start again. This glue is water soluble. After reapplying the label set it down on a new piece of wax paper and wait it down. Allow it to dry for a minimum of 4 hours or overnight.
Back to Fun With Tubes.
Back to Fun With Transistors.
Back to Table of Contents.
Back to Top.8.2.5 Final Assembly.
Use an X-acto knife to cut out the large hole in the paper over the hole in the box.Do not cut out the small hole.
Now that the label has been glued to the box it, the label, is vulnerable to damage. Handle with care.
Hold the switch upright so the lockwasher and stop ring won't fall off and remove the nut.
Hold the box so the hole for the alignment pin is on the same side of the large hole as the pin on the switch. Insert the shaft through the hole. Let the wires and resistor bend as you push the switch into the box. Seat the switch in the box and start the nut with the smooth side toward the box.
Check to be sure that the alignment pin has entered the small hole and tighten the nut finger tight. Then use a suitable socket wrench, end wrench, or pair of pliers to snug down the nut. Not too tight now.

Form the blue, and black wires, and the lead of the 10 k ohm resistor so they will fit into the box as shown in the picture above.
Insert the black wire through the solder lug, bend it over and solder it (S1).
Insert the blue wire through the hole in the pin of the BNC connector labeled "OUTPUT" and solder it (S1).
Insert the free lead of the 10 k ohm resistor through the hole in the center pin of the BNC connector labeled "INPUT" and solder it (S1).
Install the box cover.
Back to Fun With Tubes.
Back to Fun With Transistors.
Back to Table of Contents.
Back to Top.8.3 Initial Test>
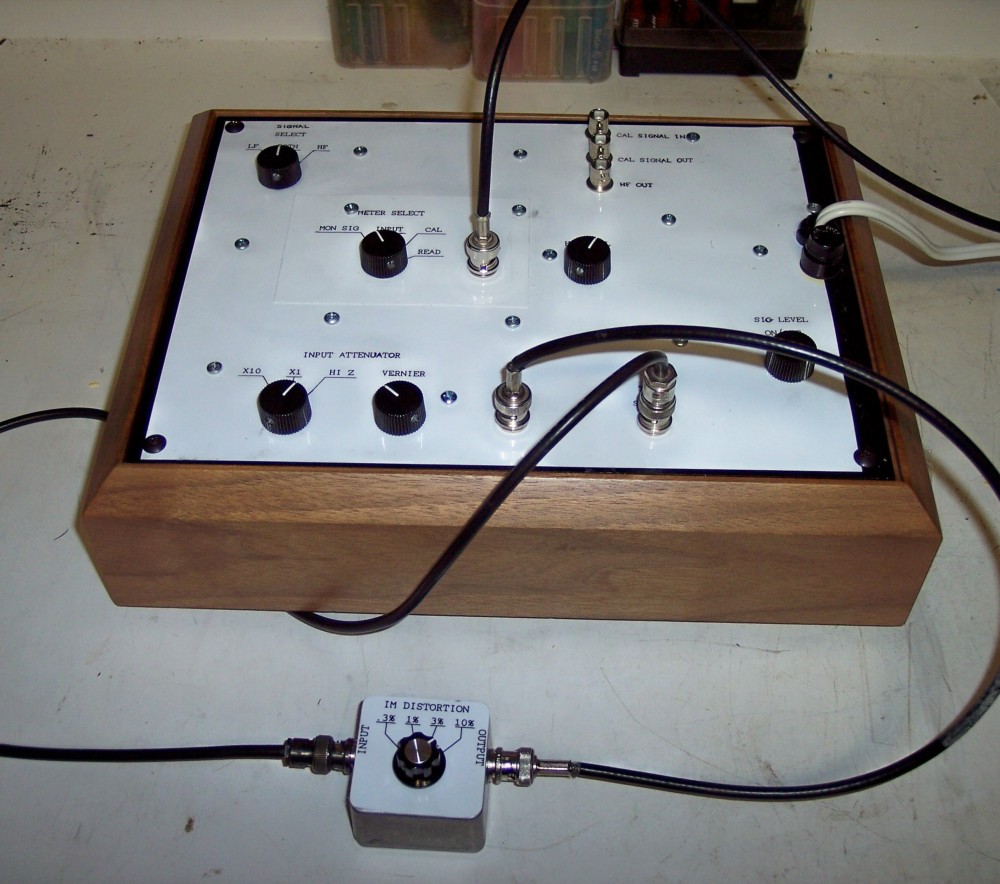
- Use a BNC to BNC cable to connect the "TEST SIGNAL" on the analyzer to the "INPUT" of the reference.
- Use another BNC to BNC cable to connect the "OUTPUT" of the reference to the "TEST INPUT" of the analyzer.
- Set your readout device to the 1 volt range, the "METER SELECT" to "MON SIG", and the "SIGNAL SELECT" to "LF". Adjust the "SIG LEVEL" for a reading of 1 volt on the meter.
- Change the "SIGNAL SELECT" to "HF" and the readout range to 0.3 volts. Adjust the "HF LEVEL" for a reading of 0.25 volts.
- Set the switch on the reference to the 10% position.
- Set the "METER SELECT" to "CAL". Set the "INPUT ATTENUATOR" to "HI Z" and adjust the "VERNIER" for a reading of 100% on your readout device.
- Change the "METER SELECT" to "READ". Switch the range switch on your readout device to a lower range to get a more accurate reading. The indicated value on my unit is 9.4%.
- Change the switch on the reference to another position and repeat steps 6 and 7.
Every time you change the position of the selector switch on the reference you must go back to step 6 and work forward from there.
8.4 Measured Values of IMD and THD.
Here are the measured values of intermodulation distortion and total harmonic distortion produced by this little box. I will be curious to see how your measurements agree with mine. If you want to compare notes or have any questions you can email me here.
Measured Distortion Values Switch Setting IMD THD 10% 9.45% 2.83% 3% 2.95% 0.90% 1% 0.99% 0.316% .3% 0.295% 0.091%

Epilog.
If you have worked through this project you are likely thinking it has taken a long time. Well, I have been at work on it for 9 months. That is the usual gestation period isn't it? I wrote these pages as I built the analyzer which certainly increased the time. Also I had to build parts of it over again because some things didn't work out. It has been fun even though there weren't any tubes involved. Whether the fun for you is in building or using I think you have already had or are going to have a lot of fun with this project. Good luck and I hope your soldering iron stayed hot and your beer stayed cold.Back to Fun With Tubes.
Back to Fun With Transistors.
Back to Table of Contents.
Back to Top.