Go.Netscape.Viewer help page (page 2 of 3)
- Creating a Registry Backup/Restore file on a Boot Disc.

 |
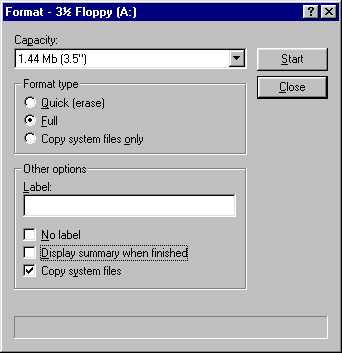
Regardless of whether or not the Floppy Disc (A:) needs to be formatted, the cautious approach is to format it, to ensure it is 100% functional. By RIGHT-CLICKING on the Floppy Disc (A:) entry you will get the pop-up box with the format option. By clicking on Format you should get a window something like the one shown to the left. MAKE SURE YOU ARE FORMATTING A: and NOT C:
Before you start the formatting check that it is Drive A: (as shown)
Formatting will take a few minutes to complete. Be patient. |
|
OK. The emergency Boot/Backup/Restore disc is nearly ready. Our last task with this disc is to add the Autoexec.Bat file that will contain the Backup/Restore menu, and instructions for your use.
As you have a download problem, it is pointless for me to put a link here for you to download the backup file yourself. You need to copy it from this screen (it's simply a sequence of DOS commands in plain ordinary text), and paste these DOS commands into a file that will be created on your floppy disc.
If you explore the floppy disc now that it has been formatted, you should see that it has one (or more) files on it. If there isn't a file called Command (or Command.com), then don't panic. It means that you formatted without the 'Copy System Files' option checked, and that you should repeat the Format function again (do it properly this time!
We MUST have Command.com on the floppy disc. Don't worry if Windows shows other files present - there are other system files included, but Explorer often hides these files from your view, depending upon how your copy of Windows is configured (these other special 'hidden' files should not be deleted from the disc - just leave them there if they are showing).
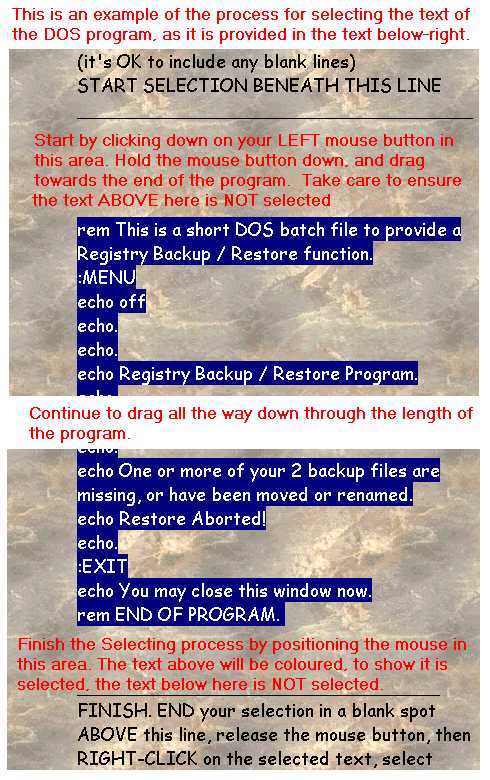
Take a look at the picture on the Right. It shows the process for easily copying the special DOS commands from this page (they're just a bit further down, in the next block of text underneath this block).
You need to use your mouse to select these DOS commands. |
 |
 |
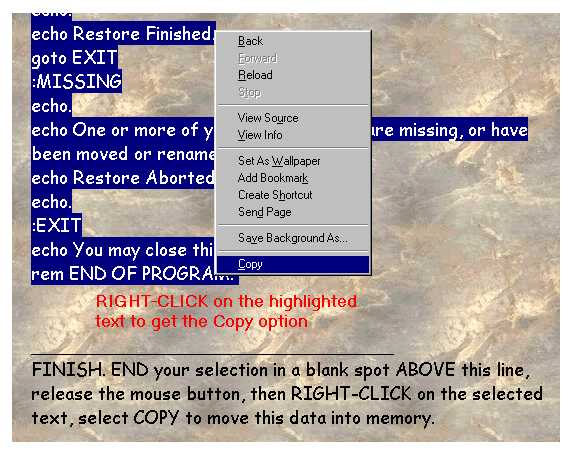
Once you have the entire list of DOS commands highlighted like this you will need to release the mouse button, reposition the mouse over any part of the highlighted text, RIGHT click the mouse, and select COPY from the menu that appears. The DOS commands will then be held in memory (temporarily). We will then simply paste these commands into a text editing program (Notepad, Wordpad or Word), and save them directly onto your floppy disc.
Feel free to study the DOS files list of commands as they are shown below right. They may not make much sense to you, but you should be able to reassure yourself of their purpose, and that there is nothing malicious about their action when the commands are activated. |
|
The following block of text is your Backup/Restore program. You need to select the entire block below (as described in the previous block) WITHOUT these first few lines of instructions, and copy it to your clipboard (memory).
Start selecting the block by CLICK-and-HOLDing the mouse button down in the blank space immediately beneath the START line (below). Drag the mouse down through the entire block of text until you have it all selected |
 |
 |
OK. So you now have the text of the DOS program sitting in memory, but you can't run it yet, it needs to be saved onto that Floppy Disc we've already organised. Insert the Floppy Disc.
You now need to run a Text Editing Program, which you WILL have, as they come as standard accessories in Windows.
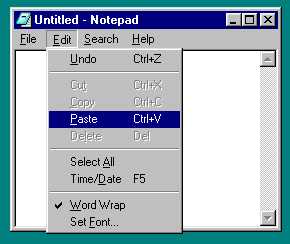
Make certain that you are using a BLANK document. Right-Click the document space, and select PASTE (or refer to the picture ABOVE). Scroll through the document. Specifically, make certain that it STARTS with the line: :MENU and that it ENDS with the line: rem END OF PROGRAM. If any other instruction lines have slipped in either before, or after these points, delete them (it's very easy to accidentally select and copy a lot more than you want). Now the last bit in finishing the Floppy Disc. We Save the document onto the Floppy Disc.
Study the picture to the Left. In the Save box that appears, ensure that you select Drive A: as the destination, and that you name the file AUTOEXEC.BAT TAKE SPECIAL CARE to ensure that you save it to drive A: . If you save it to Drive C: you might upset other programs, such as virus checkers that you may have installed, as these are often started from another Autoexec.bat file which is stored on C: You must not overwrite the copy of Autoexec.bat on C: Autoexec.bat is a special filename. Whenever a computer starts it will search for a copy of Autoexec.bat (among other things), and (depending on many aspects of your system) might run the program automatically for you.
(NOTE: If you can't find either Notepad or Wordpad or Write, you can install them using your original Windows media. The sequence is : Start Button, Control Panel, Add/Remove Programs, Windows Setup Tab, Accessories, Details Button, Wordpad (ensure it is ticked), OK button). |