
How To: Make Your Own A6 Side Markers
Disclaimer
I am in no way responsible for what you do on your own time with your own hands to your own car. The following information is provided for informational purposes only. Assume the worst, that the following modification COULD cause damage to your vehicle. If you choose to modify your car it is your own business and I'm not part of the equation.
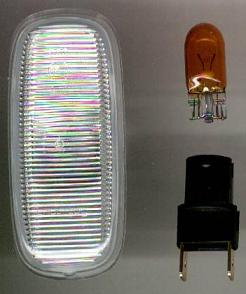
These are instructions for installing 1998 Audi A6 side markers. The reflectors are clear, thin, and rectangular with amber bulbs. I think they're also used on the newer A4s. You can get them from your local Audi/Volkswagen dealer. VW might have different part numbers, but they are the same components. The parts list is below:
P/N; description; unit price (list).
4B0-949-127; turn signal reflector; $7.50 ea.
161-949-111; bulb socket; $2.70 ea.
N-017-753-4; amber bulb; $1.90 ea. (or any other color bulb you may want sold at most Auto stores.)
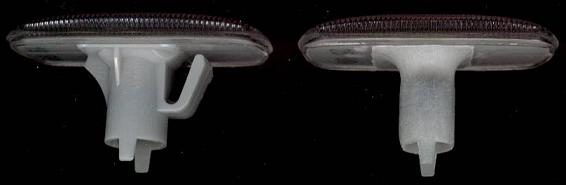
You will need to modify the reflector. It comes with many flanges and a clip even. File them all off with a rasp or dremel tool. If you file it down enough, they will fit with no modification to the fender. Otherwise just enlarge the hole in the fender with a unibit or dremel and use touch-up paint to protect the exposed edges. Use 3M double-sided foam tape to mount the markers. The reflectors won't fit perfectly flush. I found that the 3M tape is just the right thickness to cover it up without protruding too much.
The side markers can be wired for single state operation (on with parking lights only or turn signals only) or two-way operation (full-bright with turn signals, half-bright with parking lamps). I did the latter, pictures are available under my profile. The schematic is available here (Thanks to John Miks for the help.):

Done this way, you'll also need two electrical components per side:
Radio Shack might have these parts; I found mine for under $10 total at an electronics surplus store. The resistors I bought were wire-wound and encased in sand. The diodes were rated up to 25V but anything above 15V should work fine. Depending on how you route the wire, a rubber grommet may be needed. Look around the hood hinge; you should see an approx. 1-inch hole there. From there you can route the wiring to the fender.
I used six splice connectors. Three per side, one for the parking lamp filament, one for the turn signal and one for ground. Remove the headlight assy (three screws) and you will see the wires that need to be tapped. Black is ground, the other two are orange.
With the schematic, it should be self-explanatory from here. A picture is worth a thousand words, heh. But just in case: I used a clothes hanger to run a 4-ft length (12V) and a 5-ft length (ground) to the fender hole through the hood hinge hole. I then soldered them to the copper spades of the side marker socket. I then ran the 12V lead to the components, soldered the connection and used heatshrink to cover up any exposed wire. From there, two 1-ft lengths were routed to the headlight assy and splice-locked to the parking lamp and turn signal leads. The 5-ft ground lead from the side marker was also splice to the assy ground. All lengths are approximate.
Took me one afternoon total, and that's with running back and forth to Home Depot for needed hardware, heh. Hardest part is probably mounting the components and routing the wires. Cable ties come in real handy. I'll try to get pictures of my installation, seeing that I have to repeat the fender mod again (yay). These instructions should also work for Mondeo side markers or whatever else you choose. Enjoy...
Friends Cars
My 2000 Contour SVT
Lay's 1998 Contour SVT
Ben's 2001 Mustang GT
Julian's 2003 Mustang GT
Daniel's 2000 Camaro
