525 KEEL REINFORCEMENT
REPAIRS
lenschoonover@msn.com 7-07
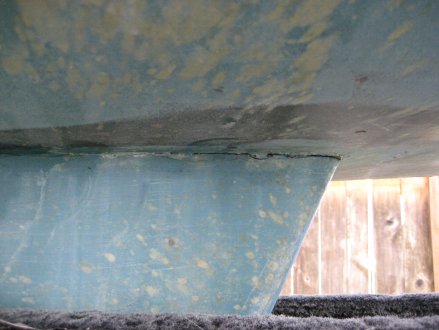 If you pull your 525 out, check the
keel to hull joint for any gaps. This is a "warning" that you could be
in for a little repair project. Check the keel bolts under the
removable sole board. They may just need to be re-torqued. If there is
a depression around the washers and nuts, it is more serious and the
following project may have to be duplicated.
(FOR MORE DETAILS ON WHICH PRODUCTS TO USE, SEE THE WEST SYSTEM BOOK FOR REPAIR TECNIQUES AND/OR SEE THE OTHER ARTICLES ON RUDDER REPAIR)
Some of the tools required for this project include: rotary cut off blade, it could be electrical or air powered; Respirator, for fiberglass particles, you can also buy chemical cartridges for organic fumes; putty knife, chisel to clean up residue on the inside hull surface; Acetone for cleaning the surfaces and for epoxy clean up; PVC sheeting to replace the teak boards; Epoxy and epoxy thickener; Drill and hole saw; saw to cut the PVC boards; Torque wrench for proper tightening; Silicone sealant; tape.
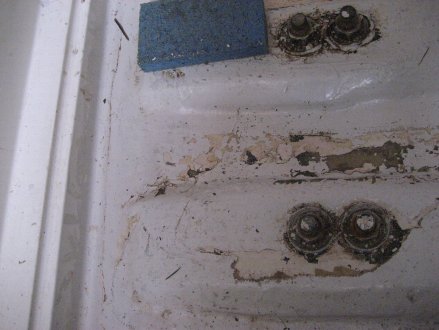 The 950 lb. 525
keel is held by 5 stainless studs that come up through the hull and
then
through 3 teak boards and finally a fiberglass shell called the bilge
liner. If there has been a leak in your
boat at one
time or water was allowed to get in between the liner and the hull, it
will
have settled at the lowest point and you may have teak that has been
saturated
with water for many years without your knowledge. This
will compromise the strength of the
teak. ( The worst result is "dry rot" A fungal disease that
causes timber to become brittle and crumble into powder.) The
fiberglass over the boards of
our boat was dimpled where each nut tightened to hold the keel. (see picture)
Since we didn’t buy the boat new, I don’t know how the surface
looked
when things were fresh and tidy. I think
this surface was flat when it left the factory.
If you would like to test your wood for moisture, you can do as
I did
and drill a quarter inch diameter hole through the fiberglass and into
the
wood. The tailings of the drill will
tell you the story. Mine was soaked.
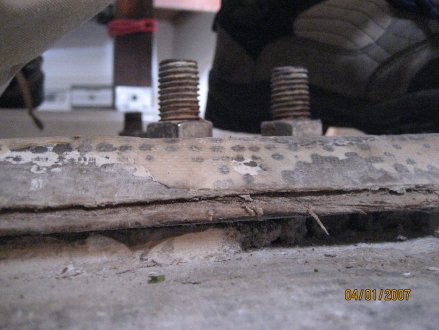
There are three boards that support the keel and one more forward under the mast support. I have replaced the keel boards and hopefully next season I will tackle the one under the mast support. First one must cut through the fiberglass cap to expose the board. I had Opus on the trailer so the keel couldn’t go anywhere and I started with the aft board. Cutting the fiberglass was done with a cut-off wheel on an air tool.
(NOTE here ++AWAYS USE AN APPROPRIATE RESPIRATOR WHEN CUTTING FIBERGLASS – THE FIBERS DO NOT COME OUT OF LUNG TISSUE)
ps: you can cover your exposed skin to help
prevent the dreaded "ich" that imbeaded fiberglass fibers can give you.
Duct tape can be used to help remove some of them should you get a few.
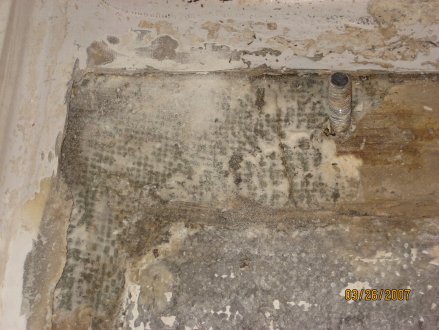
It was quick and the wheel left a somewhat smooth edge.
The liner is thin, so don’t try to cut too
deep. Better to go back and do a cut
again than to get into the hull material.
The wood came up easily but the bonding or bedding material had
to be
chipped off with a putty knife. When you
have chipped your way down to fiberglass, get the 80 grit sand paper
and clean
off any more bedding residue. Don’t try
to cut into the hull, just rough it up a bit so your new bedding resin
will be
able to bight into the surface. Now the
area
needs to dry out for a few days. I put a
heat lamp on it for 48 hours and it seemed to do the trick.
Do be
careful and do not over-heat the fiberglass. We want to warm the surface, not make it hot, so place the lamp with that in mind.
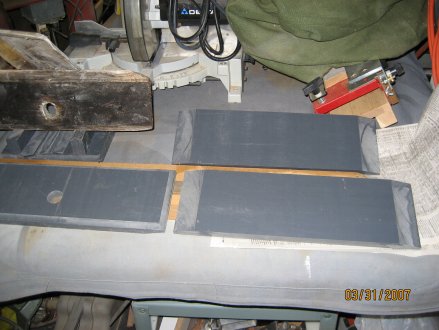
I bought a
sheet
of one inch thick PVC from my local plastic shop and on my table saw
cut it to
match the teak board. Use the board for
a pattern and drill the hole with a common hole saw.
I had to drill one side as deep as the hole
saw would go and then flip it over to complete the hole.
With a router, I ran a round-over bit around
the top edges for a finished look. On
the bottom of the PVC use your 80 grit paper and scuff it up to help
the resin
get a good grip.
The ends were beveled to match the curved shape of the hull.
Other materials can be used instead of the
PVC. The PVC is convienent, cuts and can be worked with wood working
tools and is not effected by moisture. It has good compressive strength
to withstand the compressive forces experienced when torquing the keel
bolts.
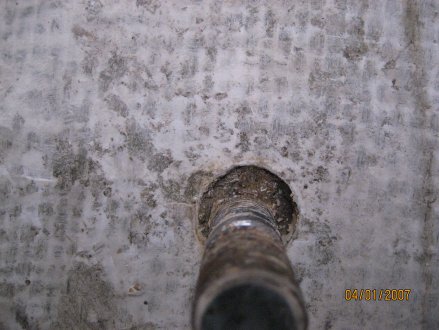
I replaced one
board at a time so that the keel stayed in alignment during the project. For preparation, I dug out the old sealant
until I hit the bottom of the hole around each stud.
I forced 5200 sealant down around the stud
and some around the inner surface of the hole.
I masked off the outer perimeter and was all ready get sticky.
I mixed West epoxy as per the directions and
painted both
surfaces. Then I added thickening agent
to the mix in the cup so the resin would stay where I put it. I didn’t use enough thickener on the first
one so it oozed out all over the place. We want peanut butter
consistency here
not syrup. Lesson learned.
Spread it onto the board and hull with a
putty knife and put the board in place.
Wiggle it down until it stops and then run the nut down hand
tight,
keeping it centered around the stud. As
it oozed out around the board I kept pushing it back in at the center
in hopes
of eliminating any bubbles. I guess I
could have used a modeling clay dam around it but that didn’t seem
necessary.
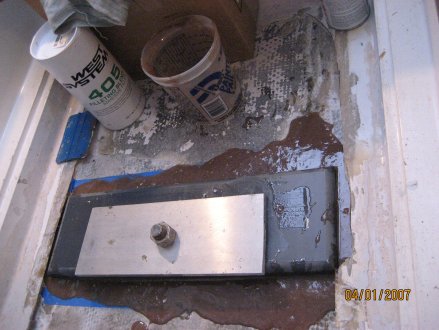
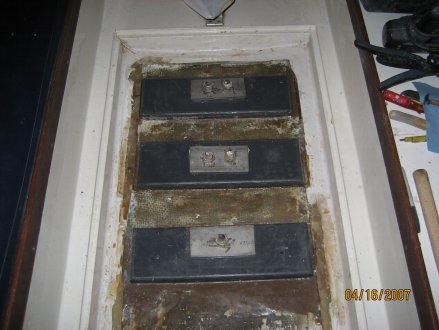
When you are satisfied with the mess you have made, take the left over resin and tools and go clean up. Don’t try it in the cabin as the chemical fumes from the acetone and curing epoxy will overcome your lungs. When the resin had kicked off and was like soft plastic I did a little cutting off of excess. I also added a drain slot at each end of the bilge liner so that any future water can expose itself allowing me to sponge it out.
The next board is done just like this one, but there are two holes to drill. I’m very pleased with the results and just have to put a coat of bilge paint or something down there. One other improvement I added was a blob of clear silicone on the top of each keel stud. This keeps the stud from cutting into the base board and acts as a bit of padding.
NOTE:
This is a good opportunity to let the keel down a bit
and refresh the sealant on the outside, between the keel and hull. I did this when the last board had been
installed and the resin had cured. I
raised the boat on the trailer first, and being concerned that I would
ruin the
5200 seal around the studs I loosened each nut only about one turn and
checked
outside. Sure enough a small crack was
evident where the keel meets the hull. I
used the caulking gun size cartridge with a small hole in the tip of
the
applicator. Scrape out what you can from
the crack and then use the pressure of the calking gun to force new
sealant
into the crack. When you tighten the
nuts you should get a bead of sealant oozing out all the way around the
keel to
hull joint. Make sure you tighten in
steps and use this pattern: middle, forward, aft, middle, forward. I did mine at 75 then 100 then 110. Schock could not give me a torque spec for
these bolts but only a standard chart for stainless bolts.
After everything is tight and the sealant has
had 3 days minimum to cure you can apply bottom paint to the joint. You might notice in the pictures I added a
stainless plate at the top of each new PVC board. This
helps spread out the stress. I’d
like to think that Schock would have done it this way if they
had PVC
slabs and West resin back in 1979.