Here are a few tips that I’ve put together that may be of interest to you if you are not already aware of them.
(Scroll down or click the categories below to jump to a section)
Hiking, and in particular hiking in remote areas, is a great experience if approached with due regard for fitness, safety and skill.
One of the major skill categories, is the ability to navigate with or without compass and map. Ideally, no one should head off the beaten track without map or compass, but what if you find yourself
in that situation, or you lose or damage your compass?
Here are a few basic skills that could one day be of use.
Finding direction by using your watch...
If you have a watch that is set to local time, you can always quickly determine the approximate points of the compass as long as the position of the sun is visible.
The method used varies depending upon which hemisphere (northern or southern) that you happen to be living in. The following methods are described using an analog watch, (that's a watch with an hour
and a minute hand) but they can be applied just as well if you own a digital watch. Just use your imagination to superimpose the 12 hourly numerals and the relevant position of the “hour
hand” on the face of your digital watch.
This method will give you a good approximation of true north or south but is not a substitute for the accuracy of a compass and the closer to the equator, the less accurate.
Northern Hemisphere
Holding your watch horizontally, point the hour hand of your watch at the sun.
Note the direction that lies exactly midway between the hour hand and the numeral twelve on your watch.
This will be South on a north/south line. If there is any doubt as to which end of the line is north, remember that the sun rises in the east, sets in the west, and is due south at noon. The
sun is in the east before noon and in the west after noon.
Once you have established this, it will be easy to determine the other points of the compass.
Southern Hemisphere
Holding your watch horizontally, point the numeral twelve on your watch at the sun.
Note the direction that lies exactly midway between the twelve and the hour hand.
This will be North on a north/south line. If there is any doubt as to which end of the line is north, remember that the sun rises in the east, sets in the west, and is due north at noon. The
sun is in the east before noon and in the west after noon.
These methods will give you a good approximation of compass direction.
If your watch happens to be adjusted for daylight saving at the time, then remove the daylight saving for greater accuracy.
Another method of determining compass points can be used if you do not have a watch.
This method takes longer and also requires enough sunlight to cast a shadow...
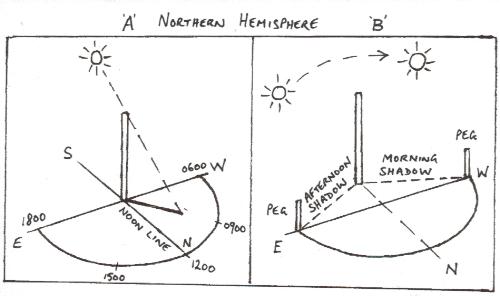
To find North without a watch...(See Diagrams 'B')
(See Diagrams 'B')
Before noon, on level terrain, position a stick of about 3ft upright into the ground.
Mark the tip of its shadow with a peg or stone.
Using the tip of the shadow as a radius, draw an arc around the stick.
The shadow will shorten as it approaches noon, pulling back from the arc. It will then lengthen again - where the afternoon shadow once again touches the arc, place another peg or stone.
Now draw a straight line between the two markers - this will be an East/West line, with the first marker that was placed being in the westerly direction.
You can now draw a North/South line at right angles to the East/West line.
A less accurate method can also be used at any time of the day without drawing an arc...
Peg the tip of the first shadow, then about 20min later peg the tip of the moved shadow.
Draw a straight line between the two pegs, and this will be an approximately East/West line, with the first peg again being the westerly one.
Telling the time without a watch...(See Diagrams 'A')
(See Diagrams 'A')
If you do not have a compass, determine North, South, East and West using the method described above.
Position your stick at the intersection point of your East/West, North/South lines.
The Eastern point of the arc around the stick will be 1800hrs, the Western point will be 0600hrs, whilst the Northern or Southern (depending on which hemisphere you are in) midpoint of the arc will
be 1200hrs.
The approximate time of day can then be read off the arc using the moving shadow.
A typical error when lost, is a tendency to wander off what you may think is a straight line bearing, sometimes even slowly circling back on yourself.
To prevent this, note an object (tree, rock, terrain feature) that lies directly ahead of you in the direction you wish to travel, then aim for it. When you reach it, take another bearing on the
direction you wish to head, sight another object directly ahead of you and repeat the process.
In areas of restricted distance visibility, you may have to repeat this quite often over short “legs” to ensure that you are remaining on course.
Keeping a course by the clouds...
What if it's a cloudy day with no sun visible to get a bearing on, or the bush canopy prevents you getting a clear “shot” at the sun?
Well, if you are lucky, it may be windy with the clouds moving in a constant direction - note the directional flow of the clouds, and adjust your course relevant to their direction. e.g., If the
clouds are moving from your front from right to left over your shoulders, keep them there, at the same time, sight an object straight ahead of you and head for it.
To retrace your steps in the same general direction, just do an about turn, then keep the clouds moving from behind and now left to right over your shoulders, and repeat the process.
As an example of “cloud navigation”, when moving inland through dense bush away from a coastal beach, it was realized that it was not immediately evident in which direction the coast
lay.
Before entering the treeline, it was noted that the clouds were moving in a direct line from the trees to the coastline. It was then just a matter of looking up and following the direction of the
clouds to enable a heading in the correct general direction and once again access the beach.
Being aware of your surroundings will often pay off, so it's a good habit to cultivate. Australian Aborigines are noted for their 'walkabout' navigational ability and awareness of surroundings no doubt plays a part in this. The following are extracts taken from an interesting article by Lira Boroditsky, a professor of psychology at Stanford University. The article is primarily about how language may affect thought patterns, but these extracts indicate the awareness of the Aborigines to items surrounding them. Particularly their personal location in relation to the passage of the sun. She found that in Pormpuraaw, a remote Aboriginal community in Australia, "..the indigenous languages don't use terms like 'left' and 'right'. Instead,
everything is talked about in terms of absolute cardinal directions (north,
south, east, west), which means you say things like, 'There's an ant on your
southwest leg'. To say hello in Pormpuraaw, one asks, 'Where are you
going?'and an appropriate response might be, 'A long way to the
south-southwest. So if Pormpuraawans think differently about space, do
they also think differently about other things, like time?"
To find out, my colleague Alice Gaby and I travelled to Australia and gave
Pormpuraawans sets of pictures that showed temporal progressions (for
example, pictures of a man at different ages, or a crocodile growing, or a
banana being eaten). Their job was to arrange the shuffled photos on the
ground to show the correct temporal order. We tested each person in two
separate sittings, each time facing in a different cardinal direction. When
asked to do this, English speakers arrange time from left to right. Hebrew
speakers do it from right to left (because Hebrew is written from right to
left). Pormpuraawans, we found, arranged time from east to west. That is, seated
facing south, time went left to right. When facing north, right to left.
When facing east, toward the body, and so on. Of course, we never told any
of our participants which direction they faced. The Pormpuraawans not only
knew that already, but they also spontaneously used this spatial orientation
to construct their representations of time."
RIVER CROSSINGS
River crossings can be deceptively hazardous. Even a very shallow swiftly flowing body of water can pack enough force to 'skittle' the unwary. If you cannot walk at the speed of a stick thrown into
the river, or if the river is swift and above knee height, then it could be hazardous to cross. If a river is in flood then wait for it to subside. Generally, in areas of snow, try to cross early in
the morning before snow melt has added to the flow of a river. If in doubt as to whether a river is safe to cross, then find an alternative route or scout further up or downstream for a possible
crossing or even a bridge. If Chris McCandless (“Into the Wild” by Jon Krakauer) had taken the time to scout a relatively short distance along the river that he thought was preventing his
exit from the wilderness, he would have found a bridge and probably prevented his eventual tragic end.
Here are some methods for water crossings...
Crossing Alone
1. If possible, view the river from above to identify the shallowest point and smoothest area of river bed possible, avoiding submerged snags, boulders etc. Do not attempt a crossing if large pieces
of debris (logs, branches, etc.) are being carried downstream.
2. Keep your boots on. Wet boots are preferable to damaged ankles or feet. Do not cross wearing long pants, these will increase resistance to the current. Release the chest strap and slightly loosen the shoulder straps on your
pack before crossing - this way you will be able to free yourself quickly if you lose your footing or find yourself in a position where your pack is snagged and holding you down. It's also well to
remember that your pack has a certain amount of buoyancy and can serve as a flotation device if necessary.
3. Generally, the safest area to cross will be a straight section between bends in a river. If you imagine the river in the shape of the letter 'S' then the safest area to cross will be the middle of
the 'S' between the bends. That way, if you should lose your footing, hopefully the current will carry you into the bank on one of the bends. Realize though, that water can be deeper and swifter at
bend sections, so always look for the best 'run off' section of a river that will carry you to a safe point and not into danger if you lose your footing.
4. Use a strong pole or stick about five or six feet in length as support, placing it on your upstream side so that the current forces it into the bottom. Use the pole as a third leg and always keep two points of contact on
the river bed at all times crossing diagonally downstream, resisting the current much like you would a strong wind. Take shuffling footsteps feeling for the bottom. Try not to look down at the
flowing water as this may upset your equilibrium, look ahead for the best possible route. Resist the temptation to grab at submerged or semi submerged rocks in transit, as this may upset your
balance.
Crossing in a party
1. Members of the party stand in line abreast, each placing their hands behind the back of the person on either side of them and grasping the lower part of that persons pack shoulder strap. (or
clothing if no pack is worn) This will 'interlock' the party. If a pack does not have a quick release buckle on the hip belt, then the hip belt should be left undone and clothing grasped
instead.
2. Enter the water parallel to the current, with the strongest member of the party in the upstream position, this will break the flow for the others. The second strongest member can be placed at the downstream end of the group. Move with the upstream person just slightly ahead
of the next person downstream and so on down the line. If a member of the party should break away during the crossing, the remaining members should maintain formation and either back out, or complete
the crossing before attempting a rescue if necessary.
Crossing in a party using a pole
Members stand in line abreast with arms linked and each holding onto the pole that passes in front of them at about waist height. Enter the water parallel to the current with the strongest member of the party in the upstream position and the second strongest at the downstream end.
Crossing in groups of three
Another crossing method is the ‘Triangle’ crossing.
1. Three members enter the water in the shape of a triangle with each member facing inwards, arms linked and each grasping the person to either side of them. The heaviest person should be at the
point of the triangle that directly faces the water flow and is on the downstream side of the triangle.
2. Then in turn, each member moves one step at a time, supported by the other two.
With any crossing, ensure that important items are stowed in waterproof areas of your pack. (Plastic rubbish bags make good pack liners)
If you lose your footing and are carried away, release your pack but hold onto it. Float with your head upstream, this will allow you to fend off from any obstacles with your feet.
Using a rope to assist in crossing is not generally a good idea and could be hazardous unless it is anchored correctly and a proper technique used. Ropes can hold people under the water, entangling
the person crossing and preventing their ability to swim. They can also become snagged on the river bed or to a rock, pinning the person in the river. A rope may also end up pulling someone from the
bank into the river.
Remember, flowing water is deceptively strong. Do not view river crossings lightly.
Method for gauging the width of a river (or gorge)
1. Sight a point 'A' on the opposite bank.
2. Place a marker 'B' into the bank directly opposite 'A'.
3. Walk at right angles for a known number of paces and then place another marker 'C'
4. Continue for another equal number of paces and then place another marker 'D'
5. Turn at right angles away from the river and marker 'D' and keep moving back until your second marker 'C' and the point 'A' on the other side of the river are in line. The distance from here back
to 'D' will give a good approximation of the width of the river/gorge.
SOME GENERAL HIKING AND BACKPACING TIPS
Pack and Equipment
There are two basic pack types, internal and external frame.
The internal frame pack has superseded the external frame as the most popular type, though both have their pros and cons. One of the advantages of the internal frame is that it is less prone to
“snagging” if you are hiking through heavily vegetated areas. It will also tend to sit more comfortably on your back as it is more form fitting than the external frame type and will make
for better balance. Being closer fitting, this of course will trap more body heat, which often is not a bad thing.
The external frame packs are wider and therefore easier to load gear into and then to access it. They will also sit 'cooler' on your back. It is a matter of preferance which type you choose. I
personally prefer the internal frame.
Don't haul unnecessary gear. Go through each piece of your equipment and clothing before you start and determine whether it is really necessary or whether another item you are carrying can double for
both tasks. e.g., one pot, cup, and a spoon should cover all your culinary needs. Clothing can double as a pillow.
Consider the use of dehydrated type foods as they will save a lot of weight. Bear in mind though that they will require a water source to prepare them.
Lining your pack with a large plastic rubbish bin bag is a cheap and efficient way to help keep the contents dry. Pack covers have limited success in heavy rainfall, none in river crossings, and are
an extra piece of gear that you have to haul.
As a general rule, load your pack with the heaviest items towards the top and close to your back. This will lift the weight higher on your back making for an easier load to balance and carry.
Make sure that any items that may be needed in a hurry (bad weather clothing, gloves, med kit, etc.) are easily accessible and not buried in your pack.
The weight from a heavily loaded pack (if a heavy load is unavoidable!) can sometimes cause the adjustment of the shoulder straps to continuously “slip”, dropping the pack down your back – consider adding small
strips of hook & loop (velcro) tape to the ends of the straps and to a fixed non moving part of your pack, (e.g., waist belt or standing part of the strap) so that the ends of the straps can be
easily “locked” down holding them in the desired position.
Plastic soft drink bottles (Coke etc.) make excellent water bottles. They are cheap, extremely strong and almost weightless. When empty they can be flattened to take up less pack space –
blowing into them will return them to normal shape. If pack space is at a premium an accessible way to carry a full 2 litre bottle, is to loop a cord noose around its neck, attaching the other end of the cord to the top of the pack and slot the bottle into a side pocket of the pack. If there is no side pocket on your pack the bottle can be secured from “swinging” by a collar of hook & loop (velcro) tape that is attached to the pack and secured around the lower part of the bottle. Generally, carrying items on the outside of your pack apart from maybe your tent is not a good idea as they become more prone to loss or snagging but sometimes through lack of pack room or for convenience it can be necessary.
Fire Lighting
It’s good practice to carry an easy means of cooking such as a light camping stove along with fuel and source of ignition. This way you are not dependent on weather conditions and availability
of natural fuel. However, there may be times when you have to build a fire from available material. There are several methods and means of starting fire, amongst them friction methods, but they all
require time, a degree of skill and correct materials. Here are a few easy 'sure fire' methods of getting results....
Carry a few rubber bands cut from old bicycle inner tubes. These can act as “fire lighters” if kindling is scarce or is wet. They will burn for some time and can also double as 'elastic
bands' if required.
Cotton balls impregnated with petroleum jelly make good fire starters.
Tampons are also very useful as fire starters - teased apart they provide good tinder that is easily ignited with a spark from a steel. They are also individually cellophane wrapped which will help keep them dry in your pack.
Carry a firesteel. These can produce a spark of around 3000 C and will function in all environments.
Carry matches along with a strip of abrasive in a waterproof tubular plastic film canister.
Waterproof matches can be bought, or you can make your own by sealing conventional matches in layers of wax, in effect making miniature candles that will be waterproofed and also burn longer.
Always strike your match in cupped hands, facing into the wind and with the head of the match in a downward position.
Carry a candle stub - this will save matches and will burn for longer.
A small magnifying glass can be used for igniting tinder on sunny days.
Small gas lighters are convenient and the spark from them may be of use even when empty of gas.
Before starting your fire, always gather and prepare enough fuel to keep it going.
Light your kindling on the windward side so that the flame is blown into the material.
If there is no small kindling available, kindling can be made by shaving a larger piece of timber or stick. i.e., use your knife to slice a series of small thin “wings” on the surface of
a larger stick. The thinner “wings” will ignite easier and in turn ignite the larger body of the stick. This can be helpful if the available wood is a bit damp or too large for using as
kindling.
Make sure your fire gets sufficient oxygen by not building it too densely.
One method is to build a small platform of twigs an inch or so above the ground, supported at the edges. Load the platform with tinder material (pine needles, smaller twigs, dry moss) then build a
pyramid or tepee of kindling sticks over and around this. Once the fire is established, larger fuel can be added.
Another method of building a fire is the Dakota Fire Hole or Fire Pit. This method is particularly good in a 'stealth' situation as its flames are not immediately visible and it will also burn with less smoke.
Dig the fire hole about 12 inches deep and 12 inches in diameter and slightly wider at its base.
Dig a tunnel about 6 inches in diameter starting 10 or 12 inches from the hole. Tunnel diagonally down to the base of the hole to connect up with it. If there is any wind or breeze, then dig your tunnel from the windward side of the fire hole.
Build your fire at the base of the hole. The tunnel will entrain air encouraging a 'blast furnace ' effect and providing a hot fire for a relatively small amount of fuel. A pot can either be suspended directly over the hole or laid on a grid of green sticks over the hole.
After use, extinguish the fire, return the removed soil and turf and you've left no trace.
Clothing
Lightweight “layers” that can be removed or added to is the best method - along with a good wind/rain outer garment shell, preferably of breathable material.
Avoid cotton clothing. It will dry slowly and can be dangerously cold and heavier if worn when wet - use synthetic materials such as polyprop' or its equivalent. These are light, warm when wet and
dry out rapidly. The only cotton you may want to carry is maybe a light long sleeved shirt for sun protection. This applies to jeans material as well, there are better alternatives. Wear long pants
made from quick drying material, or hiking shorts.
Gloves. Mittens are more efficient than regular gloves. If your intention is to hike in extreme conditions, then an additional pair of regular gloves worn inside the mittens will enable you to easier
attend to some tasks without exposing your hands entirely.
Headgear. This is necessary for sun protection and also for insulation in cold weather - the majority of body heat is lost through the head and neck areas. Carry separate headgear for differing
conditions - a brimmed hat for sun protection and beanie/balaclava for cold weather or night time sleeping insulation. Don't forget sunglasses.
Boots
Make or type will vary with an individuals preferences and intentions.
There is a current trend towards lighter footwear or 'trail shoes' and you may well prefer these. However, I personally prefer boots and the protection they afford - I once twisted an ankle in a
nanosecond of inattention while wearing shoes.
If your intentions are for an extended trip carrying a heavy pack, do consider a leather boot that gives the ankle some support such as produced by Asolo, Garmont etc. (not a calf length boot) These
will give the desired support and will also stand the rigours of being submerged in river crossings or the attachment of crampons if ever needed. Fabric boots may be preferable but bear in mind they will not be as durable long term depending on usage.
Care should be taken to get the correct fit. Unfortunately, the only foolproof method of knowing your boots are the correct fit is to hike in them! However, the following points may help in selecting
and using your footwear...
When selecting your boots always wear the socks that you will be hiking in. Many prefer to wear two pairs of socks. A thin inner pair of synthetic material that will wick moisture away from the foot
and an outer thick hiking sock. This double sock method will help in preventing blisters, as any foot slide will be more protected.
Tap your foot forward in the unlaced boot and you should be able to easily get a finger down between the back of your foot and the boot. This will indicate the space you will have between the end of
your toes and the front of the boot.
Take out the boot's insert, place the insert on the floor and stand on it - this will give you a good visual on how your foot fits inside the boot. Remember, your foot will spread and expand when you
are hiking and carrying any weight. Shop for your boots toward the end of the day when your foot is at its maximum 'expansion'.
Lace the boots up securely and walk around in them - some stores have an inclined area to see how the boots feel. There should be no undue movement around the heel area, but the boot should also not
feel as if it is cramping the foot anywhere, particularly in the toe area. Take into account that there will be a certain amount of “give” in leather. As a general rule, you will want
your boots at least one size bigger than your normal “town” shoes.
Always take care of your boots with a good application of protectant before and after a hike. When they get wet, let them dry out naturally and they should last you for many miles.
Flipflops make good camp footwear. They are very cheap, extremely light and will allow your feet to air at the end of a day.
Here’s an alphabetical list of website links for various hiking boot brands...
Lastly, whether hiking in company or hiking solo, always advise someone who cares, of what your intended movements are and when you intend to be back out.
The more you hike the more you will find out what works for you and what modifications can be made. Hopefully the above tips will be of some help in enjoying the outdoors.
Hope that was of interest.
Happy hiking!
George


 (See Diagrams 'B')