
(*Hint.. please read the tutorial first so you get the idea of what you need to do & then go step by step.)
Here is the bounce in PSP
and here is the bounce made with PI:
The bounce is much better in PI (Photo impact).. For PSP7 what you need to do is:
1. On a new Canvas (400 X 400) Using your favorite Font, write your text, color it.. do effects etc.
2. Duplicate this layer... now on "copy of layer 1" rotate the name Right 90 degrees .. save as psp.
3. Open up file in animation. Go to Animations, adding 2 empty frames (starting at frame 2 carrying over checked). Go to effects in animation & Choose Image effects > pinch... this will pinch the name in all 3 frames.
4. Click on first Frame.. go to File>Export to PSP.
5. Rotate 90 degrees to Left. Copy & then go to original Canvas being worked on in PSP. Paste as new layer.
6. On File that was exported in from animation pro, x the box. Click on yes to save changes in animation. This brings you back to Animation Pro.
7. Repeat steps 4-6 for remaining two frames in animation pro. Once all are completed, exit out of animation pro. (There is no need to save these frames).
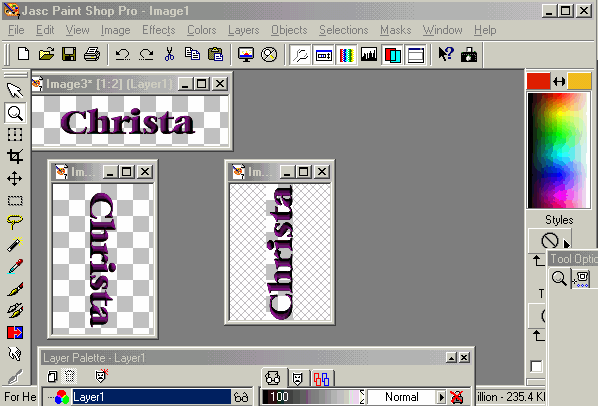
8. Go to layer pallette in PSP.. Delete "copy of layer 1" layer) (highlight layer & click on Garbage can.)
9. You should now have 4 layers in your PSP layer pallette. The original name & 3 names that are pinched. Line them up using the mover tool so the original is on the bottom & centering the pinched ones layer by layer on the original- ie: stacking will be the appearance.
10. Click on layer 1 in layer pallette & x layers 2-4.(click on eyeglasses in layer pallette)
11. Click on Tube tool. Choose the tube item you want to use for your "Bounce".
12. Add Raster Layer.
13. Since the layer you are working on (layer 1) is the original name (no pinching) you want the tube to be the highest. With mover tool (+) place your tube & with effects 3D add a dropshadow behind it. (6=horizontal, 6=vertical, 50=opacity, 5=blur, color=black)
14. Duplicate this layer (layer 5 with tube 3 times)
15. In Layer pallette drag copy of layer 5 above layer 2,drag copy of copy layer 5 above layer 3 & copy of copy of copy layer 5 above layer 4. 'X' in layer pallette all the tube copy of layer 5 layers.
16. Merge layer 5 with layer 1 (as done in step 13, as you already placed the base layer at the height you wanted)..
17. "un-X" layer 2 with the next tube layer & move the tube layer down a bit with your mover tool so it is lined up. X first merged layer & then merge the layer 2 with the copy of layer5 layer.
18. Repeating step 17 for the remaining 2 sets, always moving your tube layer down so that the tube will rest on layer 4 the most "pinched" name layer.
19. After Merging the last set, this is what your result should look similar to:

20. Save as filename.psp.
21. Open up file in Animation Pro.
22. Click on Edit>Select all.
23. Go to Animation>Frame Properties>set at 10.
24. Go to File>Save Frame as
25. Run animation wizard. (remember to select loop & opaque.. frame speed is 10)
26. Go to File>Save as filename.gif
Voila!
Here is my bounce again made with PSP:
To do this with PI, I used the Deform gallery on the text. This has 3 layers.. the deform gallery effects I used were the original sized name, using "Valentine Font" then copying & pasting and applying deform gallery effect "HT02", then pasting again the original & applying deform gallery effect "HT15". Same technique is used to apply the stamps/tubes for the bouncing item. I find it easier to 'see' my layers in PSP, so I save each text layer as a .png file so I can open them in psp & apply the tubes going back to step 9 with the PSP layers. Here is my bounce made with PI:
