

Gamurra
 January 4, 2004 - The bodice pieces are all cut out and the linen is sewn to the canvas interlining. I was originally going to construct the bodice with flat-feld seams but looking at the linen and canvas, it would have been a very bulky seam. So I perused Tangwystyl Archaeological Sewing and found an interesting attachment for an interlined shirt.
"(54) Modified running stitch of (fabric and lining, single-folded towards each other) Medieval -- Linen shirt from 11th century. Joining two double (lined) pieces (body sides) -- each pair of outer and lining fabrics have the edges turned slightly under where they face each other; all four folded edges are lined up right sides together and sewn with a modified running stitch right along the edge -- the needle skips the first fold on each pass. (Fentz 1998, Seam VIII"
I folded the four layers right and ironed in place then pinned. The first pass didn't work too well as the top layer had been pushed to the side a little, leaving a very bulky seam. So I ripped and repinned a different way to hold it steadier. I used the left-side running stitch on my machine and placed all of the fabric under the arm of the machine so I could sew the very edge, while still having the feeder be able to grab the fabric. The second try was a success. Its a little bit thicker than I wanted, but probably about the same thickness as if I had just done a flat seam, and definately thinner than a flat-feld seam.
I ironed and pinned the other side of the bodice and it is waiting for me to sew tomorrow night. Then I just need to wait for my black silk thread to get here, which should be the day after tomorrow, and I can sew the wool together and then sew the whole bodice together. I will try to remember to take pics before I start sewing tomorrow.
January 13, 2004 - I finally got the pics of the seams formatted and uploaded. I decided to show them on a seperate
page. The pics of the black wool side of the bodice didn't show up. I started pleating the skirt last night. I guess I'm doing triple box pleats. Now I know how cartridge pleating came about. All I need to do is fold my triple box pleats in and it looks like cartridge pleating.
January 17, 2004 - Well I got the skirt attached to the linen side of the bodice. Here is a pic with the bodice tacked into place with safety pins, and the rest of the dress safety pinned onto me.
January 29, 2004 - I got the wool side of the bodice attached, the front of the skirt sewn and the straps sewn in time to wear the dress to Ursalmas. I forgot to have anyone take a pic of me, but the fit is much better now. Unfortunately the dress is just a tad heavier than I wanted it and was kinda awkward to wear. So I've gone back to the drawing board about the skirt. I'm going to rip it off the bodice and turn it into a type of circle skirt using a variation of one of Alcega's patterns. I will post more once I know it will work.
March 1, 2004 - A whole month of not working on the dress when I am unemployed and have oodles of time. The thought of having to tear the skirt off and all those hours of hand sewing the double box pleats down was depressing. But I finally did it. The skirt is completely unattached. Now I need to seperate the panels and wash the hems as it got really muddy at Ursalmas. I tried not to think about what I was doing and just ripped, ripped, ripped. Very depressing though.
March 15, 2004 - Finally got up the courage to cut the skirt panels in the new configuration. Luckily I remeasured the width of the fabric before I cut. I made my pattern based on a 61" width and found out that its 58" wide. Don't know how I miss measured, but I remeasured every single panel and they are 58". I will post my pattern once its all done and I know it works.
I got one flat felled seam done today and one is sitting on my ironing board all pinned for the second line of stitches and then the second will be done. Hopefully tomorrow I can attach the two sections I got done today and start on the last two side panels. There will be six panels in all. Four are 21 1/2 on top (wider at the bottom, ummm 58-21.5=??? hmmm brain dead) and two will be 15" top and bottom. Meaning five seams before I start box pleating. So 1 1/2 done today, hopefully 2 1/2 done tomorrow, possibly start pleating on Wednesday. Trying to get this done for an ithra on the weekend after next.
I had been practicing my buttonhole stitch so I could get the eyelets done, but I have found out I need a LOT of practice therefore I will wait until later to do eyelet holes and just repair the lacing rings that fell off at Ursalmas. But I have a new lacing cord. 100% reeled silk thread braided into a fiveloop cord. With my mothers help it is perfectly tensioned from top to bottom. She makes a wonderful beater.
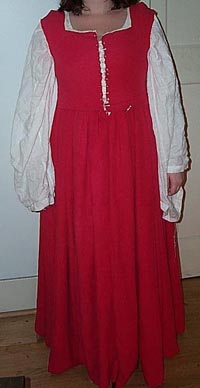
May 10, 2004 - Got the linen skirt redone. Here are the pics.

Maniche - On to the sleeves

1488 Italian
Dress
Camicia -
Gamurra -
Maniche -
Fazzoletto -
Giornea -
Hair and Make-up -
Cuffia -
Stockings -
Scarpette -
Jewelry
Male
Shirt -
Underwear - Farsetto - Maniche - Calze - Giornea - Scarpette - Hat - Accessories
