For a verbal description click here.
History of the Radio from Inception to Modern Day
This is a well prepared site that provides much more detail than is available here.
The All American Five represents a triumph of the bottom line over quality and safety. It was the radio that the Atwater-Kent company went out of business rather then make. Every feature had one purpose, to reduce the cost of manufacture. After World War II there were millions sold under hundreds of brand names from Admiral to Zenith.It is called the All American Five because all brands were made in America. This was long before the mass exodus of the electronics industry. The five comes from the fact that it used 5 tubes. There were variations using 4 tubes which didn't perform very well and 6 tubes which costs more. The average person who didn't stay up late to see how many distant stations they could hear (known as D X ing) didn't care about the improvements provided by 6 tubes. Consequently the All American Five became a post war standard which did not fade away until replaced by the All Japanese Six, the six transistor radio made in Japan.Afterthoughts, Three Years Later.
Much scorn has been heaped on the little AA5 by myself and others but the truth is it's a wonder of design and simplicity. The word is starting to get around and local antique dealers are bringing me their AA5s to put into operating condition. I have had the opportunity to see a great many different radios. The marvel is how well they work considering their construction. There's no such thing as a wiring harness. Wires go every which way, crossing over, twisted around, power next to audio, audio next to RF, power next to RF. Terminal strips are seldom used or used in great moderation. That sometimes means that wires are just brought together in the middle of the air and soldered together. Yet still they keep on ticken. The design has been so well refined that it seems impossible to build one that won't work.The most prominent feature of the AA5 was that it had no power transformer. The result was that the circuit common was connected to one side of the power line. Because there was no polarized plug there was a 50 - 50 chance that the radio's chassis would be connected to the hot side of the power line. Very late models from the sixties were carefully designed not to have any metal parts on the outside even going so far as to recess screws in deep holes. In the 40s and 50s there was no such concern on the part of manufacturers. It was common to see chassis mounting screws exposed on the bottom of the plastic case. These radios could be, and sometimes were, lethal. All it would take was for an unwary person to complete the circuit between a metal part on the radio to a kitchen sink. I once owned one that was in a metal case. My friends and I called these radios "suicide boxes".
How They Worked
How did they work? Amazingly well. The tube line up was as follows.
Function Octal tube. 7 pin mini tube. Converter 12SA7 12BE6 IF Amplifier 12SK7 12BA6 Detector and First Audio 12SQ7 12AV6 Audio Power Output 50 L6 50C5 Rectifier 35Z5 35W4
The first AA5s used the octal (8 pin) tube line up. In the 50s most manufactures converted to the 7 pin miniature line up. I recently bought a plastic case radio at an antique shop which was a hybrid. It has a 50L6 as the audio output and the rest of the tubes are from the 7 pin mini lineup.
The number which begins each tube number is the heater voltage of that tube. Add them up. Did you get 121? The line voltage is 120, coincidence? No! The heaters all required the same amount of current namely .15 amperes. They were connected in series across the power line. What that meant to trouble shooters was they were like the old style Christmas lights, when one burned out they all went out. What it meant to the manufacturer was that a transformer was not needed to light up the tubes.
What About B+?
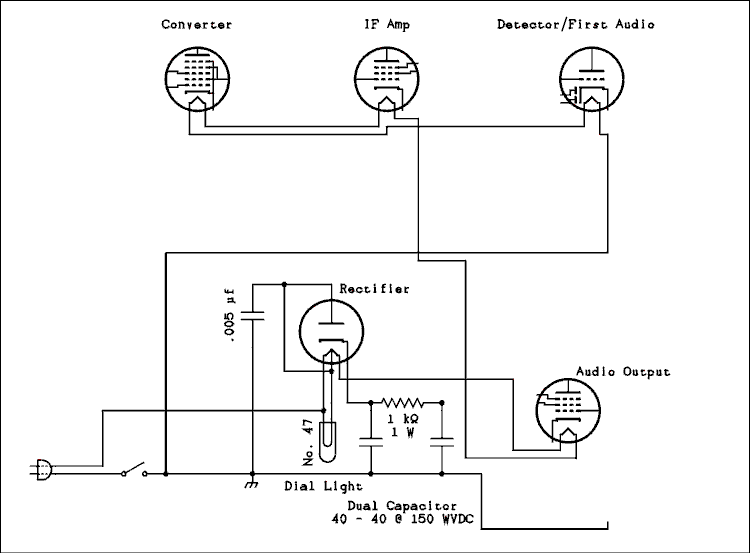
The 35Z5/35W4 was the rectifier. The plate connected to the line (almost) which rectified it and provided about 140 to 150 volts of DC for the plates of the tubes. Score number 2, no transformer needed for B+. But there was a little trick. Figure AA5.1 shows a diagram of the power supply of an AA5.
For a verbal description click here.
The tube manufacturer had provided a tap on the heater of the 35Z5/35W4to operate a 6 volt light for illumination of the dial. But the lamp filament also needed .15 amps so it just couldn't be connected to the six volt tap The voltage would drop way down and part of the heater would be under heated while the rest would be over heated. The currents were equalized by having the B+ current flowing through the parallel combination of the lamp and portion of the heater. So the plate of the 35Z5/35W4 connects to the tap as shown in the figure. All of the tubes had been designed so the B+ current would be right for the lamp. Score number 3, no transformer needed to operate a dial light.But why didn't they just connect the lamp filament in series with the tube heater string? The overall error in voltage would have only been a little more than 5 percent.
Good question. If the dial light burned out the radio would go dead. But the main reason was the warm up time of the tubes as compared to the warm up time of the lamp. The resistance of the tube heaters and the lamp filament are very low at room temperature. The initial current is very large and falls off as things heat up. The lamp heats up much faster than the tube heaters so right after turn on the lamp would have the entire line voltage across it. It would go off like a flash bulb and then be dead. This warm up time accounts for the way a dial lamp behaves. At turn on the current through the heater string is very large maybe as high as 2 amps. This will supply the normal 6 volts to the dial lamp and it is bright at first but quickly dims down as the tube heaters come up to operating temperature and draw less current making less current available to the dial lamp. Then the tube cathodes begin to emit electrons and the plates begin to draw current from the B+ supply. As this current comes up to normal the lamp comes back to normal brightness. If the dial lamp burns out the voltage on part of the rectifier's heater will be too high but the radio will operate for many months before the tube finally burns out. Older models often have resistors across the lamp and the other part of the heater to minimize the effect of a burned out dial lamp. Later ones eliminated these resistors to save money figuring the owner would have to pay the cost of replacing the tube and it was no skin off the nose of the manufacturer.
Moral; if you are using an AA5 and the dial lamp burns out, turn it off and replace the dial lamp at once. No one is making any new 35Z5s or 35W4s so don't waste a scarce 6 dollar tube for a 50 cent light bulb.
Note the location of the switch in the diagram. Placing the switch in the ground side of the line saved them a terminal lug. They were concerned with saving fractions of cents. In the last section on the AA5 I tell how to wire the radio for increased safety.
Sometimes the chassis served as the ground but occasionally it didn't. Some manufacturers of these units were willing to spend a cent or two for increased safety. There had to be a grounding wire run all over the radio and this meant using some terminal lugs to solder the wires to. While such radios were less of a shock hazard to the user they tended to produce more hum if plugged in the wrong way. Reversing the plug would reduce the hum and make the radio even safer at least when it was turned on.
In the circuit shown above one side of the line plug connects through the switch to the circuit common which is the line running generally across the bottom edge of the diagram. Note that the heater of the last tube in the heater string, the detector and first audio, connects back to the common point. The other side of the line goes to one end of the heater of the rectifier and also to the No. 47 dial light. The other side of the lamp goes to the tap on the heater where the plate of the diode is also connected. If the radio had no dial lamp the diode plate would go directly to the high side of the line and the heater tap would not be connected to anything. In this circuit the parallel combination of the lamp and part of the heater carry the heater string current plus the plate current of the rectifier.
The .005 microfarad capacitor is to filter noise and voltage spikes from the AC voltage going to the plate of the rectifier. The cathode of the rectifier goes to one of the capacitors in the dual capacitor commonly used in these radios. Sometimes this is a can capacitor which stands up on top of the chassis but more often it is a tubular shaped cardboard covered thing that is under the chassis with one black lead coming out of one end and two red leads, or a red and a yellow, coming out of the other. The first capacitor provides smoothing of the pulsating DC from the rectifier's output. The plate of the output tube is powered from this first power output point. The 1 k ohm (May be 1200 or 1500 in some sets) resistor and the other 40 microfarad capacitor provide more filtering for much smoother DC but at a lower current. This output point supplies B+ to the screen grid of the output and to the plates and screens of all the other tubes.
Or use your "Back" button to return to where you were.
Thank you for visiting my page at Angelfire.
Please come back and visit again!This site begun March 14, 2001
This page last updated June 28, 2010.