 About Your Ultra Small Form Factor Computer
Dell™ OptiPlex™ GX620
User's Guide
 About Your Ultra Small Form Factor Computer

|
NOTICE: When setting up your computer, secure all cables toward the back of your work area to prevent the cables from being pulled, tangled, or stepped on. |

|
NOTICE: When setting up your computer, ensure that the computer has at least 6 cm (2 inches) of airflow space on the front and the back of the computer. |

|
NOTICE: To ensure proper ventilation, do not block the cooling vents. |

|
NOTICE: Do not place your monitor on the computer. Use a monitor stand. |

|
NOTE: If you want to orient your computer under a desktop or on a wall surface, use the optional wall-mount bracket. To order this bracket, contact Dell. |
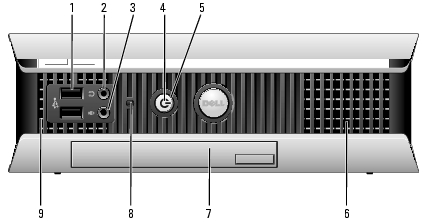
|
1 |
USB connectors (2) |
Connect USB devices such as a mouse, keyboard, memory key, printer, joystick, and computer speakers into either of the USB connectors. |
|
2 |
headphone connector |
Attach headphones to this connector. |
|
3 |
microphone connector |
Attach a microphone to this connector. |
|
4 |
power light |
The power light illuminates and blinks or remains solid to indicate different states:
To exit from a power-saving mode, press the power button or use the keyboard or the mouse if it is configured as a wake device in the Windows Device Manager. For more information about sleep modes and exiting from a power-saving mode, see "Power Management." See "Diagnostic Lights" for a description of light codes that can help you troubleshoot problems with your computer. |
|
5 |
power button |
Press this button to turn on the computer. NOTICE: To avoid losing data, do not use the power button to turn off the computer. Instead, perform a Microsoft® Windows® shutdown. |
|
6 |
vents |
The vents allow air to flow through your computer. To ensure proper ventilation, do not block these cooling vents. |
|
7 |
module bay |
Install a D-module CD/DVD drive, second hard drive, or floppy drive in the module bay. |
|
8 |
hard-drive access light |
The hard-drive access light is on when the computer reads data from or writes data to the hard drive. The light might also be on when devices such as your CD player are operating. |
|
9 |
vents |
The vents allow air to flow through your computer. To ensure proper ventilation, do not block these cooling vents. |

|
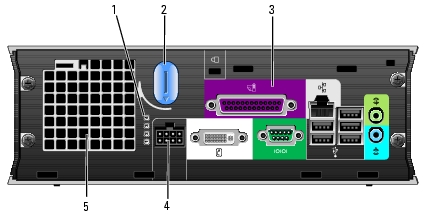
1 |
vents |
The vents, which are on each side of the computer, allow air to flow through your computer. To ensure proper ventilation, do not block these cooling vents. |
|
1 |
diagnostic lights |
See "Diagnostic Lights" for a description of light codes that can help you troubleshoot problems with your computer. |
|
2 |
computer cover release knob |
Rotate this knob in a clockwise direction to remove the cover. |
|
3 |
The connectors for your computer. |
|
|
4 |
power connector |
The connector for the power adapter. |
|
5 |
vents |
The vents allow air to flow through your computer. To ensure proper ventilation, do not block these cooling vents. |
|
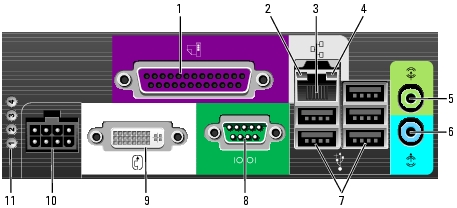
1 |
parallel connector |
Connect a parallel device, such as a printer, to the parallel connector. If you have a USB printer, plug it into a USB connector. |
|
2 |
link integrity light |
|
|
3 |
network adapter |
To attach your computer to a network or broadband device, connect one end of a network cable to either a network jack or your network or broadband device. Connect the other end of the network cable to the network adapter connector on the back panel of your computer. A click indicates that the network cable has been securely attached. NOTE: Do not plug a telephone cable into the network connector. On computers with a network connector card, use the connector on the card. It is recommended that you use Category 5 wiring and connectors for your network. If you must use Category 3 wiring, force the network speed to 10 Mbps to ensure reliable operation. |
|
4 |
network activity light |
The amber light flashes when the computer is transmitting or receiving network data. A high volume of network traffic may make this light appear to be in a steady "on" state. |
|
5 |
line-out connector |
Use the green line-out connector to attach an amplified speaker set. |
|
6 |
line-in connector |
Use the blue line-in connector to attach a record/playback device such as a cassette player, CD player, or VCR. |
|
7 |
USB connectors (5) |
Connect USB devices such as a mouse, keyboard, printer, joystick, and computer speakers into any of the USB connectors. |
|
8 |
serial connector |
Connect a serial device, such as a handheld device, to the serial connector. |
|
9 |
video connector |
If you have a DVI-compatible monitor, plug the cable from your monitor into the white connector on the back panel. If you have a VGA monitor, see "Connecting a VGA Monitor." |
|
10 |
power connector |
The connector for the power adapter. |
|
11 |
diagnostic lights |
See "Diagnostic Lights" for a description of light codes that can help you troubleshoot problems with your computer. |
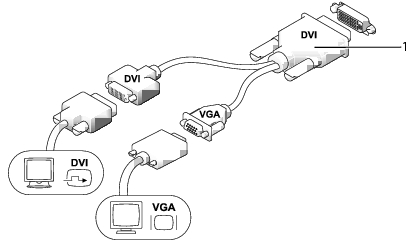
If you have a VGA monitor, plug the adapter cable into the white DVI display connector and connect the monitor cable to the adapter.

|
1 |
adapter cable |
|
1 |
cable adapter |
Use the cable adapter to connect a VGA monitor and a DVI monitor to the DVI-I connector on the back panel.
When you connect two monitors, the driver will detect this connection and activate the multimonitor functionality.

|
CAUTION: Before you begin any of the procedures in this section, follow the safety instructions in the Product Information Guide. |

|
CAUTION: To avoid electrical shock, always unplug your computer from the power adapter before removing the cover. |

|
NOTICE: To prevent static damage to components inside your computer, discharge static electricity from your body before you touch any of your computer's electronic components. You can do so by touching an unpainted metal surface on the computer chassis. |

|
1 |
heat sink assembly |
4 |
hard drive |
|
2 |
speaker (optional) |
5 |
security cable slot |
|
3 |
memory modules (2) |
6 |
chassis intrusion switch |

|
1 |
fan connector (FAN_FRONT) |
8 |
battery |
|
2 |
internal speaker connector (INT_SPKR) |
9 |
clear CMOS jumper (RTCRST) |
|
3 |
system board speaker (BEEP) |
10 |
password jumper (PSWD) |
|
4 |
channel B memory connector (DIMM_2) |
11 |
hard-drive power connector (SATA_PWR) |
|
5 |
channel A memory connector (DIMM_1) |
12 |
fan connector (FAN_REAR) |
|
6 |
SATA data cable connector(SATA0) |
13 |
intrusion switch connector (INTRUDER) |
|
7 |
standby power indicator (AUX_LED) |
14 |
microprocessor heat-sink assembly |
The jumper locations are shown below.
|
Ultra Small Form Factor Computer |

|
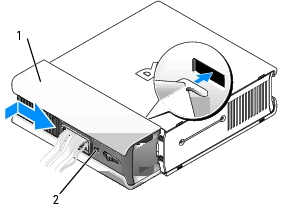
|
1 |
cable cover |
|
2 |
security cable slot |

|
1 |
release button |

|
CAUTION: Before you begin any of the procedures in this section, follow the safety instructions in the Product Information Guide. |

|
CAUTION: If your power adapter cable has a green grounding wire, do not permit contact between the |
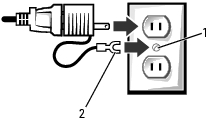
|
1 |
grounding source |
|
2 |
metal ground connector |

The power adapter has a status light that is off when the AC adapter is not plugged into the outlet and green or amber for different states:

|
CAUTION: Before you begin any of the procedures in this section, follow the safety instructions in the Product Information Guide. |
The badge on the front of your computer can be rotated. To rotate the badge:

|
1 |
release lever |
|
2 |
slots |